Adding Folders to a Project
You can add folders to the set of default project folders. Such folders can be used for any purpose that you choose.
Add a new folder using the following steps:
- In the workspace File view, right-click the project node that you want to add a folder to and select New Folder from the pop-up menu.
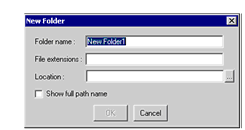
- Specify a name for the new folder in the Folder name field.
- Enter the file extensions that you want to associate with the folder in the File extensions field. For example, if you want a folder specifically for bitmap graphics and icons, enter *.bmp; *.ico in this field. You must enter a value. You can use “*.*” to indicate all file extensions.
- Specify a location where files associated with the folder will reside. Click the Browse button (“...”) to the right of the field to navigate the file system to select a location. If the specified location does
not exist, it is created automatically. For example, to create a new physical folder for documentation files in the same location
as your default project folders, your location specification might look like:
c:\development\project1\documentation
A new physical folder named documentation is created when you click OK to complete the dialog.
Note: Note that only new files created in the workbench or files that you physically move to the folder are actually located there. When you add an existing file to the folder with the Add/Remove File function, AcuBench simply creates a logical link to the file. - Enable the Show full path name check box to cause the full path name of files in this folder to display in the File view.
- Click OK to create the folder.