Connecting to the Gateway
When the Gateway service is up and running, navigate to the AcuToWeb start page using the syntax:
http://[server ip]:[configured port]
The default value is http://127.0.0.1:3000.
The Connection Setup dialog box appears, which confirms that the Gateway is running:
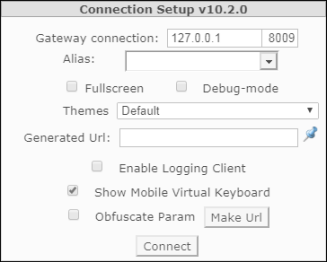
From this point, you can use the following options to create a URL that can be distributed to your end-users; they can paste the URL into their browsers to run the application that the alias refers to:
| Option | Description |
|---|---|
| Gateway connection | Specifies the host name or IP address, and port number of the AcuToWeb Gateway. These values are taken from the gateway.conf configuration file. |
| Alias | Specifies the alias of the AcuConnect to be executed. By default, this option is empty, but you can populate a list of values
by adding them to the
fillCombo.js file. By default, this file is located in the
AcuToWeb\Web\js sub-directory of your installation path, but you can use the PATH_FILL_COMBO
option in
gateway.conf to use a
fillCombo.js file at another location.
The following excerpt adds aliases for the Calculator and Tour applications: [
{"type": "category", "text": "Main Applications"},
{"type": "elem", "text": "Calculator", "value": "calc-alias"},
{"type": "elem", "text": "Tour", "value": "tour-alias"}
]
You can also type an alias name into the field, then click Make URL, which will generate a URL that you can distribute to customers, which will allow them to paste into their browser and connect to the gateway directly. |
| Fullscreen | When selected, it allows you to toggle Full-screen mode on the browser.
Note: If your program contains multiple windows, you can use
Shift +
Tab to switch between them.
|
| Debug-mode | When selected, the ACUCOBOL-GT debugger immediately starts when connecting to the gateway. |
| Themes | Select a theme (.css file) for the application to use in the browser. This option is only available if you have added one or more themes to the service from the Gateway Services tab of the AcuToWeb Control Panel. |
| Generated Url | Displays the URL required to connect to the gateway. |
| Enable Logging Client | When selected, logging is enabled whilst the application runs. An additional
 (Console) icon is added to the top-right corner of the interface to indicate that logging is enabled. Click the icon to display the
Logging Console; see
Using the Logging Console for more information. (Console) icon is added to the top-right corner of the interface to indicate that logging is enabled. Click the icon to display the
Logging Console; see
Using the Logging Console for more information.
|
| Show Mobile Virtual Keyboard | Displays a mobile virtual keyboard when connecting through the gateway on a mobile device, to help navigate the application. This option is enabled by default, but will not have an effect if not connecting to a mobile device. |
| Obfuscate Param | Encodes the URL parameters using the Base64 encoding scheme, so that when a URL is distributed, the specific details are not readable (without first being decoded). |
| Connect | Connects to the gateway using the parameters provided. |