Adding File Control Information
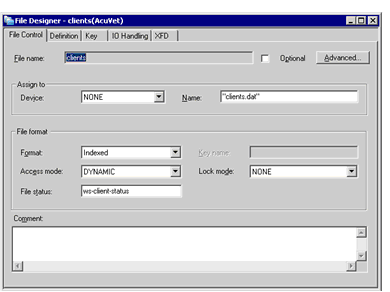
When the File Designer opens, the File Control tab is selected by default. This tab is used to construct most of the SELECT statement that will be generated into the associated .sl COPY file. (Key information is entered in a different File Designer tab). Selections made and information entered in this interface must conform to the ACUCOBOL-GT rules for a File-Control paragraph SELECT statement. See Environment Division for more information.
Use the File Control tab to view or edit the following information:
- The File name field displays the name of the current data layout file. The file name is established when you create a new data layout and cannot be changed here. To change the name, right-click the DLT in the Data view and select Properties.
- The Optional check box is used to indicate whether the SELECT statement should contain an OPTIONAL phrase. If this box is marked and a program invoking the data file cannot locate the file, a new, empty data file is created with the characteristics defined in the FD and SELECT.
- The Device and Name fields are used to create the ASSIGN TO phrase of the SELECT statement. First select a device from the drop-down list, then enter a file name or variable. If name is a literal, such as clientfile.dat, the file name must appear between quotation marks.
-
Select a file format from the Format drop-down list. Other options in the File format area vary depending on the file format that you choose (NONE, Binary Sequential, Line Sequential, Relative, Indexed, or Sort).
- If you have selected Relative format, the Key name field is enabled. Enter a name for the data item that will hold the value of the relative key.
- Choose a value from the Access mode drop-down list to determine how the file will be accessed.
- Select a value from the Lock mode drop-down list to determine what type of file locking is used with this file.
- Enter a file status variable in the File status field. The value that you enter here is added to Working-Storage automatically.
- Add a comment in the Comment field, if desired.
-
Click the Advanced button to add additional file control information, if needed. The options available in the Advanced dialog depend on the file format that you have specified, and the Advanced button is disabled when you specify a SORT file.
The Advanced Options for Indexed File screen contains all of the possible options available on the Advanced interface. The interfaces for relative and sequential files contain a subset of these options:
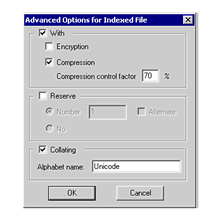
- If you want to enable encryption or compression, mark the With check box, then mark the Encryption and/or Compression check boxes. If you enable compression, you must also specify a compression factor.
- To include the RESERVE phrase in your SELECT statement, mark the Reserve check box. You can then either select the No radio button or select the Number radio button and enter a number. Mark the Alternate check box to add an ALTERNATE AREA phrase.
- To include a COLLATING phrase, mark the Collating check box, then enter the name of an alphabet declared in SPECIAL-NAMES in the Alphabet entry field.
To continue creating or editing your DLT, continue with Adding a File Description.