Installation Steps
Follow these steps to install your products.
- Insert the product CD or download the installation package from the Micro Focus website.
- The setup program should start automatically. If it does not,
- Click on Start and select Run.
- Type x:setup in the entry box (where x is the letter of the drive containing your installation).
- Select Install Products.
- At the License Agreement screen, you must accept the terms in order to activate the Next button and continue the install.
- Enter the information on the Customer Information screen if desired.
Note that you can also choose whether to install the applications for any user of the computer, or just for you.
- At the Destination Folder screen, you are prompted to specify an installation directory or to accept the default location.
If you are a previous user of
extend products, take special note of several changes related to selecting an installation directory:
- Default directory path.
Starting with Version 9.0, the default directory path no longer includes Acucorp. Instead, it includes Micro Focus. The full default path is: C:\Program Files\Micro Focus\Acucbl9xx. On 64-bit machines, 32-bit executables are installed at: C:\Program Files (x86)\Micro Focus\Acucbl9xx This is consistent with Microsoft standards related to software installation.
- Installing in a non-default directory
When specifying a path other than the default, a subdirectory named with the release version numbers (for example, Acucbl900) is not created, as was the case in versions before 8.0. The software is installed in the directory you specify, not in an automatically created subdirectory that specifies the version.
When installing into an existing directory, there is no warning message if the directory already exists. This means that if you attempt to install Version 9.x into an existing directory containing a previous version of extend products, that version will be overwritten by the current version you are installing. If you want to maintain several versions of extend products, be sure to specify a different directory for each version.
- Directory names containing spaces
You can specify a directory name that has embedded spaces.
- Default directory path.
- At the Select Products screen, select the products you wish to install.
You must have product codes and keys to activate each product; however, you can install all products now, and activate those products for which you do not have a license at a later date. (Be aware that if you attempt to use products for which you do not have a license you may receive error messages indicating that no license file is available).
In cases where you are installing to a non-default directory, this approach makes installing additional products easier. See Uninstalling and Reinstalling for more information.
Deselect any products you do not want to install. When your products are selected, click Next.
Note: Be sure to select Online Documentation on this screen to install and access HTML versions of the product user guides. - At the Installation Settings screen, select whether or not to add your products to your machine's path and whether to install
and launch the License Activator.
Note: Only one version of extend products should be specified in the path variable. Having more than one version specified may cause unexpected results.
- If you chose to launch the Activator, the setup program opens the Activator utility after the install process completes.
You then enter into the appropriate entry fields the product codes and keys that came in your package.
Note that the Activator is case-insensitive and displays only uppercase characters. The Activator also ignores embedded spaces and separating characters. Product codes and keys do not contain the letters "O" or "I".
Note: If you are installing a Windows runtime ("wrun32.exe") and an Alternate Terminal Manager (ATM) runtime ("run32.exe") on the same machine, be aware that the Activator utility creates a license file named "wrun32.alc" for each of them. You must use one of the following precautions:- Install the ATM runtime and rename the license file to match the executable (change "wrun32.alc" to "run32.alc") before installing the Windows runtime.
- Make a back-up copy of the Windows runtime license file prior to installing (and renaming) the ATM runtime.
This will avoid a situation in which the Activator overwrites the license file for the second runtime.
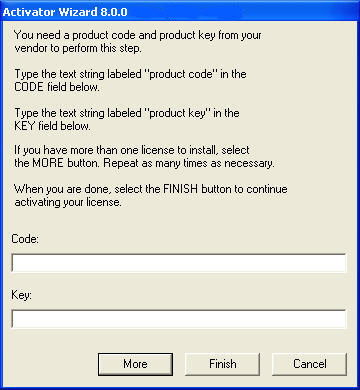
If you have more than one code and key pair to enter, select the More button to continue entering code/key pairs. Each time you press More, the Activator creates the license file for the product code and key you entered and returns you to the code and key entry screen. You may select More as many times as you have product code and key pairs. Select the Finish button to create your license file. The Activator creates a separate license file for each product.
When the above steps are complete, the Activator displays a dialog box that confirms whether license file activation was successful. You can now begin using your products.
When installation is complete, you will find an icon named tour.acu in your \Program Files\Micro Focus\Acucbl9xx\AcuGT\sample\samplprj\object folder. Double-click this icon to execute a sample program that displays a window with a graphical interface containing a variety of controls and demonstrates how they work.
Please read the RELEASE file. The RELEASE file (if present) describes changes to the product that are not covered in the documentation.