Setting Vault Rules
When a User object is removed from Active Directory, you can have File Dynamics vault the contents of the user’s home folder from primary storage to less expensive secondary storage. File Dynamics lets you specify what to vault or delete through vault rules. For example, before vaulting a user’s home folder, you might want to remove all .tmp files. Or, you might want to vault only the user’s My Documents folder and nothing else in the home folder. You accomplish all of this through settings in the Rule Editor.
- In the left pane, click Vault.
The Vault Path field displays the vault path that you established when you set up cleanup rules. - Click Add to open the Rule Editor.
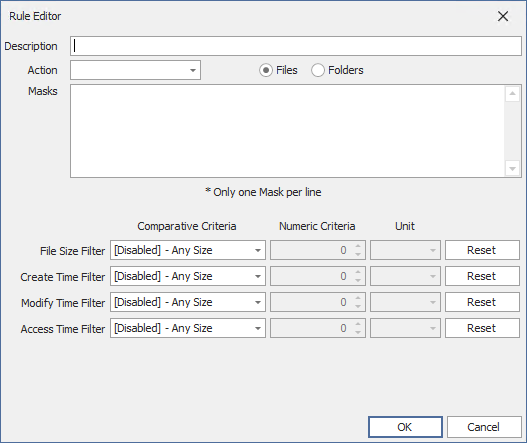
- In the Description field, specify a description of the vault rule.
For example, “Files to delete before vaulting,” or “Files to vault.” - From the Action menu, select an action.
Select whether the rule will vault files or folders, delete files or folders, or ignore a vault rule.There is only one action for each vault rule. For example, if you wanted to delete some files and vault others, you would need to establish two different vault rules.
Vault: Moves all of the files or folders that meet the criteria specified in the vault rule to a location specified in the policy.
Delete: Deletes all of the files or folders that meet the criteria specified in the vault rule.
Ignore: Ignores the conditions that would normally vault or delete a file or folder, based on specifications you provide in the Mask field.
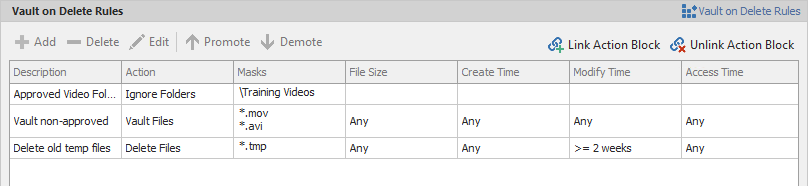
For example, if you wanted to vault all.MOVfiles, with the exception of approved training videos located in a folder namedTraining Videos, you could set an individual rule to vault.MOVfiles, and another rule to ignore vaulting theTraining Videosfolder.
Selecting Folders disables the filter settings in the lower portion of the Rule Editor.
File or folder names can contain an asterisk. - Specify whether the rule will apply to files or folders.
Files: If the vault rule you are creating will vault, delete, or ignore content at the file level, leave the File option selected.
Folders: If the vault rule you are creating will vault, delete, or ignore content at the folder level, select the Folders option. - Specify the masks for the rule.
Masks: List the files or folders you want to be vaulted or deleted, according to what is indicated in the Action drop-down menu. For example, if you wanted to delete all temporary files, you could list*.TMPin the Masks field.
Be aware that if you select Vault, only the files or folders that you list in the Masks text box are vaulted and the remainder of the managed path content is deleted. Conversely, if you select Delete, only the files or folders that you list in the Masks text box are deleted, and everything else is vaulted. - (Conditional) If the rule you are creating is specific to files, complete the applicable filter settings.
Leaving the setting as [Disabled]-Any Size, vaults or deletes all file types listed in the Masks text box according to what is indicated in the Action drop-down menu. Choosing any of the other options from the drop-down menu lets you indicate files to delete or vault according to size, when created, when last modified, and when last accessed.
ghghgh - Click OK to save the vault rule.
- If necessary, create any needed additional vault rules by repeating the procedures above.
- (Conditional) If you have set any rules designed to ignore a vault or delete action, in the Vault on Delete region of the Vault page, use the Promote arrow to move the rule to the top. This protects files or folders specified in the Masks field from being vaulted or deleted.
- Proceed with Setting Groom Rules.
