Install a New Instance of SQL Server
The following procedures are specific to Microsoft SQL Server 2017. Procedures will vary based on your version of SQL Server.
- From the Microsoft SQL Server ISO, double-click
setup.exe. - On the SQL Server Installation Center page, click Installation.
- Select New SQL Server stand-alone installation or add features to an existing installation.

- The Setup Support Rules operation is run.
- When the operation has completed, click OK.
- When prompted, enter your product key, then click Next.
- Accept the license terms and click Next.
- Include all Microsoft SQL Server product updates, then click Next.
- The Setup Support Rules operation is run again.
- When the operation has completed, click Next.

- On the Feature Selection page, select Database Engine Services.
- In the Instance root directory, Shared feature directory, and Shared feature directory (x86) fields, specify the path where you want to SQL instance to reside, then click Next.
- In the Instance Configuration page, click the Named instance option and specify a descriptive name for the instance such as
FSFDBand click Next. - On the Server Configuration page, click the Collation tab.
- Click Customize.
- Click the Windows collation designator and sort order option.
- From the Collation designator drop-down menu, select an acceptable collation and settings for your locale.
- For example, in North America, an acceptable collation would be Latin1_General_100 with the Accent-sensitive check box selected.
- We recommend that you select a collation that aligns with the Windows locale of the server where the Engine is installed.
- For more information on collation and locales, refer to this Microsoft document:
https://learn.microsoft.com/en-us/sql/relational-databases/collations/collation-and-unicode-support.
- Click OK.
- Click Next.
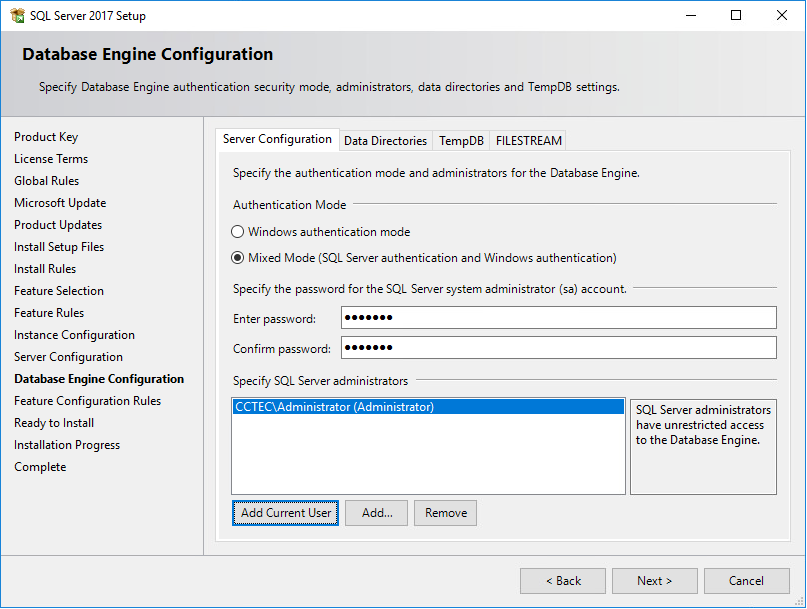
- On the Database Engine Configuration page, select the Mixed Mode (SQL Server authentication and Windows authentication) option, enter and confirm the SQL Server administrator password, then click Add Current User.

- Click Install.
- When the installation has completed, click Close to close the wizard.
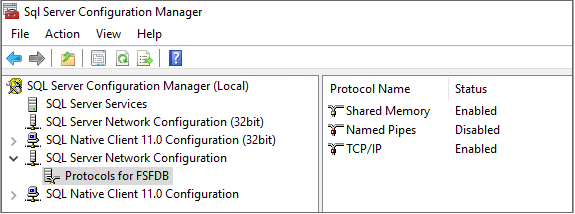
- Launch SQL Server Configuration Manager.
- In the left pane, expand SQL Server Network Configuration.
- Click Protocols for FSFDB (or the name of the database instance you chose earlier).
- Right-click TCP/IP and select Properties.
- Click the IP Addresses tab.
- Under the IP2 heading, for the Enabled field, right-click to select the drop-down men and change the setting to Yes.
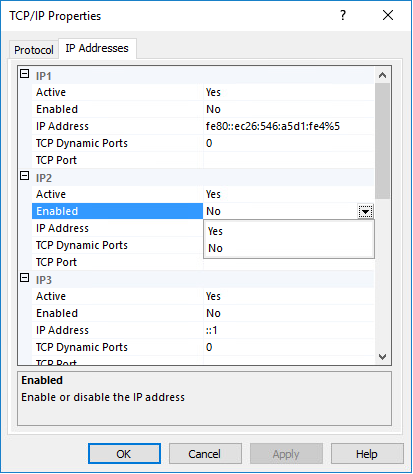
- Select TCP Dynamic Ports and clear the field so there is no number associated to it.
- Scroll down to the IPALL heading and for the TCP Dynamic Ports field, clear the field so there is no number associated to it.
- In the TCP Port field, and enter
1433. - Click Apply.
- When the warning dialog box appears, click OK.
- Click OK to close the TCP/IP Properties page.
- Close the SQL Server Configuration Manager.
- Launch Windows Firewall with Advanced Security.
- From the left column, click Inbound Rules.
- From the Actions column, click New Rule.
- In the Rule Type page, select Port.
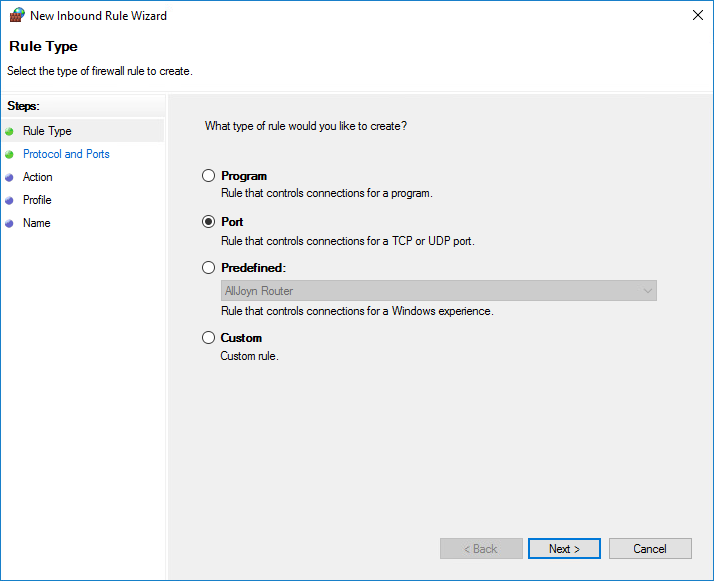
- Click Next.
- In the Protocol and Ports page, enter
1433in the Specific local ports field, then click Next. - In the Action page, accept the default setting by clicking Next.
- In the Profile page, accept the default settings by clicking Next.
- In the Name page, specify a name for the new inbound rule in the Name field.
- For example,
SQL Server. - Click Finish.