Microsoft SQL Server
IMPORTANT: Unless you are upgrading File Reporter OES from a previous instance that uses Microsoft SQL Server, we strongly recommend using PostgreSQL for new installs.
Use of SQL Server will be deprecated in a future release.
Supported Versions
File Reporter OES 24.4 supports the following versions of SQL Server:
- SQL Server 2022
- SQL Server 2019
System Requirements
-
Any Microsoft-supported platform for SQL Server on Windows Server or Linux.
-
Minimum 16 GB RAM
-
Depending on the size and frequency of your scans, you may need significantly more RAM.
-
Supported Editions
The following editions of SQL Server are supported in production:
- SQL Server Enterprise
- SQL Server Standard
IMPORTANT: Due to considerations with security and Unicode collation support, you should install a dedicated instance of SQL Server for File Reporter OES.
Install a New Instance of SQL Server
The following procedures are specific to Microsoft SQL Server 2022. Actual procedures will vary based on your version of SQL Server. These instructions assume you are installing a single instance of SQL Server on a Windows Server host with no Azure integration.
-
Double-click
setup.exefrom the Microsoft SQL Server ISO. -
Click Installation on the SQL Server Installation Center page.
-
Select New SQL Server stand-alone installation or add features to an existing installation.

-
Complete the following forms in the SQL Server Setup wizard:
-
Edition: Select the SQL Server edition, enter the product key, select the license option, then click Next.
-
License Terms: Accept the license terms, then click Next.
-
Global Rules: Review the results, then click Next.
-
Microsoft Update: Click Use Microsoft Update to check for updates, then click Next.
-
Install Rules: Review the results, then click Next.
-
Azure Extension for SQL Server: Uncheck Azure Extension for SQL Server, then click Next.
-
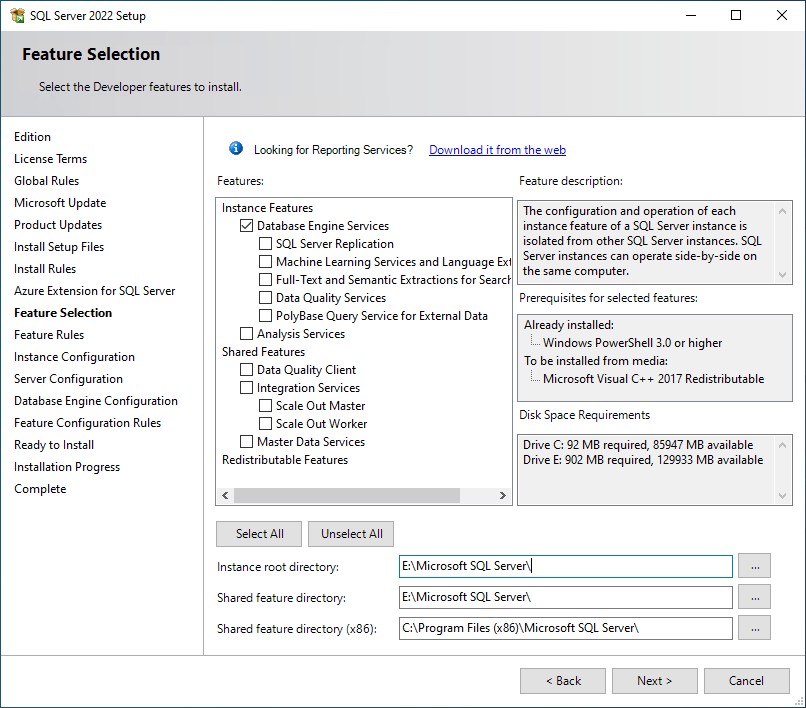
Feature Selection: Check Database Engine Services and review the installation paths, then click Next.
NOTE: For larger installations, consider installing the SQL Server instance on a separate volume by changing the Instance Root Directory path parameter.

-
Feature Rules: Review the results, then click Next.
-
Instance Configuration: Select the appropriate instance type, modify the Instance ID if desired, then click Next.
-
-
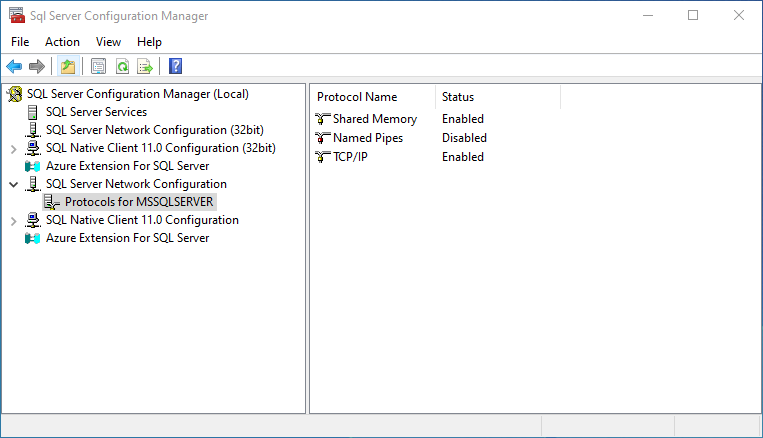
Launch SQL Server Configuration Manager from the Windows Start Menu.
-
Expand SQL Server Network Configuration in the left-hand pane.
-
Click Protocols for MSSQLSERVER (or the name of the database instance you chose earlier).

-
Right-click TCP/IP and select Properties.
-
Click the Protocol tab.
-
Select Yes in the Enabled field.
-
Select Yes in the Listen All field.
-
Click the IP Addresses tab.
-
Set the TCP Port field to
1433under the IPAll heading at the bottom. -
Click OK.
-
Close the SQL Server Configuration Manager.
-
-
Select the Collation tab in the Server Configuration page, then click Customize.

-
Select Windows collation designator and sort order, then select your desired collation.
-
If possible, select a collation that aligns with the Windows Server hosting the 24.4 Engine.
-
If unsure which collation to use, select Latin1_General_100, which is a safe option for File Reporter OES.
NOTE: Select one of the *_100 or later collations, as these offer the best compatibility for advanced options such as Supplementary characters. Refer to the following Microsoft document for details about collation and locales:
https://learn.microsoft.com/en-us/sql/relational-databases/collations/collation-and-unicode-support.IMPORTANT: 24.4 requires the use of a Windows collation. Legacy SQL collations are not supported.
-
-
(Optional) Select Accent-sensitive and Supplementary characters.
-
(Optional) Select options for Kana-sensitive, Width-sensitive, and Variation selector-sensitive if you understand their impact with specific Asian character sets.
-
Deselect all other options.
-
Select Windows Code Page (1252) for the Char/Varchar Storage Options.
IMPORTANT: File Reporter OES does not currently support the use of UTF-8 as a character storage option.
-
Click OK to close the Collation customization dialog, then click Next.
-
-
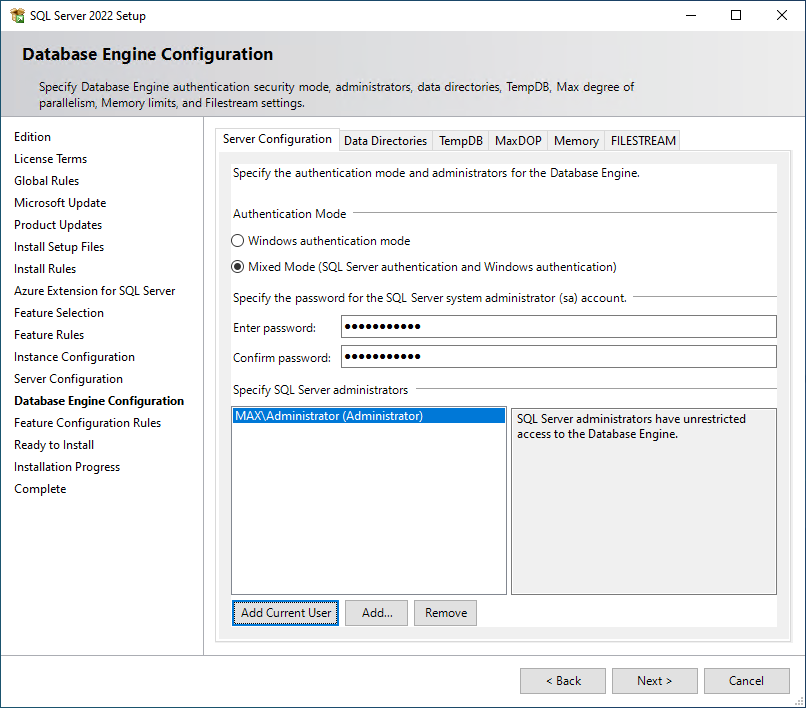
Database Engine Configuration: Perform the following operations in this panel:
-
Select Mixed Mode (SQL Server authentication and Windows authentication).
-
Enter a password for the sa account in the Enter password and Confirm password fields.
-
Click Add Current User to add your current account to the SQL Server administrators list.
-
Review your selections then click Next.
-
-
Feature Configuration Roles: Review any messages, then click Next.
-
Ready to Install: Perform a final review of all installation options, then click Install.
-
Complete: Click Close to exit the setup wizard once the installation is complete.
-
-
Launch Windows Firewall with Advanced Security.
-
Click Inbound Rules from the left-hand column.
-
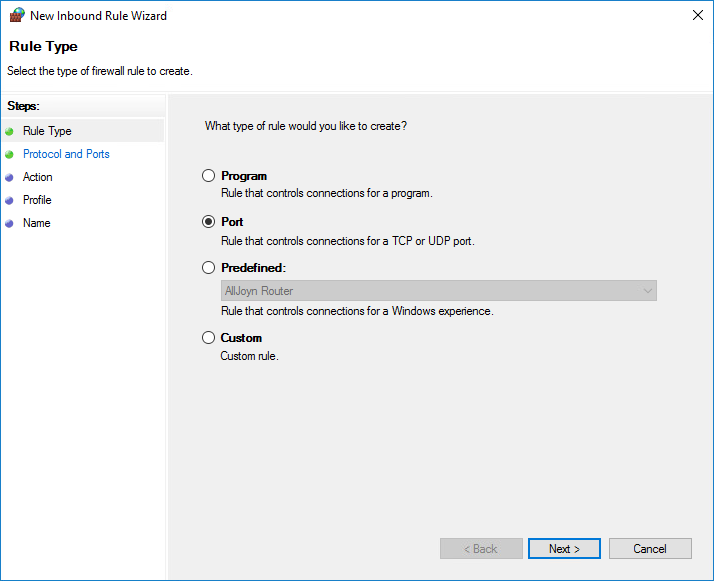
Click New Rule from the Actions column.
-
Select Port in the Rule Type page.
-
Click Next.
-
Enter
1433in the Specific local ports field of the Protocol and Ports page, then click Next. -
Click Next to accept the default setting in the Action page.
-
Click Next to accept the default setting in the Profile page.
-
Specify a Name for the new inbound rule (e.g.,
SQL Server) in the Name page. -
Click Finish.
-