Configuring the Web Application
-
If not already running, select File Reporter OES Config Dashboard in the Start menu.
-
Click Configure Web Application.
-
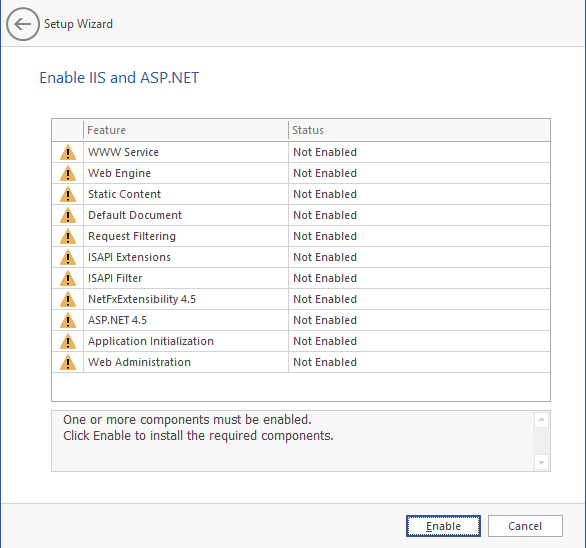
Review what is to be configured, then click Next.
-
(Conditional) If the components are not enabled, click Enable.
-
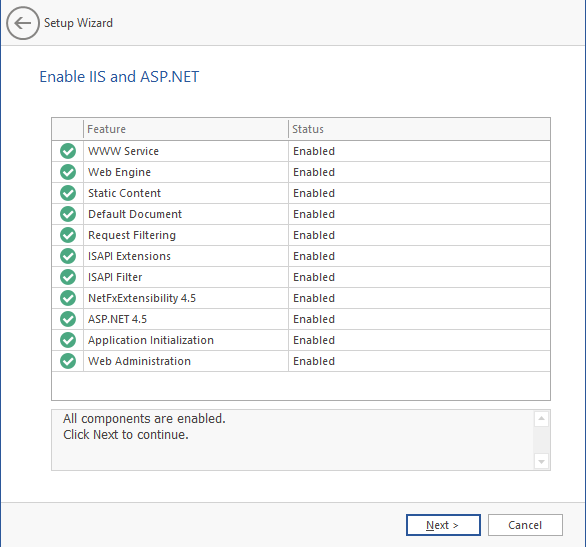
Click Next when all Microsoft IIS components are enabled.

-
Review or edit settings applicable to the File Reporter OES Web Application. Leave the settings as currently established unless there is a need to change a setting.
-
Web Site: Details the settings for the File Reporter OES site in Microsoft IIS.
-
Web Site: The default name for the File Reporter OES site. Edit as needed.
-
Physical Path: The path specified during installation as the location that serves up content for the website. This field cannot be edited.
-
IP Address: Indicates that web requests will be responded to from any IP address available on the server by default. You can specify which one to use if the server has multiple IP addresses.
-
SSL Port: The default port is 443. You can select another port if there is a conflict.
-
Host Name: The hostname as defined in the DNS you specified in Prerequisites.
-
If a warning sign appears next to the Host Name entry, then the hostname is not fully resolved.
-
Verify that there is a DNS entry for the File Reporter OES Web application and that the resolved IP address(es) are located on the host machine.
-
-
Application Pool: Details the settings for the File Reporter OES application pool in Microsoft IIS.
-
Name: Use the default name for the application pool or edit as needed.
-
Service Account: Specifies the service account name used by the application pool.
-
Password: Use the generated password or enter one manually.
-
Confirm Password: Use the same generated or manually entered password.
-
-
-
Edit the fields as necessary and click Next.

Include rule for HTTP redirection to HTTPS: Leave this selected to provide automatic redirection from HTTP to HTTPS.
-
Click Next to install the URL Rewrite module and configure Application Initialization.
-
(Conditional) If one or more Web services are not running, you may now start them.

Start Selected Services: Starts the selected web services
-
(Optional) Click Start Selected Services then verify those services are now running.
-
Click Next.
-
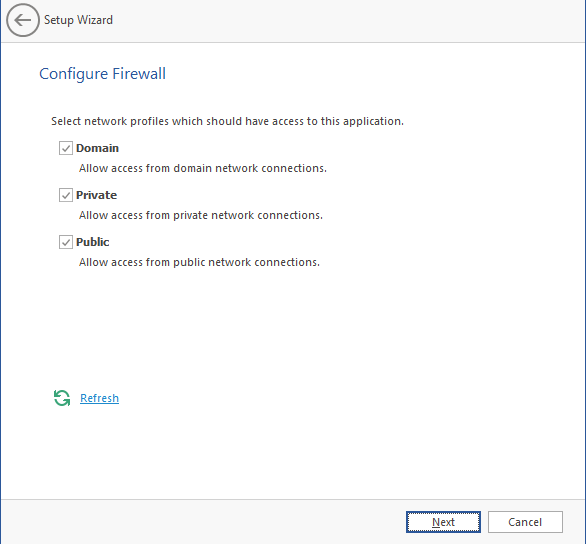
Set the firewall network profiles according to your organization's security policies, then click Next.
-
Click Finish when the initial setup for the Web Application is complete. The Database, Engine, and Web Application are now configured.

-
Click the hyperlink located below the Web Application heading to launch the web-based administrative interface.
-
(Conditional) If prompted for a security exception, accept it and follow the procedures for establishing the Web Application URL as a trusted website.