Managing Scheduled Scans
You can instruct Fortify WebInspect to conduct a scan at a time and date you specify. The options and settings you select are saved in a special file and accessed by a Windows service that starts Fortify WebInspect (if necessary) and initiates the scan. It is not necessary for Fortify WebInspect to be running at the time you designate the scan to begin.
Note: Scheduled scans, when complete, do not appear in the Recent Scans list that displays on the Fortify WebInspect Start page. To access scheduled scans after they are complete, select the Start page and click Manage Scans.
On the Start Page, click Manage Schedule.

A list of scans you previously scheduled appears in the right-hand pane of the Start Page.
The current state of the scan is indicated in the Status column. For more information, see Scheduled Scan Status.
You can perform the following tasks:
- To delete a scan from the list, select a scan and click Delete.
- To edit settings for a scheduled scan, select a scan and click Edit.
- To run a scan immediately, without waiting for the scheduled time, select a scan and click Start (or right-click a scan and select Start Scan from the shortcut menu). As with all scheduled scans, the scan runs in the background and does not appear on a tab.
- To stop a scheduled scan, select a scan that is running and click Stop (or right-click a running scan and select Stop Scan from the shortcut menu).
To schedule a scan:
-
Click Add.
-
In the Type of Scan group, choose one of the following:
-
Basic Scan
-
Web Service Scan
-
Enterprise Scan
-
-
Specify when you want to conduct the scan. The choices are:
-
Immediately
-
Run Once: Modify the date and time when the scan should begin. You can click the drop-down arrow to reveal a calendar for selecting the date.
-
Recurrence Schedule: Use the slider to select a frequency (Daily, Weekly, or Monthly). Then specify the time when the scan should begin and (for Weekly or Monthly) provide other schedule information.
-
-
Click Next.
-
Enter the settings for the type of scan you selected.
-
For Web Site and Web Service Scans only, you can elect to run a report at the conclusion of the scan:
-
Select Generate Reports and click the Select Reports hyperlink.
-
Continue with Selecting a Report (below).
-
-
To schedule the scan without generating a report, click Schedule.
Selecting a Report
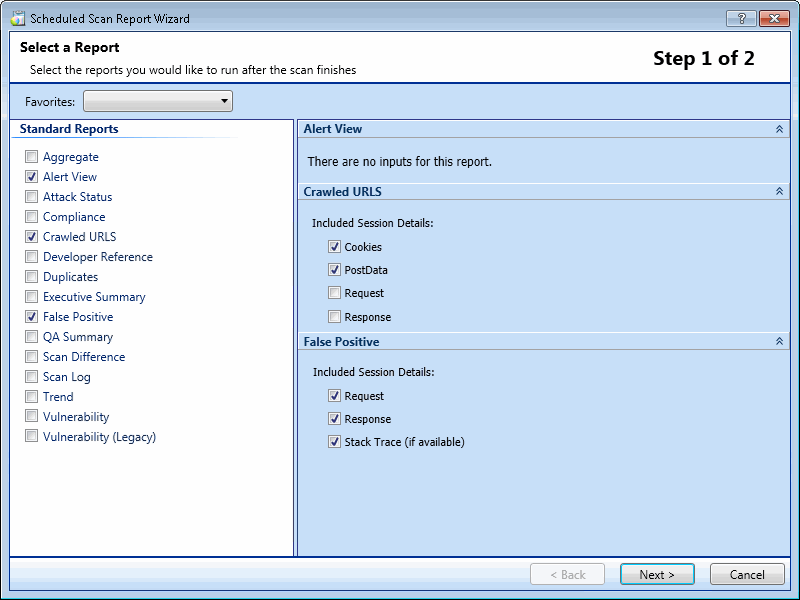
If you opted to include a report with the scheduled scan, the Scheduled Scan Report Wizard appears:
-
(Optional) Select a report from the Favorites list.
A "favorite" is simply a named collection of one or more reports and their associated parameters. To create a favorite once you have selected reports and parameters, click the Favorites list and select Add to favorites.
-
Select one or more reports.
-
Provide information for any parameters that may be requested. Required parameters are outlined in red.
-
Click Next.
The Configure Report Settings window appears.
Configuring Report Settings

- If you select Automatically Generate Filename, the name of the report file will be formatted as <reportname> <date/time>.<extension>. For example, if creating a compliance report in pdf format and the report is generated at 6:30 on April 5, the file name would be "Compliance Report 04_05_2009 06_30.pdf." This is useful for recurring scans.
Reports are written to the directory specified for generated reports in the Application settings.
-
If you did not select Automatically Generate Filename, enter a name for the file in the Filename box.
-
Select the report format from the Export Format list.
-
If you selected multiple reports, you can combine then all into one report by selecting Aggregate reports into one report.
-
Select a template that defines the headers and footers used for the report and, if necessary, provide the requested parameters.
-
Click Finished.
-
Click Schedule.
See Also