2.3 Walk through
The following instructions are based on a basic default installation. This means that all components are installed locally and are using default ports. With this installation in place you can follow the steps and familiarize yourself with Host Access for the Cloud and MSS.
See Deploying for information about installing into production environments and different production scenarios.
2.3.1 Steps you will follow

|
Open the MSS Administrative Console. |
|
|
Create and launch a new session. This opens a new browser window and the web client panel displays. |
|
|
Configure settings, including key and color mapping, enabling hotspots and macros, and other connection and user preference options. |
|
|
Assign users to sessions. |
|
|
Provide access to sessions. |
Open the Administrative Console
-
In a Windows environment, from the Start menu, under Micro Focus Host Access for the Cloud, click Administrative Console or open the URL for the administrator login page in your web browser. The URL uses this format: https://myserver.mycompany.com:443/adminconsole.
-
If you connect using HTTPS and your server has a self-signed certificate, your browser will warn you about the certificate you created. This is expected behavior; you can accept the self-signed certificate or choose to proceed and the administrator login page will open. After you purchase a CA-signed certificate or import the self-signed certificate into your certificate store, these warnings will stop.
-
The administrative account has a built-in password, admin. Log on as an administrator using this password or by entering the password that you specified when you installed MSS.
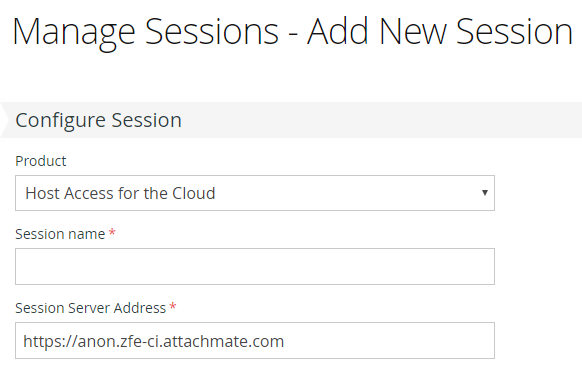
Create a new session
You add, edit, and manage sessions from the Manage Session panel of the Administrative Console. When you add a session it becomes available in the session list of this panel.
-
From the Manage Sessions panel, click to create a new session
-
If it is not already selected, select Host Access for the Cloud, enter a session name, and click to open a new browser window and start configuring the session for the server listed at the session server address.
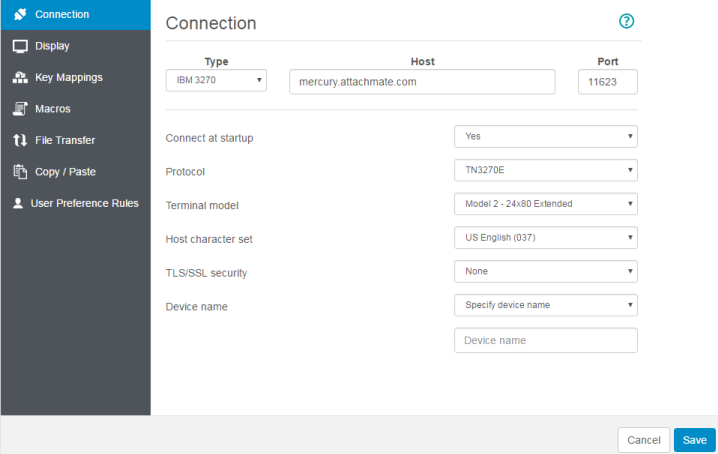
Configure settings and connect
You configure different settings and options for the session, as well as connect to the host, in the web client browser window.
-
On the panel, for the session you are creating, choose the host type, and enter the name and port number of the host.
-
Connection settings vary depending on the type of host connection. For detailed descriptions of the setting options for each host type, see the web client help. Setting options include mapping keystrokes to selected keys, mapping host colors to match your preferences, and recording session macros.
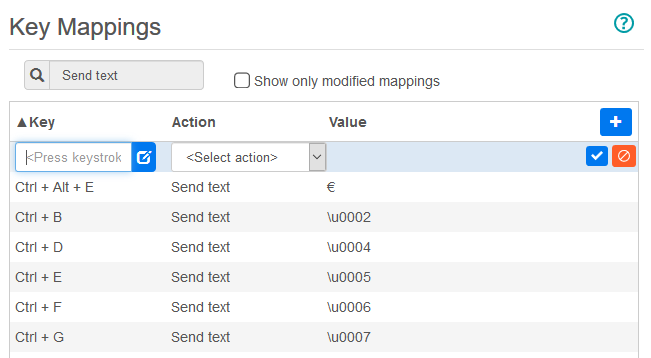
Mapping keys
-
To map keys to selected keys, open .
-
Press the key or key combination you want to use to trigger the selected action.
-
From the drop down list select the action you want mapped to the selected keystroke. Click
 to complete the key mapping. You can continue adding and mapping keys.
-
Click to complete mapping keys.
Change host colors and other options
-
From the left navigation panel, you can map host colors, set font and keyboard options, and enable hotspots by opening the panel. Color choices are specific to each session.
-
Open to extend configuration options to your end users.
-
Click to return to the Administrative Console browser window to authenticate and assign users to sessions.
Configure authentication and assign users to sessions
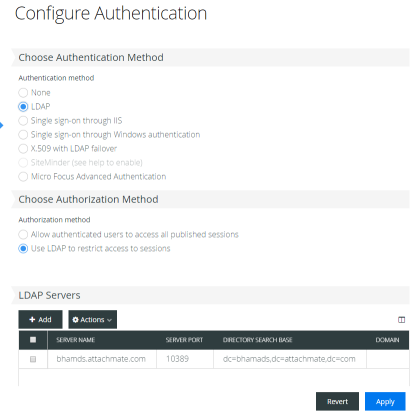
Now that sessions are created, you need to grant users access to those sessions. Users are authenticated and assigned to sessions in the MSS Administrative Console. A user can be assigned to multiple sessions.
-
Authentication and authorization validates the identity of a user and the method you want to use to map sessions to individual users or groups of users. From the left navigation panel, select .
-
Choose an authentication method. Your options change depending on your selection.
-
There are descriptions of the various options in the MSS documentation. Click
 .
.
-
Click to complete the process.
-
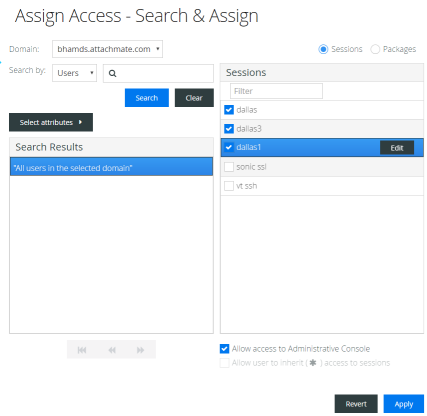
Open to map sessions to individual users or groups of users.
-
Map the sessions to the users you want to access the sessions and click You can also choose to allow users to inherit access to sessions and to the Administrative Console.
2.3.2 Provide end users access to sessions
The final step is to share a URL to your session server with your users. The URL usually looks something like this:
https://myserver.mycompany.com:port
When they access the session server, your users will be prompted to log in as needed, and then they will be given access to their assigned sessions.
In more complex deployments the URL you provide will be to a load balancer and not the session server itself. These links are often embedded in corporate portals or other proprietary web sites.
