2.0 Getting Started
Host Access for the Cloud provides zero-footprint terminal emulation that delivers browser-based HTML5 access to 3270, 5250, VT, UTS, ALC and T27 host applications without the need to touch the desktop or install and manage Java runtime environments. A centralized administrative location reduces IT costs and desktop management time while efficiently providing and delivering host access to end users. Communication is protected using HTTPS, SSL/TLS, and SSH security.
Next steps
2.1 How it works
2.1.1 Components
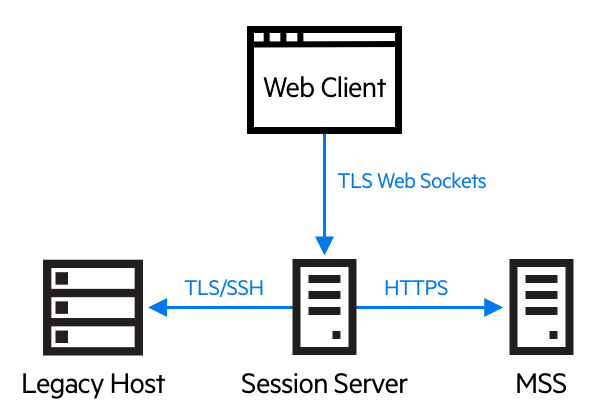
Familiarize yourself with the three components:
-
Host Access Management and Security Server
The Host Access Management and Security Server (MSS) provides an Administrative Console, a web-based centralized location where you can add, edit, and delete terminal sessions. MSS is part of the broader Micro Focus story and is compatible with other Micro Focus products. This icon
 which you will see throughout the documentation indicates where additional configuration in the MSS Administrative Console is required.
 -
Session Server
The session server is an NT service or UNIX daemon that provides the engine that runs host sessions. Multiple session servers can serve up tens of thousands of sessions and provide efficient and rapid access to your host data.
-
Web Client
The web client is the web-based terminal emulator where your users can easily access authorized sessions from any platform and from any location.
The Web client provides macros, keyboard and color mapping, on-screen keyboard, copy/paste functionality, host-initiated screen updates, and file transfer capabilities.
Administrator and end user roles
Both administrator and end user roles are represented in the documentation and work flow. The administrator creates sessions, assigns users to those sessions, and sets user preferences. The end user accesses his assigned sessions, interacts with the web client to connect to the host, and accomplishes his tasks.
2.1.2 Browser and operating system support
Host Access for the Cloud is a 64-bit based product and supports Google Chrome, Mozilla Firefox, and Microsoft Internet Explorer and Edge browsers. The use of Docker containers makes vertical and horizontal scaling possible and supports cloud-based technologies. A complete list of supported platforms and other installation requirements is available in Evaluation system requirements.
2.1.3 Security considerations
When you open up your legacy hosts to users outside the corporate firewall - business partners, remote users, mobile sales personnel, and others - you need to shield your information from known security threats. With Host Access for the Cloud, you can provide secure web-to-host access to all your users, whether they’re around the corner or around the world. Host Access for the Cloud, along with the MSS, provides HTTPS connections and a variety of authorization and authentication options.
Host Access for the Cloud supports the TLS and SSH protocols to protect mission-critical data. To secure your passwords and other sensitive data, use the HTTPS protocol, which provides TLS encryption.
Host Access for the Cloud can be connected securely to the browser, the host, and the management server. See Securing connections for information on securing those connections.
2.2 Getting Host Access for the Cloud
2.2.1 Evaluation system requirements
To successfully install and evaluate Host Access for the Cloud your system needs:
-
8 GB of memory
-
A supported browser and operating system.
See System Requirements for a comprehensive list of supported environments.
Downloading the evaluation software
If you don’t have our software yet, visit our site and fill out an evaluation request form. You’ll be sent an e-mail message with instructions to download and install an evaluation copy of Host Access for the Cloud good for 120 days. Using this evaluation copy you can open and close host sessions and maintain 5 active host connections at a time. The trial site has all the information you need to take the next step.
The Micro Focus download site contains the compressed files necessary to install all supported platforms, including the Windows connector. Different activation files will enable different editions/platforms of Host Access for the Cloud.
2.2.2 Basic install
The following instructions provide you with the basic default installation. This means that all components are installed locally and are using default ports. With this installation in place you can follow the walk through and familiarize yourself with Host Access for the Cloud and MSS.
-
From the Micro Focus download site, download your product install package. The package includes support for all supported platforms.
-
Following the install program prompts, install Host Access for the Cloud and Management and Security Server (MSS).
MSS uses activation files (activation.jaw) to enable product functionality. The install program contains the needed activation file and it is activated as part of the install process.
NOTE:During a basic install a self-signed certificate is used to ensure secure connections. When you move into a production environment you can provide your own certificates.
Now you can take the next step; walking through Host Access for the Cloud.
2.3 Walk through
The following instructions are based on a basic default installation. This means that all components are installed locally and are using default ports. With this installation in place you can follow the steps and familiarize yourself with Host Access for the Cloud and MSS.
See Deploying for information about installing into production environments and different production scenarios.
2.3.1 Steps you will follow

|
Open the MSS Administrative Console. |

|
Create and launch a new session. This opens a new browser window and the web client Connection panel displays. |

|
Configure settings, including key and color mapping, enabling hotspots and macros, and other connection and user preference options. |

|
Assign users to sessions. |

|
Provide access to sessions. |
Open the Administrative Console
-
In a Windows environment, from the Start menu, under Micro Focus Host Access for the Cloud, click Administrative Console or open the URL for the administrator login page in your web browser. The URL uses this format: https://myserver.mycompany.com:443/adminconsole.
-
If you connect using HTTPS and your server has a self-signed certificate, your browser will warn you about the certificate you created. This is expected behavior; you can accept the self-signed certificate or choose to proceed and the administrator login page will open. After you purchase a CA-signed certificate or import the self-signed certificate into your certificate store, these warnings will stop.
-
The administrative account has a built-in password,admin. Log on as an administrator using this password or by entering the password that you specified when you installed MSS.
Create a new session

|
See Add a Session in the MSS Administrator Guide for complete instructions. |
You can add and update session settings from the Manage Sessions panel of the Administrative Console. When you add a session it becomes available in the session list of this panel.
-
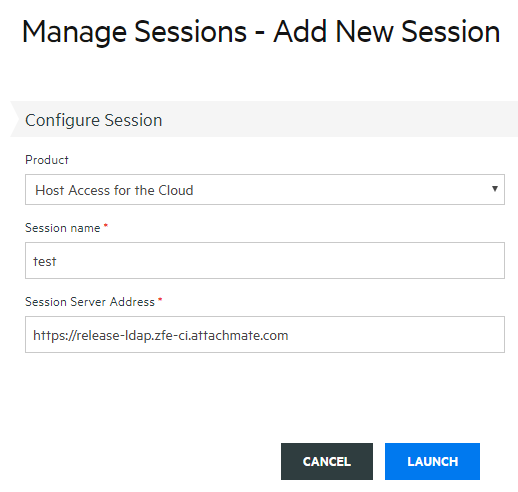
From the Manage Sessions panel, click ADD to create a new session.
-
If it is not already selected, select Host Access for the Cloud, enter a session name, and click Launch to open a new browser window and start configuring the session for the server listed at the session server address.
-
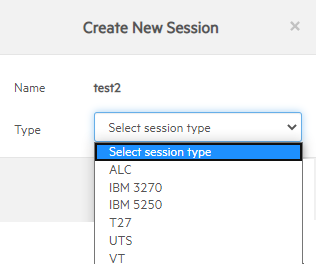
On the Create New Session dialog box, select the host type from the drop down list and click Next.
Configure settings and connect
You configure different settings and options for the session, as well as connect to the host, in the web client browser window.
-
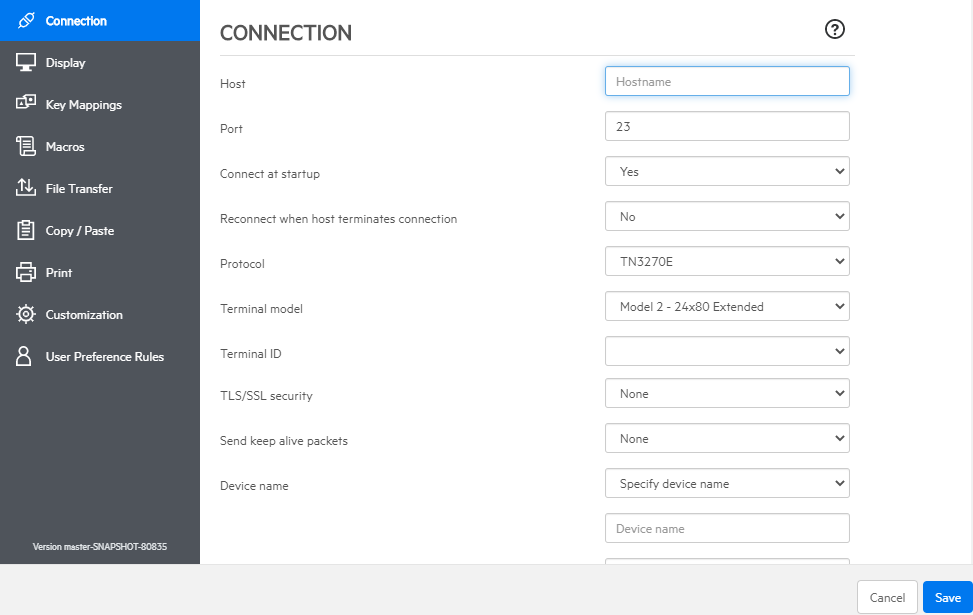
On the Connection panel, for the session you are creating, enter the needed connection information.
-
Connection settings vary depending on the type of host connection. For detailed descriptions of the setting options for each host type, see the web client help. Setting options include mapping keystrokes to selected keys, mapping host colors to match your preferences, and recording session macros.
Mapping keys
-
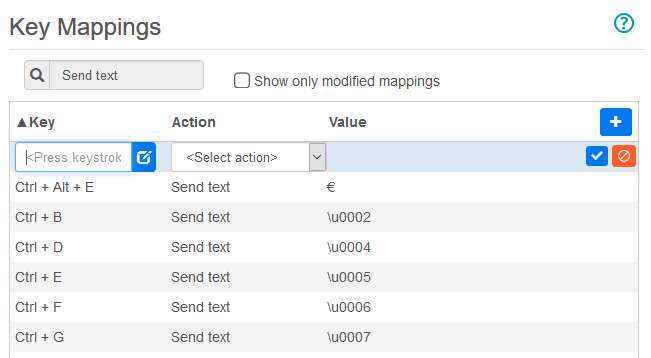
To map keys to selected keys, open Key Mappings.
-
Press the key or key combination you want to use to trigger the selected action.
-
From the Action drop down list select the action you want mapped to the selected keystroke. Click
 to complete the key mapping. You can continue adding and mapping keys.
 -
Click Save to complete mapping keys.
Change host colors and other options
-
From the left navigation panel, you can map host colors, set font and keyboard options, and enable hotspots by opening the Display panel. Color choices are specific to each session.
-
Open User Preference Rules to extend configuration options to your end users.
-
Click Exit to return to the Administrative Console browser window to authenticate and assign users to sessions.
Configure authentication and assign users to sessions
Now that sessions are created, you need to grant users access to those sessions. Users are authenticated and assigned to sessions in the MSS Administrative Console. A user can be assigned to multiple sessions.
-
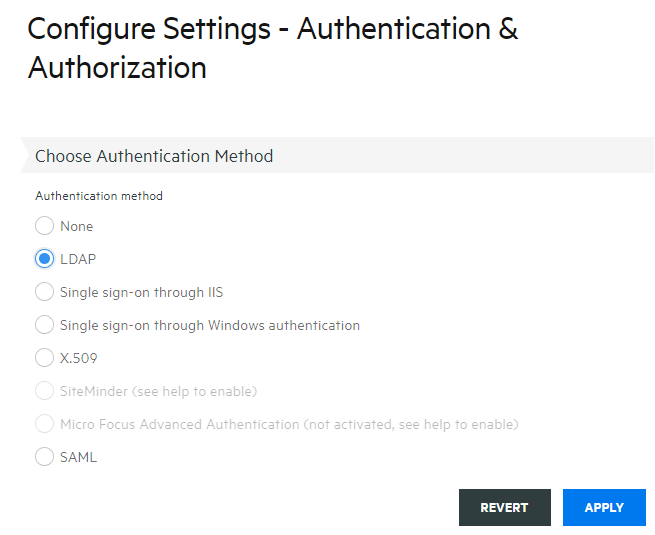
Authentication and authorization validates the identity of a user and the method you want to use to map sessions to individual users or groups of users. From the left navigation panel, select Configure Authentication.
-
Choose an authentication method. Your options change depending on your selection.
-
There are descriptions of the various options in the MSS documentation. Click
 .
. -
Click Apply to complete the process.
-
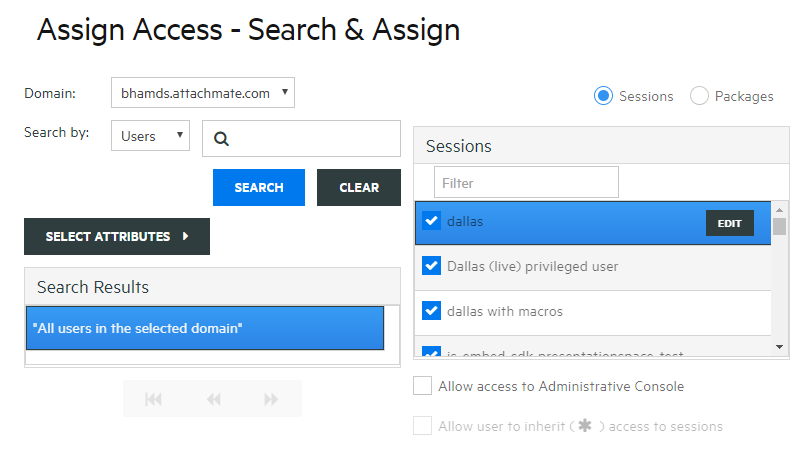
Open Assign Access to map sessions to individual users or groups of users.
-
Map the sessions to the users you want to access the sessions and click Apply. You can also choose to allow users to inherit access to sessions and to the Administrative Console.

|
See Select a method to authenticate users in the MSS Administrators Guide. |
2.3.2 Provide end users access to sessions
The final step is to share a URL to your session server with your users. The URL usually looks something like this:
https://myserver.mycompany.com:port
When they access the session server, your users will be prompted to log in as needed, and then they will be given access to their assigned sessions.
In more complex deployments the URL you provide will be to a load balancer and not the session server itself. These links are often embedded in corporate portals or other proprietary web sites.

Related Topics