Download and install a MySQL server and MySQL Connector/ODBC (which contains the Unicode driver). During installation, set up a user account with superuser privileges. For instructions, refer to the MySQL documentation on www.mysql.com.
Once installed, the MySQL server appears in the Services tab in Windows Task Manager.
Configure the database server for use with Media Server:
- Open the configuration or options file for the MySQL server (usually named
my.ini). - So that Media Server can send large amounts of binary data (images) to the database, set the configuration parameter
max_allowed_packet=1073741824. - Save and close the configuration file.
Add the MySQL bin directory path to the PATH environmental variable.
This step enables you to use the command mysql to start the mysql command-line tool from the Windows Command Prompt. If the directory path is not added to the PATH variable, you must specify the mysql.exe file path in the Command Prompt to start psql.
Open the mysql command line tool:
-
In the Windows Command Prompt, run the command:
mysql -u userName -p
- Enter your password when prompted.
Run a CREATE DATABASE command to create a new database. Specify the following database settings.
| Database name | Any name. |
| Character set | Must be Unicode–either UTF8 or UCS2. |
| Collation | Any that is compatible with the encoding. |
For example:
CREATE DATABASE myDatabase CHARACTER SET utf8 COLLATE utf8_unicode_ci;
Run the my.sql script provided in the Media Server installation directory. This script sets up the database schema that Media Server requires.
-
Close the mysql command-line tool:
quit
-
In the Windows Command Prompt, run the following command:
mysql -u userName -p -v -D databaseName -e "source path/my.sql"
where,
userNameis the MySQL user name. databaseNameis the name of the database you created in Step 2. pathis the path to the my.sql file. NOTE:Running the script non-interactively from the terminal ensures that the script terminates if an error occurs.
- Enter your password when prompted.
Grant privileges to the user that Media Server will connect as. Required privileges are:
| Database | Create Temporary Tables |
| All tables | Select, Insert, Update, Delete |
| All functions and stored procedures | Execute |
If security is not a consideration, grant all privileges.
-
Start the mysql command-line tool:
mysql
-
Run the
GRANTcommands:GRANT CREATE TEMPORARY TABLES ON databaseName.* TO userName; GRANT SELECT, INSERT, UPDATE, DELETE ON databaseName.* TO userName; GRANT EXECUTE ON databaseName.* TO userName;
where,
databaseNameis the name of the database you created in Step 2. userNameis the user name that Media Server will connect as. -
Close the mysql command-line tool:
quit
Open the Data Sources (ODBC) program:
-
In the Windows Control Panel, click System and Security.
The System and Security window opens.
-
Click Administrative Tools.
The Administrative Tools window opens.
-
Double-click Data Sources (ODBC).
The ODBC Data Source Administrator dialog box opens.
In the User DSN tab, click Add... .
The Create New Data Source dialog box opens.
Select the MySQL ODBC Unicode driver from the list and click Finish.
The MySQL Connector/ODBC Data Source Configuration dialog box opens.
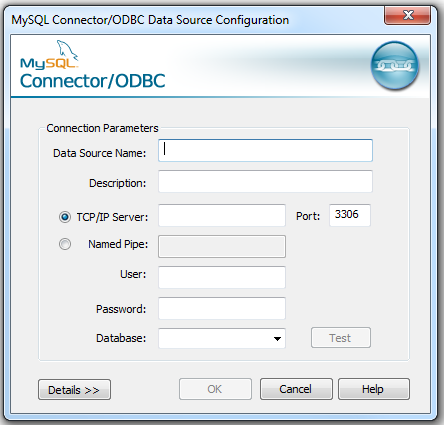
Complete the Connection Parameters fields:
| Data Source Name | The data source name (DSN). Choose any string. Media Server can use this string to connect to the database server. |
| Description |
An optional description for the data source. |
| TCP/IP Server |
The IP address or hostname of the server that the database server is installed on. |
| Port | The port to use to communicate with the database server. |
| User | The user name to connect to the database server with. |
| Password | The password for the user account that connects to the database server. |
| Database | The name of the database that you created in Step 2. |
Click Test to test the connection.
The Connection Test box opens containing a message describing whether the connection was successful. If the connection failed, use the information in the message to resolve any issues.
Click OK to close the Connection Test box.
In the MySQL Connector/ODBC Data Source Configuration dialog box, click OK to close the dialog box.
In the ODBC Data Source Administrator dialog box, click OK to close the dialog box.