InfoConnect API Guide
Walkthrough / Retrieve and Enter Data / Enter Data With a Visual Studio Office App
In This Topic
    Enter Data With a Visual Studio Office App
    In This Topic

    This walkthrough shows how to create a Microsoft Visual Studio Office solution that can be used to open InfoConnect and enter data from Excel into a host application. You can use this process to develop an Excel application level add-in that includes these features for any Excel workbook or to customize an Excel workbook so that they are available only when that workbook is open.

    Create an Excel workbook add-in

    1. Create a Microsoft Project and select the Office Add-ins Excel Workbook template or the Excel Add-in template.
    2. When prompted, select to Create a New Document.
    3. In Visual Studio, create a new Console Application project and add references for the following InfoConnect assemblies. (Depending on your version of Visual Studio, these can be found either on the .NET tab or under Assemblies | Extensions.)
      Attachmate.Reflection
      Attachmate.Reflection.Framework
      Attachmate.Reflection.Emulation.IbmHosts

    Add the Controls to the Workbook's Ribbon

    Next, add the controls you want users to see in the Excel Ribbon when they open the document.

    1. In Solution Explorer, right click on the project and select Add a new item.
    2. In the Add new item dialog box, select to add a Ribbon (Visual Designer) item to the project.
      The Ribbon1.cs file should open in Design mode.
    3. Open the Toolbox and add a Tab control to the ribbon.
    4. In the Properties window, change the Tab label to Internal Applications.
    5. Add a Group control and change its label to Sales Data.
    6. Add a Button control to this group and change its label to Enter Data.
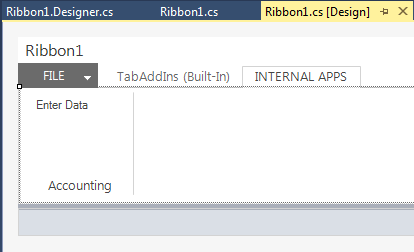
      When you're done, the ribbon shown in design view should look like this:

    Add the Code for the Controls to the Ribbon1.cs file

    Now that you have designed the Ribbon for the workbook, set up the Ribbon.cs file to handle the button click event for the Enter Data button. This code does the work of opening InfoConnect, navigating to the data, and copying the data from Excel to the host application.

    You can follow along with this section or skip to Ribbon1.cs code at the end of this article and copy all of the code to Ribbon1.cs.

    1. Double click the Enter Data button and replace the code in the Ribbon1.cs file with the following code. This code starts InfoConnect and navigates to a screen that has a data form.Then it calls methods to get the data from the Excel worksheet and enter it into the form.
      Enter data from Excel to host application
      Copy Code
      using System;
      using System.Collections.Generic;
      using System.Linq;
      using System.Text;
      using Microsoft.Office.Tools.Ribbon;
      using Excel = Microsoft.Office.Interop.Excel;
      using Attachmate.Reflection.UserInterface;
      using Attachmate.Reflection;
      using Attachmate.Reflection.Framework;
      using Attachmate.Reflection.Emulation.IbmHosts;
      
      namespace PutInData
      {
          public partial class Ribbon1
          {
              private void Ribbon1_Load(object sender, RibbonUIEventArgs e)
              {
              }
          
              private void button1_Click(object sender, RibbonControlEventArgs e)
              {
                  //Start a visible instance of InfoConnect or get the instance running at the given channel name
                  Application app = MyReflection.CreateApplication("MyWorkspace", true);
                 
                  //Create a terminal, configure, and connect
                  IIbmTerminal terminal = (IIbmTerminal)app.CreateControl(new Guid("{09E5A1B4-0BA6-4546-A27D-FE4762B7ACE1}"));
                  terminal.HostAddress = "demo:ibm3270.sim";
                  terminal.Port = 623;
                  terminal.Connect();
      
                  //Make the sesion visible and get a handle to the screen
                  IFrame frame = (IFrame)app.GetObject("Frame");
                  frame.CreateView(terminal);
                  IIbmScreen screen = terminal.Screen;
      
                  //Navigate to the screen that has the data entry fields
                  screen.SendControlKey(Attachmate.Reflection.Emulation.IbmHosts.ControlKeyCode.Transmit);
                  screen.WaitForHostSettle(2000, 3000);
                 
                  screen.PutText("ISPF", 23, 1);
                  screen.SendControlKey(Attachmate.Reflection.Emulation.IbmHosts.ControlKeyCode.Transmit);
                  screen.WaitForHostSettle(2000, 3000);
                  screen.PutText("1", 2, 15);
                  screen.SendControlKey(Attachmate.Reflection.Emulation.IbmHosts.ControlKeyCode.Transmit);
                  screen.WaitForHostSettle(2000, 3000);
      
                  //get the data from the Excel worksheet
                  string[,] data = GetData();
      
                  //Enter the data into the host form
                  EnterData(data, screen);
                  }
          }
      }
      
    2.  Add the GetData method to the Ribbon1 partial class. This method gets an Excel range based on the UsedRange property. Then it gets the data in the range row by row and adds it to an array until it gets a delimiter that indicates the end of the data. It returns the array of data.
      GetData method
      Copy Code
      public string[,]  GetData()
      {
          //Get the range that includes all the cells used in the worksheet
          Excel.Worksheet myWorksheet = (Excel.Worksheet)PutInData.Globals.ThisWorkbook.ActiveSheet;
          Excel.Range range = myWorksheet.UsedRange;
                
          //Create an array to hold the range values
          String[,] rangeArray = new string[range.Rows.Count, range.Columns.Count];
      
          //Get all the values in the range
          for (int rCnt = 1; rCnt <= range.Rows.Count; rCnt++)
          {
              for (int cCnt = 1; cCnt <= range.Columns.Count; cCnt++)
              {
                  string cellValue = (string)(range.Cells[rCnt, cCnt] as Excel.Range).Value2;
                  rangeArray[rCnt - 1, cCnt - 1] = cellValue;
              }
          }
          return rangeArray;
      }
      
    3. Finally, add the EnterData method to the Ribbon.cs partial class. This method enters the data from the spreadsheet into the host, row by row, until all of the data is entered.
      EnterData method
      Copy Code
      public void EnterData(string[,] data, IIbmScreen screen)
      {
          for (int rCnt = 0; rCnt < data.GetLength(0); rCnt++)
          {            
              //Enter the row of data in the form
              for (int cCnt = 0; cCnt < data.GetLength(1); cCnt++)
              {
                  string input = data[rCnt, cCnt];
                  screen.PutText(input, (cCnt + 5), 18);
              }
      
              //Submit the form to add the data
              screen.PutText("Autoexec", 2, 15);
              screen.SendControlKey(ControlKeyCode.Transmit);
                     
              //The Wait allows you to see the input
              screen.Wait(3000);
              //To speed this up, replace the above line with the following line
              //screen.WaitForHostSettle(2000, 3000);
      
              //Go back to the previous screen to enter some more data
              screen.SendControlKey(ControlKeyCode.F3);
          }
      }    
      

      Testing the Add-in

      1. Press F5 to compile and run the sample.
      2. When the Excel workbook opens, enter a few rows of data in the first four columns of the worksheet.

      3. Open the INTERNAL APPS tab and then click the Get Data button.
      4. Verify that InfoConnect opens and navigates to the screen with the data entry form and that the data is entered into the form.