

| Introduction | Configuring Adis Using Adiscf | |
The enhanced ACCEPT/DISPLAY syntax (Adis) is a run-time support module which is provided for Screen Section and enhanced ACCEPT/DISPLAY syntax. Adis can be configured to an application's requirements using its configuration utility Adiscf. Alternatively, calls can be made from the COBOL application to Adis to configure it at run time; for example, to enable function keys - see the chapter Configuring Adis Using Adiscf.
The enhanced ACCEPT/DISPLAY syntax provides functionality beyond the standard ANSI ACCEPT syntax.
The table below represents those features of Adis over and above those of the standard ANSI ACCEPT and DISPLAY syntax.
| Syntax type |
Features |
|---|---|
| ANSI ACCEPT | Input data item |
| Accept day, date, time into data item | |
| ANSI DISPLAY | Output literals |
| Output contents of data items | |
| Adis | Specify screen position and screen attributes |
| Accept and display data from and into: | |
| - elementary data items in individual fields | |
| - group items in multiple fields1 | |
| - screen section items | |
| Configure keyboard keys |
1 Group items in multiple fields. For multiple-field ACCEPT operations, FILLER describes the number of character positions to skip over to the next field. In a DISPLAY operation, FILLER defines the number of spaces between literals. All areas defined as FILLER are unaffected by the ACCEPT or DISPLAY operation.
These are fully explained in later sections.
You can also set up the keys on the keyboard so that you can use them during the execution of an ACCEPT statement.
Adis consists of four modules:
| Module |
Description |
|---|---|
| adis | The main support module. |
| adisinit | The initialization module, used only when the enhanced ACCEPT/DISPLAY syntax is first loaded. |
| adiskey | The keyboard-handling module. |
| adisdyna | The enhanced ACCEPT/DISPLAY syntax dynamic attributes module. |
They interact as shown in the diagram below.
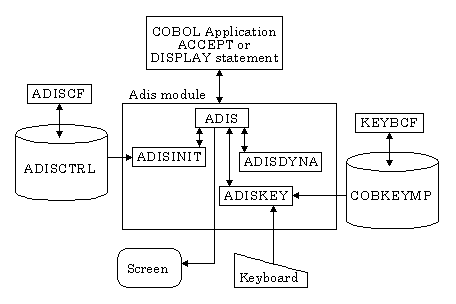
Figure 2-1: Adis Modules
The ACCEPT statement is executed differently for alphanumeric fields and numeric fields.
To use ACCEPT and DISPLAY elementary items from and into single fields at run time, use the syntax:
display data-item at xxyy ...
accept data-item at xxyy ...
where:
| data-item | An elementary item defined in the Data Division of your program. |
| xxyy | Specifies the position on the screen (xx=line,yy=column) where the DISPLAY or ACCEPT field starts. The length of the field is governed by the length and type of data-item, and by the SIZE clause of the ACCEPT or DISPLAY statement. |
The term alphanumeric field is used here to cover all alphanumeric, alphabetic and alphanumeric-edited fields. For the purposes of an ACCEPT statement, an alphanumeric-edited field is treated as an alphanumeric field of the same length. Any insertion symbols such as the forward slash character (/) or zero are ignored and treated as an X. Therefore, a field defined as PIC XX0XX0XX is treated as if it was specified as PIC X(8).
If the field is defined as alphabetic, only the characters "A" to "Z", "a" to "z" and space are allowed into the field.
The cursor is initially placed at the start of the field.
As data is entered into the field, the cursor advances to the next character. The cursor can be moved back over the data in the field using the cursor keys, and editing functions such as backspace and delete are provided.
The form of data entry for numeric and numeric-edited fields can be one of the following:
Use Adiscf to select the style you want. The default form of data entry is Fixed-format. You should experiment with free-format to see which method you prefer, especially when accepting into simple numeric fields.
Fixed-format mode is also known as formatted mode. It can best be described as "What you see is what you get". As each key is pressed, the field is automatically reformatted to conform to the picture string. The enhanced ACCEPT/DISPLAY syntax tries to ensure that the field always looks on the screen as it is stored in the Data Division, and its size is the same as the size of the data item.
Therefore, as with the DISPLAY statement, it is only really sensible to accept fields that are defined as USAGE DISPLAY with no implied sign or decimal point.
During data entry, characters other than numeric digits, the plus sign (+), minus sign (-) and the decimal point (.) are rejected. Insertion characters in edited fields are automatically skipped over as the cursor is moved backward and forward. Any sign indicator is automatically modified if a + or - is pressed, regardless of where the cursor is in the field.
Zeros are allowed as insertion characters only as a leading symbol before a decimal point, or as a trailing symbol following a decimal point. For example, PIC 0.9999 and PIC 999.90 are valid, but PIC 0.0009 and PIC 999.000 are not.
Data entry of simple numeric and numeric-edited fields with no zero suppression is similar to that for alphanumeric fields, except that insert mode is not supported in numeric and numeric-edited fields. If the decimal point character is pressed in a simple numeric field, the digits are right justified. For example, a field defined as PIC 9(5) which initially contains zeros is accepted as follows (emboldened characters indicate cursor position):
| Initial display | 00000 |
| Pressing 1 gives | 10000 |
| Pressing 2 gives | 12000 |
| Pressing 4 gives | 12400 |
| Pressing Backspace gives | 12000 |
| Pressing "." gives | 00012 |
Data entry into zero-suppressed fields is handled differently. The cursor is initially placed on the first character position that is not zero-suppressed. If all the digits before the decimal point are suppressed, the cursor is positioned on the decimal point itself.
While the cursor is to the left of the decimal point; that is, in the integer part of the field, the cursor moves to the right as digits are entered until the decimal point is reached. Any further digits are inserted immediately before the decimal point until all the integer places are filled. The cursor is then automatically moved to the first decimal digit and advances as the decimal digits are entered.
If you wish to enter digits after the decimal point when there are integer places still unfilled, the decimal point (.) must be entered.
For example, assume that a numeric-edited data field is defined as PIC ZZZ99.99 and initially contains zeros, the field is displayed as follows during the ACCEPT:
| Initial display | 00.00 |
| Pressing 1 gives | 10.00 |
| Pressing 2 gives | 12.00 |
| Pressing 3 gives | 123.00 |
| Pressing 4 gives | 1234.00 |
| Pressing Backspace gives | 123.00 |
| Pressing 5 gives | 1235.00 |
| Pressing 6 gives | 12356.00 |
| Pressing 7 gives | 12356.70 |
| Pressing 8 gives | 12356.78 |
If you want to enter 123.45 into the same field, the field appears as follows:
| Initial display | 00.00 |
| Pressing 1 gives | 10.00 |
| Pressing 2 gives | 12.00 |
| Pressing 3 gives | 123.00 |
| Pressing "." gives | 123.00 |
| Pressing 4 gives | 123.40 |
| Pressing 5 gives | 123.45 |
Fixed format mode is only allowed on numeric-edited data items of up to 32 characters in length. If they are longer than 32 characters, they are automatically handled in free-format mode as described below. Fields are also automatically treated as free-format if a SIZE clause is specified in the ACCEPT statement.
Free-format mode can be selected for either numeric fields or numeric-edited fields or both. This can be done using Adiscf.
During data entry into a free-format field, the field is treated as an alphanumeric field of the appropriate length. It is only when the user leaves the field that it is reformatted to comply with the picture string. Any characters other than the digits, the sign character and the decimal point character are discarded.
Fields occupy the same number of characters on the screen as they do bytes in memory, with the exception that an additional character is allocated for implied signs and decimal points. Therefore, a data item defined as PIC S99V99 occupies six characters on the screen in free-format mode as opposed to four characters in Fixed-format mode.
It is advisable to compile the program with the DE-EDIT"1" Compiler directive set, since free-format allows data that does not conform to the screen item's PICTURE clause; with DE-EDIT"2" this is interpreted as zeros when moved to the USING or TO data item.
Data entry is the same as for alphanumeric fields.
If an enhanced ACCEPT statement is being used, the clauses SPACE-FILL, ZERO-FILL, LEFT-JUSTIFY, RIGHT-JUSTIFY and TRAILING-SIGN are applicable only to free-format non-edited fields (and are ignored with fixed format fields).
See your Help for details on Format 5 of the ACCEPT statement.
RM style data entry is selected using the appropriate Accept/Display option in Adiscf. It is provided for emulation of numeric and numeric-edited ACCEPT operations in RM/COBOL V2.0. If this mode is selected, all other Accept/Display option numeric and numeric-edited data entries are ignored. Data entry is the same as for alphanumeric fields. All ACCEPT and DISPLAY statements behave as if the phrase MODE IS BLOCK has been specified.
This style of numeric input is not intended for use with the screen handling syntax in this COBOL system, only with programs originally written for RM/COBOL.
See the section The MODE IS BLOCK Clause for more information.
When a data item is displayed on the screen, it normally occupies the same number of characters on the screen as it does bytes in memory. The only exceptions are DBCS encoding schemes such as EUC which includes characters which differ in storage space and display size.
| Data Description | Size on Screen | Comment |
|---|---|---|
| X(5) | 5 characters | |
| N(5) | 10 characters | Each PIC N character occupies 2 bytes in memory. |
| G(5) | 10 characters | Each PIC G character occupies 2 bytes in memory. |
| 9(5) | 5 characters | |
| 99.99 | 5 characters | |
| Z(4)9 | 5 characters | |
| 99V99 | 4 characters | V is an implied decimal point and so is not displayed on the screen. |
| S9(4) | 4 characters | The sign is implied and so is not displayed on the screen. |
| S9(4) SIGN LEADING | ||
| SEPARATE | 5 characters | |
| 9(4) COMP | 2 characters | COMP fields are stored in binary; a 9(4) COMP field occupies 2 bytes in memory |
As you can see from the above examples, it is only really sensible to
display fields defined as USAGE DISPLAY which do not contain implied signs
or decimal points. When the field is displayed, it is copied byte-for-byte
from the data item onto the screen at the required position.
Note: ANSI DISPLAY operations convert non-USAGE DISPLAY numeric items to USAGE DISPLAY before displaying.
To use ACCEPT and DISPLAY elementary items from and into single fields, use the syntax:
display data-item at xxyy ...
accept data-item at xxyy ...
where:
| data-item | An elementary item defined in the Data Division of your program. |
| xxyy | Specifies the position on the screen (xx=line,yy=column) where the DISPLAY or ACCEPT field starts. The length of the field is governed by the length and type of data-item, and by the SIZE clause of the ACCEPT or DISPLAY statement. |
Control sequences cannot be embedded in the data that is displayed. If you do embed control codes (that is, ASCII codes less than 32) into the data, the character corresponding to that code is displayed. For example, displaying ASCII code 7 results in a diamond character being displayed instead of sounding the bell. (In some environments, such characters are replaced by a space.) All highlighting and cursor control must be done through the syntax provided.
If you use the CRT-UNDER phrase in a DISPLAY statement, the data item is displayed with an attribute to make the display stand out from normal displayed text. Depending on your environment, use of the CRT-UNDER phrase might cause data items to be displayed underlined, highlighted, colorized or in reverse video. This can be changed using Adiscf.
When accepting or displaying group items, each elementary item within the group is treated as a separate field. If an elementary item is defined as FILLER, it is simply used as a positioning item of the appropriate size; that is, you cannot accept into or display FILLER items.
When accepting into a group item, each field is accepted into as described for single-field ACCEPT statements, as in the sections below.
Unless you explicitly position the cursor using the CURSOR IS cluase, the cursor is initially placed at the start of the first field.
When the end of a field is reached, the cursor is normally advanced to the beginning of the next field automatically. This action can be prevented by turning off auto-skip using Adiscf. The cursor keys, and the keys set up for next and previous field operations (usually Tab and Backtab) move the cursor around the fields.
Consider the following group item:
 01 display-item.
     03 display-item-1                  pic x(20).
     03 filler                          pic x(35).
     03 display-item-2                  pic 9(10).
     03 filler                          pic x(105).
     03 display-item-3                  pic z(4)9.
If the following statement is executed on a screen 80 characters wide:
display display-item at 0101
display-item-1 is displayed at row 1, column 1,
display-item-2 is displayed at row 1, column 56,
display-item-3 is displayed at row 3, column 11
All other areas of the screen are unaffected by this DISPLAY statement. FILLER items do not cause any data to be displayed on the screen. Consequently, data already on the screen in the positions defined by each FILLER is not altered in any way by this DISPLAY statement.
If a data item is defined as follows:
 01 data-item.
    03 data-char                       pic x occurs 2000.
and the following statement is executed:
display data-item at 0101
then this is treated as a display of 2000 fields, each defined as PIC X, which is unlikely to be what you require. To avoid this, either redefine data-item as a PIC X(2000) and display that, or use the MODE IS BLOCK clause.
If the MODE IS BLOCK clause is added to an ACCEPT or DISPLAY of a group item, the group item is treated as if it was an elementary item of the total size of the group item.
Note: If a program is compiled with the IBM-MS, MS"1", MS"2" or RM directives set, the Compiler treats all DISPLAY and ACCEPT operations of group items as if MODE IS BLOCK had been specified.
ACCEPT and DISPLAY operations involving Screen Section items are treated like any other ACCEPT or DISPLAY operation, but with one important difference. Consider the following code:
 working-storage section.
 01 item-a              pic 9(5).
 01 item-b              pic 9(10).
 01 item-c              pic x(10).
 ...
 screen section.
 01 demo-screen.
     03 blank screen.
     03 line 1 column 1 pic z(4)9 from item-a.
     03 line 3 column 1 pic 9(10) to item-b.
     03 line 5 column 1 pic x(10) using item-c.
When this code is compiled, the Compiler sets up a work area for each Screen Section level-01 item (record). Therefore, in this example, a work area is set up for demo-screen, large enough to hold the data for the three fields.
When the following statement:
display demo-screen
is executed, the contents of item-a and item-c are moved from Working-Storage Section into the work area, then the data in the work area for these two fields is displayed on the screen. item-b is not displayed because it is an ACCEPT-only field.
When the following statement:
accept demo-screen
is executed, data is accepted into the work area for item-b and item-c and then the data for these two fields is moved from the work area into the Working-Storage Section. Data is not accepted into item-a because it is a DISPLAY-only field.
It is important to note that moves from the Data Division to the work area occur only on execution of a DISPLAY statement, and moves from the work area to the Data Division occur only during execution of an ACCEPT statement. Therefore, if two ACCEPT statements are executed one after another with no intervening DISPLAY statement, the initial contents of the fields at the start of the second ACCEPT are those which were put into the work area during the previous ACCEPT operation not the current contents of the Data Division items.
Another implication of this is that a field should not be defined as numeric-edited in both the Data Division and the Screen Section. This results in the compiler making numeric-edited to numeric-edited moves in order to move the Data Division item into the work area and back again. The action of such moves is undefined and has unpredictable results. This is the case even if both the Data Division item and the Screen Section item have the same picture.
Hence, if the following lines are coded in your program:
working-storage section.
 01 ws-item     pic zz9.99 value 1.23
 screen section.
 01 demo-screen.
     03 pic zz9.99 using ws-item.
 procedure division.
     display demo-screen.
the result of the DISPLAY operation is undefined. The items used in the Data Division as source or target for Screen Section ACCEPT or DISPLAY statements should always be non-edited fields.
The CURSOR IS clause specifies where in a field the cursor is positioned at the start of the ACCEPT operation, and returns where the cursor is left at the end of an ACCEPT operation. If you do not specify a CURSOR IS clause in your program, the cursor is positioned at the start of the first field for every ACCEPT operation.
The CURSOR IS clause is defined in the Special-Names paragraph, as follows:
 special-names.
     cursor is cursor-position.
where cursor-position is a field defined in the Working-Storage Section of your program as follows:
 01 cursor-position.
     03 cursor-row       pic 99.
     03 cursor-column    pic 99.
or:
 01 cursor-position.
     03 cursor-row       pic 999.
     03 cursor-column    pic 999.
where the parameters are:
| cursor-row | The row the cursor is positioned on. Valid values are between 1 and the number of lines on the screen. |
| cursor-column | The column the cursor is positioned on. Valid values are between 1 and the number of columns on the screen. |
Whenever an ACCEPT statement is executed, the enhanced ACCEPT/DISPLAY syntax attempts to initially position the cursor at the position specified in cursor-position. If the position specified is invalid (that is, either cursor-row or cursor-column does not contain a valid value), the cursor is positioned at the start of the first field on the screen.
If the value in cursor-position is valid, the enhanced ACCEPT/DISPLAY syntax searches through all of the fields to see if the requested cursor position lies within one of them. If it does, the cursor is positioned at the required point. If it does not, then the cursor is positioned at the start of the first field. Therefore, if you want the cursor to be positioned at the start of the first field, set both cursor-row and cursor-column to 1.
Where the defined position is on a suppressed character or insertion symbol in a numeric edited field, the cursor moves to the first available character to the right. If there is no further data item, the cursor returns to the first data item on the screen.
When the ACCEPT is terminated, if the value in cursor-position at the start of the ACCEPT was valid, the position of the cursor when the terminating key is pressed is returned in cursor-position. This might not be the same position as the current cursor position, since the enhanced ACCEPT/DISPLAY syntax usually moves the cursor to the end of the field upon termination of an ACCEPT operation to allow relative positioned ACCEPT statements to start at the correct point on the screen.
If the value in cursor-position at the start of the ACCEPT operation was invalid, then, when the ACCEPT operation is terminated, the contents of cursor-position are unchanged.
One example of the use of this facility is that in menu-type operations, the operator need only move the cursor to a position on the screen corresponding to the selection required. The operator's choice can be determined by the returned value of cursor-position.
Screens larger than 25 lines are detected automatically by your COBOL system.
Programs using ANSI ACCEPT/DISPLAY statements, enhanced ACCEPT/DISPLAY syntax, Screen Section and the COBOL system library routines should run correctly on large screens. If an application is developed for a screen larger than the screen it is run on, the extra lines of a multiple-field ACCEPT or DISPLAY are lost. In addition, if the position specified by the AT clause of an ACCEPT or DISPLAY statement is off the screen, the screen is scrolled up by one line.
The CONTROL clause enables attributes associated with a Screen Section item to be defined at run time. You specify this clause within the WITH phrase of Format 2 of the screen handling ACCEPT and DISPLAY statements, and within Adis ACCEPT and DISPLAY statements.
The following subjects are described in this section:
There are several types of Adis keys: function keys, data keys, shift keys, and lock keys.
| Adis Keys | ||||
|---|---|---|---|---|
| Function Keys | Data Keys | Shift Keys | Lock Keys | |
| Adis Function Keys | User Function Keys | |||
| cursor keys | F1…F12 | ASCII codes 32-255 | Alt | Caps Lock |
| Tab | Esc | Ctrl | Insert | |
| Backspace | Shift | Num Lock | ||
| Enter | Scroll Lock | |||
| Del | ||||
The most general definition of a function key is any key you do not find on a typewriter keyboard. This definition includes explicit function keys on the keyboard (usually labeled F1, F2 ... F12) and such keys as Esc, the cursor keys, Tab, and Backspace. Enter is also treated as a function key, but with special considerations.
These function keys are divided into two groups:
Normally, these keys operate as defined during an ACCEPT operation. For example, the left key moves the cursor to the left, Backspace erases the previous character, and so on. With the exception of the Enter key, they do not normally terminate the ACCEPT operation. However, you can make these keys terminate the ACCEPT operation if required.
Data keys are those keys that generate characters that are in the extended ASCII character set; that is, those with ASCII codes in the range 32 to 255. During an ACCEPT operation, pressing one of these keys simply places the character into the field. However, it is possible to disable a key completely or make it terminate the ACCEPT operation (similar to the action of a function key).
ASCII codes in the range 0 to 31 can be considered as either data keys or control keys. For most purposes, they are treated as control keys and are disabled as data keys.
A shift key is a key whose depression and release are regarded as separate events. Examples of shift keys in the enhanced ACCEPT/DISPLAY syntax are Alt, Ctrl and Shift. See the section Shift Key Handling later in this chapter for more information on shift keys.
A lock key is a key whose state is toggled when it is pressed. Examples of lock keys are Caps Lock, Insert, Num Lock and Scroll Lock. See the section Lock Key Handling later in this chapter for more information on lock keys.
This section describes how to use function keys in this COBOL system. It describes the portable method that works on all environments. There is another method, using the x"B0" routine, which is not described here as it is machine dependent. If you are using this routine, see the section Conflict with the x"B0" COBOL System Library Routine for details of how this could cause problems with certain configurations.
If you decide that you want your application to use function keys, it is highly likely that you will want to be able to determine exactly which key has been pressed. To do this you need to include the CRT STATUS clause in the Special-Names paragraph of your program as shown below.
 special-names.
     crt status is key-status.
where the parameter is:
key-status |
A three-byte data item in the Working-Storage Section
of your program with the following definition:
01 key-status.
    03 key-type     pic x.
    03 key-code-1   pic 9(2) comp-x.
03 key-code-2 pic 9(2) comp-x. |
Whenever an ACCEPT statement is executed, key-status
is set to indicate how the ACCEPT was terminated. The exact usage of the
individual fields in key-status is described later.
However, in general they have the following uses:
See your Language Reference for more information on the CRT STATUS clause.
Normal termination of an ACCEPT operation returns a value of 0 in key-type, and in key-code-1 it returns a value of:
| 48 | (the ASCII code for 0), when the ACCEPT operation is terminated by pressing Enter. |
| 1 | when an auto-skip in the last field on the screen terminates the ACCEPT operation. |
     accept data-item at 0101
     if key-type = "0"
	    if key-code-1 = 48
	      display "Terminated by return key"
	    else
	      display "Terminated by auto-skip last field"
	    end-if
     end-if.
There are up to 128 user function keys. The defaults supplied with your COBOL system differ on different operating environments, but some keys are standard.
| Keystroke | User Function Key Number |
|---|---|
| Escape | 0 |
| F1 | 1 |
| F2 | 2 |
| F3 | 3 |
| F4 | 4 |
| F5 | 5 |
| F6 | 6 |
| F7 | 7 |
| F8 | 8 |
| F9 | 9 |
| F10 | 10 |
Your keyboard might not have these keys, but if they are there, they should be configured as above. Additionally, the following user function keys might be defined:
| Keystroke | User Function Key Number |
|---|---|
| Shift+F1 - Shift+F10 | 11 - 20 |
| Ctrl+F1 - Ctrl+F10 | 21 - 30 |
| Alt+F1 - Alt+F10 | 31 - 40 |
| Alt+1 - Alt+9 | 41 - 49 |
| Alt+0 | 50 |
| Alt+- | 51 |
| Alt+= | 52 |
| PgUp | 53 |
| PgDn | 54 |
| Ctrl+PgUp | 55 |
| Ctrl+PgDn | 56 |
| Alt+A - Alt+Z | 65 - 90 |
| F11 | 91 |
| F12 | 92 |
| Shift+F11 | 93 |
| Shift+F12 | 94 |
| Ctrl+F11 | 95 |
| Ctrl+F12 | 96 |
| Alt+F11 | 97 |
| Alt+F12 | 98 |
By default, the Adis function keys are enabled, although you can disable them or make them act as function keys instead.
However, before you can use the user function keys, they must be enabled. If a user key is enabled, it terminates the ACCEPT operation when it is pressed. If the key is disabled, the key is rejected and the bell rung.
See the sections Enabling and Disabling Adis Keys and Enabling and Disabling User Function Keys later in this chapter.
Use the following call to selectively enable and disable the user function keys:
 call x"AF" using   set-bit-pairs
		    user-key-control
where set-bit-pairs and user-key-control are defined in the Working-Storage Section of your program as follows:
01 set-bit-pairs          pic 9(2) comp-x value 1.
01 user-key-control.
   03 user-key-setting    pic 9(2) comp-x.
   03 filler              pic x value "1".
   03 first-user-key      pic 9(2) comp-x.
   03 number-of-keys      pic 9(2) comp-x.
and where:
| user-key-setting | is set to 0 to disable keys or 1 to enable keys. |
| first-user-key | is the number of the first key to be enabled or disabled. |
| number-of-keys | is the number of consecutive keys to enable or disable. |
Function keys are enabled or disabled until explicitly changed by another call to x"AF", or until the application terminates. Calls to enable or disable function keys are cumulative. For example, if you call x"AF" to enable function key F1, then make a second call to enable F10, both keys are enabled.
The following code enables the Escape key and function keys F1 and F10, but disables all other user function keys:
* Enable Escape key
     move 1 to user-key-setting
     move 0 to first-user-key
     move 1 to number-of-keys
     call x"AF" using set-bit-pairs
		      user-key-control
* Disable 126 keys starting from key 1
     move 0 to user-key-setting
     move 1 to first-user-key
     move 126 to number-of-keys
     call x"AF" using set-bit-pairs
		      user-key-control.
* Enable F1 and F10.
     move 1 to user-key-setting
* Enable F1.
     move 1 to first-user-key
     move 1 to number-of-keys
     call x"AF" using set-bit-pairs
		      user-key-control
* Enable F10
     move 10 to first-user-key
     call x"AF" using set-bit-pairs
		      user-key-control
Press a user function key during an ACCEPT operation. If it is enabled, the ACCEPT operation is terminated and the fields in key-status are set as follows:
| Data Item
|
Setting |
|---|---|
| key-type | "1" |
| key-code-1 | Set to the number of the user key that was pressed. |
| key-code-2 | Undefined. |
Most of the time, you need use only the one list of user function keys. However, if you are converting from another dialect of COBOL, you might have some programs that expect the values returned from the default user key list and some programs that expect the values returned by the function keys in some other dialect of COBOL. To enable you to do this, the compatibility key list is provided. This works in exactly the same way as the normal key list. Any program can use either the default user key list or the compatibility list, but not both.
See the section Using the Compatibility Key List for Adis Keys later in this chapter for details on how to convert keys.
If you want all programs in your system to use the compatibility key list, you can use Adiscf to select its use. If you want different programs to use different lists, insert the following call into your programs to select the list you require:
call x"AF" using   set-bit-pairs
		   key-list-selection
where set-bit-pairs and key-list-selection are defined in the Working-Storage Section of your program as follows:
01 set-bit-pairs      pic 9(2) comp-x value 1.
01 key-list-selection.
   03 key-list-number pic 9(2) comp-x.
   03 filler          pic x value "1".
   03 filler          pic 9(2) comp-x value 87.
   03 filler          pic 9(2) comp-x value 1.
where key-list-number is set to one of the following values:
| 1 | To select the default user function key list. |
| 2 | To select the compatibility key list. |
Normally, if a validation clause, such as FULL or REQUIRED, is specified in an ACCEPT statement, that clause must be satisfied before you can leave the field. For example, when the statement:
accept data-item with required
is executed, you are not allowed to terminate the ACCEPT operation unless something has been entered into the field.
However, if an enabled user function key is pressed during an ACCEPT operation, it is regarded as an exception and terminates the ACCEPT operation even if the validation clause has not been satisfied. If you do not want function keys to terminate the ACCEPT operation without satisfying validation clauses, you can set ACCEPT/DISPLAY option 9 using Adiscf. See the section ACCEPT/DISPLAY Options in chapter Adis Configuration Utility (Adiscf) for more information.
You must appreciate the distinction between the keys that perform the functions, and the functions themselves; there is actually a soft mapping between the keys and the functions they perform. This means that you can change the function that any of the enhanced ACCEPT/DISPLAY syntax keys perform.
There are 28 enhanced ACCEPT/DISPLAY syntax keys (numbered 0 through 27). Each key is mapped onto a function, so that when a key is pressed, it performs the function it has been mapped to. The functions are described in the section Standard Adis Key Functions.
You must also be aware that the enhanced ACCEPT/DISPLAY syntax keys themselves are given names. However, this name is used to distinguish the different keys; it might not necessarily describe the function the key actually performs. The following list gives the names of the keys and the keystrokes required to obtain them. You might have a different configuration for your environment; refer to your Release Notes for details.
| Key No. | Function | Default Key/Keystroke |
|---|---|---|
| 0 | Terminate ACCEPT | None |
| 1 | Terminate program | Ctrl+K |
| 2 | Carriage return | Enter |
| 3 | Cursor left | Cursor Left () |
| 4 | Cursor right | Cursor Right () |
| 5 | Cursor up | Cursor Up () |
| 6 | Cursor down | Cursor Down () |
| 7 | Home | Home |
| 8 | Tab | Tab |
| 9 | Backtab | Backtab |
| 10 | End | End |
| 11 | Next field | None |
| 12 | Previous field | None |
| 13 | Change case | Ctrl+F |
| 14 | Erase character | Backspace |
| 15 | Retype character | Ctrl+Y |
| 16 | Insert character | Ctrl+O |
| 17 | Delete character | Del |
| 18 | Restore character | Ctrl+R |
| 19 | Clear to end of field | Ctrl+Z |
| 20 | Clear field | Ctrl+X |
| 21 | Clear to end of screen | Ctrl+End |
| 22 | Clear screen | Ctrl+Home |
| 23 | Set Insert mode | Insert |
| 24 | Set Replace mode | None |
| 25 | Reset field | Ctrl+A |
| 26 | Start of field | None |
| 27 | Move to mouse position | None |
Note: The carriage return (CR) key is referred to here as the Enter key. On some keyboards, there is a CR key and an Enter key. In this case, the enhanced ACCEPT/DISPLAY syntax carriage return key should be set up as CR and the enhanced ACCEPT/DISPLAY syntax key "Terminate Accept" should be set up as Enter.
Below is a full list of the functions performed by the Adis keys. Functions 0 through 27 are simple functions. Functions 55 to 62 are complex functions which can perform different actions depending on some state. For example, those functions provided for RM compatibility have a different action depending on whether or not the UPDATE clause is specified in the ACCEPT statement.
| 0 - Terminate Accept | This function terminates an ACCEPT operation. The first byte of any CRT STATUS field (defined as pic 9 display) is set to the character "0" (ASCII 48) and the second byte (defined as PIC 9(2) COMP-X) is set to 0. | ||||||
| 1 - Terminate Program | If enabled, this function causes the Abort confirmation message to be output to the screen and a character requested from the user. If the user responds with anything other than "Y" or "y", the message is blanked and normal processing of the ACCEPT operation continues. If the user presses "Y", or "y" or no message is configured, the program is terminated as if a STOP RUN had been executed. | ||||||
| 2 - Carriage Return | The cursor is moved to the first character position that occurs within a field at or after column one on the next or subsequent line of the screen. If there is no such field, no action takes place. | ||||||
| 3 - Cursor Left | Moves the cursor to the previous character in the field. If the current character is the first character of the field, the cursor is moved to the last character of the preceding field. If the current character is the first character of the first field on the screen, an error is signalled to the user. | ||||||
| 4 - Cursor Right | Moves the cursor to the next character in the field. If the current character is the last character of the field, the cursor is moved to the first character of the next field. If the current character is the last character of the last field on the screen, an error is signalled to the user. | ||||||
| 5 - Cursor Up | The cursor is moved to the next unprotected character position; that is, a position that occurs in a field in direct line above the current position. | ||||||
| 6 - Cursor Down |
Moves the cursor to the next unprotected character position in direct line below the current position. For cursor up and cursor down (functions 5 and 6), cursor movement functions follow the same rules as items defined using the CURSOR IS clause if a position is found that is within a field but is protected by virtue of containing an insertion character or a suppressed numeric digit. In such situations the cursor is moved right to the first unprotected character position within that field. If all such positions are protected, the cursor is moved to the last unprotected character position within the field. |
||||||
| 7 - Move to the Start of the Screen | Moves the cursor to the first unprotected character position of the current screen. | ||||||
| 8 - Move to Next Tab Position | Moves the cursor to the next column Tab stop position. The cursor is never moved forward further than the first available character position after the end of the current field (or line in multi-line fields). | ||||||
| 9 - Move to Previous Tab Position | Moves the cursor to the previous column Tab stop position. The cursor is never moved back further than the last available character position before the start of the current field (or line in multi-line fields). | ||||||
| 10 - End | Moves the cursor to unprotected character positions in the order:
|
||||||
| 11 - Move to Next Field | Moves the cursor to the first unprotected character position of the next field on the screen. If already in the last field and auto-skip out of an ACCEPT is not enabled for this key, the cursor is positioned to the last character of the field and the request is considered to have been unsuccessful. | ||||||
| 12 - Move to Previous Field | Moves the cursor to the first unprotected character position in the current field. If the cursor is already at the first position, it moves to the first character position of the previous field. If the cursor is already at the first character of the first field, the request is considered unsuccessful. | ||||||
| 13 - Change Case of Current Character | Retrieves the character at the current cursor position, changes its case if alphabetic and processes it as if it were just keyed. The function is not permitted in numeric or Kanji fields. Changing case on a non-alphabetic character is treated as equivalent to simply typing the character again. The function cannot be used to override the fold to upper-case mechanism which simply re-inverts the case if an attempt is made to fold a character to lower-case. | ||||||
| 14 - Backspace Character | Moves the cursor to the unprotected character position logically
preceding the current one, pushes the character there into the retype
buffer and replaces it with one popped from the restore buffer. When in
insert mode, removal is achieved by moving the remaining characters in
the field along one position and popping a character from the overflow
buffer to occupy the gap at the end.
In either case, if the relevant buffer is empty or the next character is not valid for the field, a space or zero (according to type of field) is used. Action is slightly different when to the left of the decimal point in numeric fields, but the logical effect is the same - that of reversing the effect of typing a character. One unusual effect emanating from the logical requirements is that where the cursor was unable to move out of a field when a character was keyed into the last position, the cursor is not moved prior to character replacement. |
||||||
| 15 - Retype Character | Pops a character from the restore buffer and proceeds as if it had been received from the keyboard. An error is signalled if the buffer is empty or the character is illegal in the current field. | ||||||
| 16 - Insert Single Character | Places a space or zero character (according to the field type) under the current cursor position, making room for it by shuffling characters along the field. Except when to the left of the decimal point in numeric fields, significant characters can be pushed off the end (the character that is lost is pushed into the overflow buffer and an error is signalled to the user). When to the left of the decimal point in a numeric field, an attempted insertion is unsuccessful if a significant digit would otherwise be lost or if the cursor is on the leftmost digit position (since the functionality of numeric insertion operations in these circumstances implies a requirement to insert before the current digit). | ||||||
| 17 - Delete Character | Pushes the character currently under the cursor into the restore
buffer, moving the remaining characters in the field left by one
position and pops a character from the overflow buffer to occupy the gap
at the end. If the overflow buffer is empty, a space or zero (according
to type of field) is used. Action is slightly different when to the left of the decimal point in numeric fields, but the logical effect is normally the same - that of reversing the effect of inserting or restoring a character. If the field is numeric, the character is discarded and not pushed into the restore buffer. |
||||||
| 18 - Restore Character | The effect and restrictions of this function are identical to insert character (function 16 above) except that the character to be inserted is popped from the restore buffer. An error is signalled if the buffer is empty or if the character popped is not valid in the current field. This function is not available in numeric fields. | ||||||
| 19 - Clear to End of Field | Characters at, and to the right of, the current cursor position in the current field are pushed into the restore buffer and replaced by spaces or zeros (according to the type of field). Operation is from left to right and includes trailing nonsignificant spaces and zeros. The cursor does not move. Multi-line alphanumeric fields are treated as being split at line boundaries for the purposes of this operation. | ||||||
| 20 - Clear Field | The entire contents of the current field (or the current line in the case of a multi-line alphanumeric field) are pushed into the restore buffer as for clear to end of field on the first character position. The field then has spaces (alphanumerics) or zeros (numerics) moved to it and the cursor is placed on its initial position as defined for the type and format of the field. | ||||||
| 21 - Clear to End of Screen | The action defined for clear to end of field is performed on the current field (or line), and the following fields have spaces or zeros moved to them, as appropriate. | ||||||
| 22 - Clear Screen | All fields on the screen have spaces or zeros (as appropriate) moved to them and the cursor is moved to its home position (the first unprotected character of the first field). The restore and retype buffers are cleared by this function. | ||||||
| 23 - Set Insert Mode | Sets the current editing mode to insert and displays or clears any relevant configured indicators. Any Off end of field indicator is cleared by this function. | ||||||
| 24 - Set Replace Mode |
Sets the current editing mode to replace, and displays or clears any relevant configured indicators. Any Off end of field indicator is cleared by this function. The concept of insert mode and replace mode apply only in alphanumeric fields. The mode flag is therefore suppressed while in numeric fields and reinstated on moving to another alphanumeric field. Replace mode is sometimes known as overtype mode. |
||||||
| 25 - Undo | Reinstates the current field (or line) to its state when the cursor last moved into it. Operations involving hidden MOVE operations out of the current field (clear screen, clear to end of screen) can cause edits to cease to be undoable as well as the more obvious operations such as field-tab and auto-skip out. | ||||||
| 26 - Home | Moves the cursor to unprotected character positions in the order:
|
| 55 - RM Clear Field | This function is provided for RM compatibility. During an ACCEPT operation, if the UPDATE clause is specified, a Cursor Home (function 7) is performed, otherwise Clear Field (function 20) is performed. |
| 56 - RM Backspace | This function is provided for RM compatibility. During an ACCEPT operation, if the UPDATE clause is specified, a Cursor Left (function 3) is performed, otherwise Backspace Character (function 24) is performed. |
| 57 - RM Tab | This function is provided for RM compatibility. During an ACCEPT operation, if the UPDATE clause is specified, a Terminate Accept (function 0) is performed, otherwise there is no action. |
| 58 - Insert Toggle | If the current mode is insert mode, Set Replace Mode (function 24) is performed, otherwise Set Insert Mode (function 23) is performed. |
| 59 - Replace Toggle | If the current mode is replace mode, Set Insert Mode (function 23) is performed, otherwise Set Replace Mode (function 24) is performed. |
| 60 - Forward Tab | If in a multi-field ACCEPT, Move to next field (function 11) is performed, otherwise Move to next tab stop (function 8) is performed. |
| 61 - Backward Tab | If in a multi-field ACCEPT, Move to previous field (function 12) is performed, otherwise Move to previous Tab stop (function 9) is performed. |
| 62 - Restore | If the current field is numeric or the restore buffer is empty, Insert Single Character (function 16) is performed, otherwise Restore Character (function 18) is performed. |
| 255 - Undefined Mapping | This value is used if no key has been set up for a particular function. |
In general, the enhanced ACCEPT/DISPLAY syntax keys are mapped onto the function of the same name. Therefore, the <cursor left> key moves the cursor to the left, the Backspace key erases a character and so on. However, there are some keys that are mapped onto different functions by default.
| Key |
Function |
|---|---|
| Carriage return | Terminate ACCEPT operation, function 0 |
| Tab | Move to next field, function 11 |
| Backtab | Move to previous field, function 12 |
| Set Insert mode | Insert Toggle, function 58 |
Therefore, when you press Enter on your keyboard, it terminates an ACCEPT operation, because Enter is mapped onto carriage return, and carriage return causes an ACCEPT operation to be terminated.
Note:
Note that because functions are mapped, you need to reference keys 11 and 12 in order to enable/disable Adis keys 8 and 9 respectively using the x"AF" call-by-number routine.
At this stage, the idea of mapping keys may seem an unnecessary complication. Where it becomes really useful is in the emulation of other dialects of COBOL. For example, in Microsoft COBOL V2.2, the Enter key moves to the next field rather than terminating an ACCEPT operation. This is easy to emulate by simply changing the mapping for key 2 (carriage return) from 0 (terminate ACCEPT) to 11 (move to next field). If you look at the function mappings screen in Adiscf for the Microsoft COBOL V2.2 compatibility configuration, you can see that this has been done.
The RM/COBOL V2.0 compatibility configuration contains even more changes to the default mappings to emulate the action of keys in RM/COBOL.
If a key is mapped on to a value of 255, that key does not perform any function during an ACCEPT operation.
All of the standard functions in the enhanced ACCEPT/DISPLAY syntax key mappings always perform the same function, regardless of context. For example, the Move to next field function always attempts to move to the next field. However, there are some functions that behave differently depending on the context. These functions are described in the section Special Mapping Functions in Adis earlier in this chapter.
For example, the Set Insert mode key (key number 23) is normally mapped to function 58 (Insert toggle). This means that pressing the Insert key toggles between Insert and Replace mode.
Use the following call:
call x"AF" using       set-map-byte
                     adis-key-mapping
where set-map-byte and adis-key-mapping are defined in the Working-Storage Section of your program as follows:
01 set-map-byte       pic 9(2) comp-x value 3.
01 adis-key-mapping.
   03 adis-map-byte   pic 9(2) comp-x.
   03 adis-key-number pic 9(2) comp-x.
and where:
| adis-map-byte | is set to the number of the function you wish the key to be mapped to. |
| adis-key-number | is set to the number of the key you wish to change. |
The following code changes the action of the Backspace key (key number 14) to simply move the cursor to the left (function 3), and changes the Tab key (key number 8) to perform the Tab function (function 8):
* Change mapping of Backspace key
     move 14 to adis-key-number
     move 3 to adis-mapping-byte
     call x"AF" using set-map-byte
		      adis-key-mapping
* Change mapping of the tab key
     move 8 to adis-key-number
     move 8 to adis-mapping-byte
     call x"AF" using set-map-byte
		      adis-key-mapping
The x"B0" COBOL system library routine is an alternative method of defining function keys. It is not supported under UNIX and some other environments. However, we recommend that you use the method of detecting function keys defined in this section rather than the x"B0" routine.
In general, you can use the x"B0" routine to define function keys which terminate an ACCEPT operation. However, there is one limitation. If you use x"B0", the carriage return key must be mapped on to the terminate ACCEPT function. This is the default for this product. If you change the mapping of carriage return or use a configuration that changes the mapping (such as Microsoft COBOL V2.2 or IBM COBOL 1.0 compatibility), then any key set up by the x"B0" call does not terminate the ACCEPT operation. Instead, it performs the function that carriage return has been mapped onto.
Use the following call:
 call x"AF" using  set-bit-pairs
		    adis-key-control
where set-bit-pairs and adis-key-control are defined in the Working-Storage Section of your program as follows:
01 set-bit-pairs          pic 9(2) comp-x value 1.
01 adis-key-control.
   03 adis-key-setting    pic 9(2) comp-x.
   03 filler              pic x value "2".
   03 first-adis-key      pic 9(2) comp-x.
   03 number-of-adis-keys pic 9(2) comp-x.
and where:
| adis-key-setting | defines the action of the keys affected, as follows:
|
||||||||
| first-adis-key | is the number of the first key to be affected. | ||||||||
| number-of-adis-keys | is the number of consecutive keys to be affected. |
If you have set up an Adis key to act as a function key, it terminates the ACCEPT operation, and key-status is returned with the following values:
| Data Item |
Setting |
|---|---|
| key-type | "2" |
| key-code-1 | Set to the number of the pressed enhanced ACCEPT/DISPLAY syntax key. This is the number of the key not the number of the function the key has been mapped to. |
| key-code-2 | Undefined. |
The following code sets up Tab and Backtab to act as function keys and the Ü and Þ keys to act as function keys if they cause the cursor to leave the field.
* Set up Tab (key 8) and Backtab (Key 9) to act as function keys
     move 1 to adis-key-setting
     move 8 to first-adis-key
     move 2 to number-of-adis-keys
     call x"AF" using set-bit-pairs
		      adis-key-control
* Set up cursor-left (key 3) and cursor-right (key 4) to act as
* function keys ONLY if they cause the cursor to leave the field.
     move 3 to adis-key-setting
     move 3 to first-adis-key
     move 2 to number-of-adis-keys
     call x"AF" using set-bit-pairs
		      adis-key-control
     accept data-item at 0101
     if key-type = "2"
       evaluate key-code-1
       when 3
       display "cursor-left caused the cursor to
-             "leave the field"
	      when 4
	      display "cursor right caused the cursor to
-             "leave the field"
	      when 8
	      display "the tab key was pressed"
	      when 9
	      display "the back tab key was pressed"
       end-evaluate
     end-if.
In general, a particular key is defined in either the User key list or the enhanced ACCEPT/DISPLAY syntax key list, but not both. However, there is no reason why you should not define the same key in both lists.
If a key that is defined in both lists is pressed during an ACCEPT operation, the sequence of actions is as follows:
The data keys are the 256 keys in the extended ASCII character set. Normally, when you press one of these keys during an ACCEPT operation, the character is simply put straight into the field. The exception to this is the keys with ASCII codes in the range 0 to 31, that is, the control keys. These are generally disabled.
Like most other keys on the keyboard, it is possible to disable data keys or make them act like function keys, that is, terminate the ACCEPT operation. To do this, use the following call:
call x"AF" using    set-bit-pairs
		    data-key-control
where set-bit-pairs and data-key-control
are defined in the Working-Storage Section of your program as follows:
 01 set-bit-pairs               pic 9(2) comp-x value 1.
 01 data-key-control.
    03 data-key-setting         pic 9(2) comp-x.
    03 filler                   pic x value "3".
    03 first-data-key           pic x.
    03 number-of-data-keys      pic 9(2) comp-x.
The fields in data-key-control should be set up as
follows:
data-key-setting
|
Defines the action of the keys affected,
as follows:
|
||||||
first-data-key |
The first character to be affected. | ||||||
number-of-data-keys |
The number of characters to be affected. |
If a data key has been set up to act as a function key, it terminates the ACCEPT operation when pressed, and key-status is set up as follows:
| Data Item |
Setting |
|---|---|
| key-type | "3" |
| key-code-1 | Set to the ASCII code of the key that was pressed. |
| key-code-2 | Undefined. |
* Set up the characters "A" through "Z" to terminate the
* ACCEPT operation
     move 1 to data-key-setting
     move "A" to first-data-key
     move 26 to number-of-data-keys
     call x"AF" using set-bit-pairs
		      data-key-control
     accept data-item at 0101
     if key-type = "3"
	    evaluate key-code-1
	    when 65
	    display "A pressed"
	    when 66
	    display "B pressed"
	    when 90
	    display "Z pressed"
	end-evaluate
     end-if.
Adis provides a number of routines to enable an applicaton to make use of the shift key capabilities of a keyboard. These routines are described in the following sections.
UNIX:
Most UNIX terminals cannot detect when the Alt or Ctrl
keys are pressed unless they are pressed in conjunction with another valid
key. You should, therefore, avoid using these keys by themselves in
portable applications. Alternatively, the key sequences /a and /c can be
used to simulate the use of Alt and Ctrl keys
.
This routine enables you to find out which of the shift keys are detectable as unique events.
Use the following call to determine which shift keys are available to your program:
call x"AF" using    adis-function
		    adis-parameter
where adis-function and adis-parameter
are defined in the Working-Storage Section of your program as follows:
 01 adis-function        pic 9(2) comp-x.
 01 adis-parameter       pic 9(4) comp-x.
where:
A value of 1 for any particular bit indicates that the associated key is uniquely detectable.
This routine enables you to determine which, if any, of the shift keys are currently pressed.
Use the following call to determine which of the shift keys are currently pressed:
call x"AF" using    adis-function
		    adis-parameter
where adis-function and adis-parameter
are defined in the Working-Storage Section of your program as follows:
 01 adis-function       pic 9(2) comp-x.
 01 adis-parameter      pic 9(4) comp-x.
where:
adis-function |
Must be 46. | ||||||||||||
adis-parameter |
Returns which of the shift keys are currently pressed.
The 16 bits in adis-parameter refer to shift keys
as follows, with bit 0 the least significant:
|
A value of 1 for any particular bit indicates that the associated key is currently pressed.
By default, all of the shift keys are disabled during an ACCEPT operation, or the x"AF" call used to obtain a key. However, this routine enables you to enable or disable the shift keys dynamically.
Use the following call to enable or disable shift keys:
call x"AF" using    adis-function
		    adis-parameter
where adis-function and adis-parameter
are defined in the Working-Storage Section of your program as follows:
  01 adis-function              pic 9(2) comp-x.
  01 adis-parameter.
     03 shift-key-setting       pic 9(2) comp-x.
     03 filler                  pic x value "4".
     03 first-shift-key         pic 9(2) comp-x.
     03 number-of-shift-keys    pic 9(2) comp-x.
where:
adis-function |
Must be 1. | ||||
shift-key-setting |
Defines the action of the keys affected, as follows:
|
||||
first-shift-key |
The number of the first key to be affected. The events
to enable are numbered as follows:
0 - Alt pressed |
||||
number-of-shift-keys |
The number of consecutive keys to be affected. |
The following code enables Ctrl so that it can terminate an ACCEPT operation, then checks to see whether an ACCEPT operation was terminated by Ctrl:
* Enable Ctrl
      move 1 to shift-key-setting
      move 2 to first-shift-key
      move 1 to number-of-shift-keys
      move 1 to adis-function
      call x"AF" using adis-function
		 adis-parameter
      accept data-item at 0101
      if key-type = "5"
	  evaluate key-code-1
	      when 2
		  display "Ctrl pressed"
	      when other
		  display "Other shift key pressed"
	  end-evaluate
      end-if.
Adis provides a number of routines to enable an applicaton to make use of the lock key capabilities of a keyboard. These routines are described in the following sections.
This routine enables you to find out which of the lock keys are detectable as unique events.
Use the following call to determine which lock keys are available to your program:
call x"AF" using    adis-function
		    adis-parameter
where adis-function and adis-parameter
are defined in the Working-Storage Section of your program as follows:
 01 adis-function       pic 9(2) comp-x.
 01 adis-parameter      pic 9(4) comp-x.
where:
adis-function |
Must be 45. | ||||||||||||
adis-parameter |
Returns which lock keys are available to your program.
The 16 bits in adis-parameter refer to lock keys
as follows, with bit 0 the least significant:
|
A value of 1 for any particular bit indicates that the associated key is uniquely detectable.
This routine enables you to determine which, if any, of the lock keys are currently active. For example, the Scroll Lock key is active when scroll lock is on.
Use the following call to determine which of the lock keys are currently active:
call x"AF" using    adis-function
		    adis-parameter
where adis-function and adis-parameter
are defined in the Working-Storage Section of your program as follows:
 01 adis-function        pic 9(2) comp-x.
 01 adis-parameter       pic 9(4) comp-x.
where:
adis-function |
Must be 47 | ||||||||||||
adis-parameter |
Returns which of the lock keys are currently active.
The 16 bits in adis-parameter refer to lock keys
as follows, with bit 0 the least significant:
|
A value of 1 for any particular bit indicates that the associated key is currently active.
By default, all of the lock keys are disabled during an ACCEPT operation, or the x"AF" call used to obtain a key. However, this routine enables you to enable or disable the lock keys dynamically.
Use the following call to enable or disable lock keys:
call x"AF" using    adis-function
		    adis-parameter
where adis-function and adis-parameter
are defined in the Working-Storage Section of your program as follows:
 01 adis-function             pic 9(2) comp-x.
 01 adis-parameter.
    03 lock-key-setting       pic 9(2) comp-x.
    03 filler                 pic x value "5".
    03 first-lock-key         pic 9(2) comp-x.
    03 number-of-lock-keys    pic 9(2) comp-x.
where:
adis-function |
Must be 1. | ||||||||
lock-key-setting |
Defines the action of the keys affected, as follows:
|
||||||||
first-lock-key |
The number of the first key to be affected. The keys
to enable are numbered as follows:
|
||||||||
number-of-lock-keys |
The number of consecutive keys to be affected. |
Use the following call:
   call x"af" using adis-function
		    adis-parameter
where:
   01  adis-function        pic x comp-x value 1.
   01  adis-parameter
      03  bitpair-setting  pic x comp-x value 1.
      03  bitpair-section  pic x value "2".
      03  bitpair-index    pic x comp-x value 85.
      03  bitpair-count    pic x comp-x value 1.
To restore adis, so that characters are accepted in the case in which they are typed, use a bitpair-setting of zero.
Copyright © 1998 Micro Focus Limited. All rights reserved.
This document and the proprietary marks and names
used herein are protected by international law.
| Introduction | Configuring Adis Using Adiscf | |