

| Panel Groups | Running the Screenset | |
The fourth step in developing your Dialog System application is to define dialog. Dialog is the set of functions you define to control the behavior of your screenset, such as procedures, path control functions (for example, moving between fields and panels), cursor functions, keyboard functions, and group data positioning functions.
This chapter explains:
Dialog can be local, which is specific to a panel, or global, which is active for the whole screenset. For example, to specify that the F1 key displays a Help panel appropriate to that panel, you would use local dialog, whereas to specify that the <right-arrow>| key always skips to the next field, you would use global dialog.
Where a key or procedure is defined both in the local and the global dialog, the definition in the local dialog is acted upon first unless you change this precedence using the Global/Local Dialog First function described in the chapter Using Dialog System.
The following sections describe all the available functions, and the parameters you can use. A full description of each function and its parameters is in the chapter Function Code List.
To use any of these available functions and their parameters, you can either type in the required function key codes,or use the facilities available in the Dialog Definition menu described later in this chapter.
You use attribute functions to set attributes on fields. You might do this to highlight certain fields on a panel, or all the fields on a panel. For example, you would use the error attribute to highlight an error found during a validation performed in the calling program (for example, file record not found). You can use any of the six run-time attributes described in the chapter Panel Painting. The following attribute functions are available:
| SFAT | Set Field Attribute |
| SGAT | Set Global Attribute |
You use the cursor functions to turn the cursor state on and off. This might be useful, for example, if you do not require the cursor for a panel that contains no input fields but is already on the screen because of some screen activity outside the control of the Dialog System. You could set the cursor state to off to remove the cursor from the screen.
If you turn the cursor on and off, it has no relevance to panels that do contain input fields, because the cursor is automatically switched on to mark the field entry position. The following cursor functions are available (the default is cursor off):
| CON | Cursor On |
| COFF | Cursor Off |
| SETCUR | Set Cursor |
You use the path control functions to control the flow through the screenset. You can set movement to selected input fields and transfer control to selected panels. Also, you can redirect a keystroke to another panel and then repeat that keystroke. This might useful, for example, if there is a pulldown window visible and you want to redirect the <down-arrow> key on the current panel to the pulldown window so that a selection bar moves down a list of menu items.
Similarly, repeating the current keystroke is very useful to POP out of a panel after an ANYO keystroke (see the chapter Key Code List), then to use that keystroke again in the panel that you POP to. The following path control functions are available:
| GOF | Go To Field |
| GOP | Go To Panel |
| RKEY | Redirect Key |
| RPKY | Repeat Last Keystroke |
| SKNF | Skip To Next Field |
| SKPF | Skip To Previous Field |
You use procedure functions to move to and execute procedures. You can use procedures to extend a dialog line beyond the limit of eight entries; to simplify the dialog; and to be used by the calling program. You simplify the dialog by placing common sets of functions into one place to permit use from several dialog entries. Procedure names take the format Pnnn, where nnn is the number of the procedure (000-255). The following procedure functions are available:
You use stack functions to PUSH and POP panels, so that control is passed to a particular panel from a number of other panels and then is easily returned to the original panel.
The following stack functions are available:
| PUSH | Push To Stack |
| POP | Pop From Stack |
RETC forces control to return to the calling program. When control is returned to Dialog System from the calling program, the rest of the dialog following the RETC is obeyed. If the calling program requires a different action from this, the program must request a procedure (see the chapter Running the Screenset). The calling program function is:
| RETC | Return To Calling Program |
You use the callout function to call a user program directly from dialog. You might use this function, for example, when disk access or complex validation is required.
When a call is made to an external program, Dialog System passes the DS-Control-Block and the screenset-Data-Block to the called program. The callout function is:
| CALLOUT | Call External Program |
You use the refresh functions to force Dialog System to refresh the panel. You can refresh both the panel text and data or simply the text. You can also delay the panel refresh until after a number of screen activities are complete.
Dialog System attempts to optimize how much screen refreshing it performs by calculating the smallest rectangle it must display to show all changes made to the current panel since its last display. Therefore, usually only part of the panel is redrawn during these functions. The following refresh functions are available:
| RFTD | Refresh Text And Data |
| RFT | Refresh Text |
| SUSP | Suspend Panel Refresh |
You use the keyboard scan function to determine whether any of the status keys, such as Ins or Caps have been depressed while control was outside Dialog System. You might use this function to update a status line on the screen. The keyboard scan function is:
| KS | Keyboard Scan |
You use the mouse function to allow useful mouse behavior without the need to return to the application or execute a CALLOUT. The mouse function is:
| GOMOUSE | Control level of functionality of mouse |
You use the group selection bar functions to position the selection bar on a group in a panel. These functions can be applied to a data group, a fixed text group, or a virtual text group. Remember that you cannot use selection bars in attribute groups, therefore you cannot use these functions with attribute groups.
You can use these functions to move a selection bar up and down the underlying group. The following group selection functions are available:
| PBDN | Position Bar Down |
| PBUP | Position Bar Up |
| SB | Set Bar |
You use the screen group data positioning functions to scroll underlying data or text through a visible screen group, without moving the selection bar. These functions apply to data groups, virtual text groups or attribute groups. They do not apply to fixed text groups because their size is the same as the screen group's size.
| PDDN | Position Data Down |
| PDUP | Position Data Up |
| SBOD | Set Bar On Data Item |
| SD | Set Data |
You use the screen group array size and register functions to modify the contents of the array size in relation to a screen group. The array size limits the amount of movement permitted in the data group. Like the internal register, the array size is an internal variable that you can manipulate in various ways. If you do not set the array size yourself, it
defaults to the size of the underlying data group. The functions available are:
| MAS | Move Array Size |
| MB | Move Bar |
| MBD | Move Bar's Data Position |
| MTD | Move Top Data Position |
| SAS | Set Array Size |
You use the screen group insertion and deletion functions to insert and delete lines in a data group without returning to the calling program. These functions automatically adjust the array size. The functions available are:
| DBP | Delete At Bar Position |
| IBP | Insert At Bar Position |
You use the screen group procedure functions to branch to or execute a procedure, depending on the positioning in a group. You can use these functions for all group types: data, fixed text, virtual text, and attribute groups. You might use these functions when a text or attribute group is being used as a menu.
| BPD | Branch To Procedure Depending On Data |
| XPD | Execute Procedure Depending On Data |
You use the conditional functions to test the values in fields or in the register so there can be either conditional branching in the dialog, or a conditional procedure performed with subsequent return to the calling dialog.
You do this by specifying two items to test and a procedure to branch to or perform if that test is true. The functions available are:
| IF | If condition is true, branch to procedure |
| XIF | If condition is true, execute procedure then return |
The following conditions can be tested for both functions:
| IF= | IF equal to |
| IF< | IF less than |
| IF> | IF greater than |
| IF<= | IF less than or equal to |
| IF>= | IF greater than or equal to |
| IFNOT= | IF NOT equal to |
You use the data manipulation functions to initialize or update the value of fields or of the register. The functions available are:
| DECVAL | Decrement The Value By 1 |
| INCVAL | Increment The Value By 1 |
| MOVE | Move Data |
| MOVEVTXT | Move Virtual Text Data |
| MPID | Move Panel ID |
You use the flag functions to communicate with the calling program. A flag is a single-digit numeric data item in the Data Block that can have the value 0 (false) or 1 (true). You normally use a flag in the dialog to signify that an event has occurred that you want to communicate to the calling program. You can set, unset, or change the value of the flag.
The functions available are:
| CLRF | Clear Flag |
| SETF | Set Flag |
| TOGF | Toggle Flag |
You use the panel view function to show another panel without actually passing control to it. You might use this function when there is a data entry screen and you wish to show a different menu at certain points during data entry. Another example is when the user enters a new screenset and you wish to display several panels but to pass control to just one of them. The function is:
| SHP | Show Panel |
You use the move panel function to move a Micro Focus Panels screenset panel around the screen at run time. (See the chapter Using Dialog System for details of Micro Focus Panels.) The function is:
| MOVEPNL | Move Panel |
You use the clear field functions to clear all input fields, clear an individual input field, or clear from the current cursor position to the end of the field . Clearing a field consists of moving zeros to a numeric field, or spaces to alphabetic or alphanumeric fields. The functions available are:
| CLEAR | Clear All The Fields |
| CFLD | Clear Current Field |
| CEOF | Clear To The End Of The Field |
You use the validate function to force all the validations on the current screen to be applied, rather than waiting for the automatic validation of an input field that is performed when the cursor is moved off that field.
Only use this function if an exception condition is being monitored, for example with a BPE or XPE function (see the section Procedure Functions earlier in this chapter).
If a validation failure is encountered, the validate function makes the field in error the current field and raises an exception condition. If there is no exception condition monitoring, the behavior of this function is unpredictable. The function is:
| VAL | Perform Validations |
You use the terminate function to terminate the current screenset when a program completes. You must do this so that the next program (or the original one) can start another screenset. The termination ensures that all
the necessary internal storage used by the run-time system is properly reallocated. The function is:
| TERM | Terminate Screenset |
You use the sound function to specify when the bell should be sounded.
| BEEP | Sound The Beeper |
You use the timeout function to specify a procedure to follow after a specified period of time has elapsed during any future input.
| TIMEOUT | Timeout |
The following sections describe the types of parameter that can appear in a function.
The panel name parameter is the name of the panel to be used in a particular function. For example, when you use the GOP (GO to Panel) function, you must specify the panel to pass control to.
The field name parameter is either the name of the field, or a numeric value, to be used in a particular function. For example, when you use the GOF (GO to Field) function, the field name identifies the field to go to. When you use the SKNF (SKip to Next Field) function, the numeric value sets the number of fields to skip.
The field name can have a subscript . When the parameter is a field name, the subscript identifies a particular occurrence of the field. For example, GOF CUSTOMER(4) means go to the fourth occurrence of field CUSTOMER. When the parameter is a numeric value, the subscript identifies the occurrence of a field from which to retrieve a value. For example, SKNF DISTANCE(6) means skip over the number fields given by the value in the sixth occurrence of field DISTANCE. A subscript can be a numeric literal, the internal register, or another field that is not part of a group.
The group name parameter is the name of the panel, field, or group to be used in a particular function. For example, when you use the PBDN (Position Bar DowN) function, you can specify the group through which the selection bar scrolls.
The procedure name parameter is the name of the procedure to be used in a particular function. For example, when you use the XP (eXecute Procedure) function, you must specify which procedure is to follow.
The numeric value parameter is the numeric value to be used in a particular function.
The alphanumeric value parameter is the alphanumeric character to be used in a particular function. For example, when you use the MOVE (MOVE value) function, you can use textual or numeric data.
If you enter a quote character (") in the first position of a parameter, an alphanumeric literal is assumed. This enables the entry of a text literal up to 80 characters in length by scrolling the field horizontally.
The attribute parameter is the attribute to be used in a particular function. For example, when you use the SFAT (Set Field Attribute), you must specify the attribute to be used.
The register parameter is Dialog System's internal two-byte computational field register, which some functions use to provide a parameter value. The following register is provided:
| $REG | You can use this register to store values temporarily rather than using a field in the Data Block . |
The null parameter is used when a particular function provides the option of not specifying a parameter value. For example, the PUSH (PUSH panel) function requires no parameters. The null parameter is signified by the mnemonic "$NULL".
A procedure is a sequence of dialog functions that you can use to:
Like dialog, you can define procedures at global or local level by entering the Dialog Definition menu from the appropriate place (see the chapter Panel Painting for details on accessing local dialog). Procedures are identified by their number and type. Procedures must be numbered in the range 000 through 255; however, there is a maximum of 100 global dialog entries and 100 local dialog entries (all of which could be procedures).
The procedure number P000 in global dialog is an initialization procedure for the screenset, which is executed whenever this screenset is first entered. You must ensure that the clear dialog flag is set to 0 on the initialization call (see the chapter Running the Screenset for details of this flag). Similarly, procedure number P000 in local dialog is an initialization procedure for the specific panel for which it is defined. It is executed whenever control is passed to that panel. Typically, you can use it to show a menu panel or a help panel.
Procedure numbering is an important consideration when you wish to execute different procedures depending on a register value. The procedure named in the function parameter is considered as relating to a register value of one. For example, if the internal register contains a value of two, the procedure number is incremented by one; if the register contains a value of five, the procedure number is incremented by four. The relevance of this correlation between procedure numbers and the register is related to functions like Branch to Procedure Depending On Register (BPR) and Execute Procedure Depending on Register (XPR), described later in this chapter.
A procedure is just like any other dialog line except that it cannot be defined as an event, because it is not actually a key. Of course, procedures can use procedures, including the initialization procedures.
You specify the procedure number in the Key field in the popup list. The sequence you must follow is defined in the Function field, which is described later in this chapter.
The Dialog Definition menu is accessed from the Main menu for global dialog and from the Panel Painting Alt menu for local dialog. In either case, its functions are identical. To define global dialog, press F4=global dialog from the Main menu. The popup panel and menu shown in Figure 9-1 are displayed.
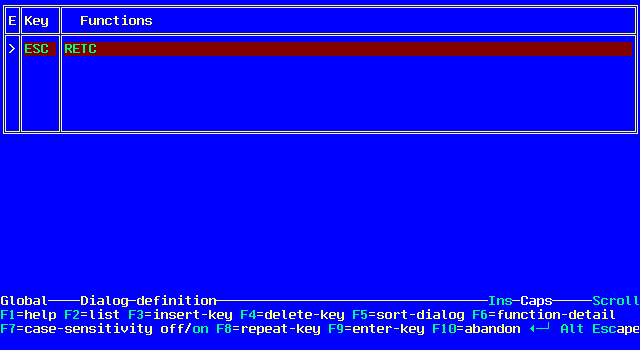
Figure 9-1: Dialog Definition Menu
When you first access this menu, one dialog definition already exists. It specifies that the Escape key returns control to the calling program. This exists so that if you run a screenset, there is always a way out of it. You can, of course, remove this entry. When you access this function after you have already defined some dialog entries, you can scroll up and down the list and insert, change, or delete them, using the appropriate function keys.
You can enter the following details on the popup panel:
It can be useful to visualize your dialog in the form of a table. The following table is an example for the dialog to scroll an array of data (see the chapter Common Questions and Answers for details of how these dialog functions perform).
Key    Funct   Param 1   Param 2   Param 3

CURU    PBUP    DATA-GRP  0001
CURD    PBDN    DATA-GRP  0001
TAB     SKNF    0001
BTAB    SKPF    0001
You can either type your dialog entries directly onto this list or use the facilities available from the Dialog Definition menu.
Pressing F2=list from the Dialog Definition menu displays a popup list of available key values. Position the selection cursor on an empty line and press F2. Use the <up-arrow> and <down-arrow> keys to scroll up and down the list to the desired value and press Enter to select the mnemonic and place it on the list.
A sample of the key mnemonics available in the list facility is shown below:
You can also define procedures in the key field. For example, the mnemonic "P003" refers to procedure number 003. If you define this procedure in global dialog, it can be executed from any of the other dialog lines in the current panel.
Similarly, you can enter the mnemonic "ERR", which behaves like a procedure. You use this to define the set of functions that are executed when a validation error occurs.
You can enter the value "*" to define a line of comment text. Enter the comment text in the Parameters column.
To define a procedure in the key field, you must type the procedure number or "ERR", because they are not contained in the list facility.
Pressing F3=insert-line from the Dialog Definition menu enables you to insert a new dialog line above the current line in the list. To add a new line at the end of the list, position the selection bar on the last entry in the list and press Enter.
Pressing F4=delete-line from the Dialog Definition menu deletes the current dialog line from the list. If the dialog line defines a procedure that is referenced in the dialog, you are be prevented from deleting the line.
Pressing F5=sort-dialog from the Dialog Definition menu sorts the dialog lines into the same sequence in which they are automatically sorted when the dialog is exited and saved.
The sort order is:
Pressing F6=function-detail from the Dialog Definition menu invokes the Function Detail menu (see Figure 9-2), which enables you to add or change function entries in a dialog line. A popup panel is also displayed, listing each function with up to three associated parameters. You can define up to eight functions for the current key.
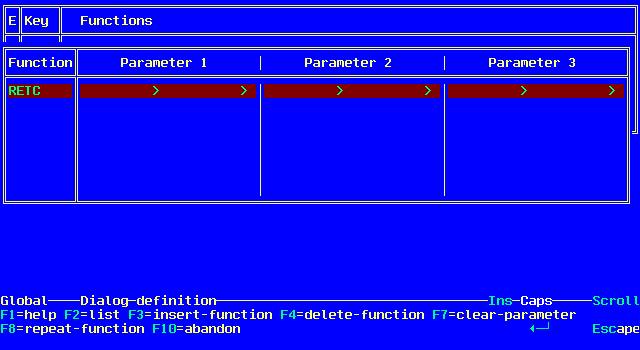
Figure 9-2: Function Detail Menu
You can use the scroll delimiters in the dialog fields to look at the data names, which can be up to 30 characters. If a dialog field contains text literals, the scroll delimiters are visible over the text, unless that field is the current field. If a dialog field containing text literals is the current field, the scroll delimiters are suppressed and you can edit the field in the normal way.
Use the <right-arrow>| and |<left-arrow> keys to move between the parameter fields in this list. The parameters differ depending on the function with which they are associated or on the type of the parameter entered. You can use fields that are part of a data group as parameters. In this case you must provide a subscript, which can be a numeric literal, a non-group field, or the internal register.
To use this menu option, you need to know about the functions that can be defined and the parameters associated with each function. The functions are described briefly earlier in this chapter. See the chapter Function Code List for a full list of function codes and parameter types.
Pressing F7=case-sensitivity off/on from the Dialog Definition menu enables you to define whether or not the run-time software allows upper- and lower-case keys. If you set this toggle on, you can define both lower- and upper-case versions of a single character key (for example, "a" and "A") and these can be used at run time. If you set this toggle to off, you can set only upper-case characters in the dialog, and all character entries at run time are treated as upper case. Case sensitivity off is useful if a panel does not need to differentiate the case of letters, because you only need to define one dialog entry for each key, rather than two entries; one for each case.
If you attempt to switch case sensitivity off when entries exist in dialog for both the upper-case and lower-case of any key, an error is displayed. If an entry exists for the lower-case of a key, the entry is converted to upper case.
Case-sensitivity on.
Pressing F8=repeat-key from the Dialog Definition menu duplicates the current dialog line, except for the key value. The cursor remains in the key field so you can enter the key value, which must be unique in the current dialog entries. You cannot leave the line until you enter a key mnemonic. When deliberately defining recursive dialog, you can press Enter to override the warning message produced.
Pressing F9=enter-key from the Dialog Definition menu enables you to select a key value by pressing the desired key on the keyboard. Position the selection bar on an empty line, press F9, then press the key you require. The key mnemonic is displayed in the popup list. You can use this function for all the keys except the status keys, such as Ctrl or Scroll Lock.
To select a status key, you must use one of the two alternative methods described earlier to select keys. You can type in the mnemonic for the key you require, or you can select the F2=list function and choose the desired mnemonic from the popup list.
The run-time behavior of certain keys, described in the following list, is preconfigured. You can override these configurations by defining other functions for these keystrokes in the list of dialog entries. However, if you do redefine a key, the preconfigured function of that key is no longer executed on the panel where you have redefined the key.
Your keyboard might not have exactly the same control keys as the following list. Consult your Release Notes to see which keys on the standard keyboard for your system provide the equivalent functions.
| <right-arrow> | Moves the cursor to the right in the current input field. If the field is an autoskip field, makes the cursor skip from the rightmost character of a field to the start of the next field. |
| <left-arrow> | Moves the cursor to the left in the current input field. If the field is an autoskip field, makes the cursor skip from the first character of a field to the previous field. |
| Home Key | Moves the cursor to the first character in the current input field. |
| End Key | Moves the cursor to the last character in the current input field. |
| Del Key | Deletes the character at the cursor position in the current input field. |
| Backspace | Deletes the character to the left of the cursor position in the current input field. |
Pressing F10=abandon from the Dialog Definition menu cancels the dialog definition without saving any of the current changes. You return to the Main menu if you were defining global dialog, or the Panel Painting menu if you were defining local dialog.
Pressing Alt from the Dialog Definition menu invokes the Dialog Definition Alt menu described later in this chapter.
Pressing Escape from the Dialog Definition menu saves the functions and parameters defined during the current session and exits from the menu. You return to the Main menu if you were defining global dialog, or the Panel Painting menu if you were defining local dialog.
The Dialog Definition Alt menu provides the following facility for dialog definition.
Pressing F2=event-key from the Dialog Definition Alt menu enables you to define any key as an event key. An event key takes priority over any validation of the current field or any field exits that you might define, so the dialog you define for an event key is obeyed at run time, regardless of any validations or field exits.
This might be useful if you want to display a help panel to explain validation rules if a field fails validation. You can specify that the key to invoke the help panel is an event key, so the user can view help, even though normally they cannot leave a field if it has failed a validation rule.
To define an event key, position the selection bar on the desired key and press F2. A greater-than (>) character is displayed by the key mnemonic in the popup list, which identifies the key as an event key. You can define any number of event keys.
After you define the dialog for a screenset, you are ready to test your screenset and make any required modifications. See the chapter Running the Screenset.
Copyright © 1998 Micro Focus Limited. All rights reserved.
This document and the proprietary marks and names
used herein are protected by international law.
| Panel Groups | Running the Screenset | |