

| Windows GUI Application Wizard | Programming Your Own Controls | |
The previous chapter showed you how the new Windows GUI Application Wizard can provide you with an easy route for accessing and querying any installed database. This chapter describes how you can manipulate this data.
Note: The programs and files that are output as a result of using the Windows GUI Applications Wizard are meant as a starting point for developing your own data access applications. They are not intended to be universally applicable to all situations, but are provided so that you can learn to use the basics. You can then adapt the code provided to suit your own, possibly more complex, needs.
The chapter Creating a Windows GUI Application in the Getting Started on-line book is a tutorial which includes practical details on how to use the wizard.
The Wizard process created a new screenset and automatically generated an associated COBOL program configured to the functionality you requested. Both the screenset and associated COBOL program were automatically added to your project.
If you want to access an installed database, you must have selected the OpenESQL Data Access option in Step 3: Select Screenset Features.
There are two possible ways of viewing the results of your query after building your application, depending on the option you chose in Step 4 of the Windows GUI Applications Wizard:
- or -
These views provide the same functionality but use different interfaces. The grid view has a more direct feel in use; the list view is more familiar to experienced Windows users.
When you run a query in grid view, all of the data is read into memory. This means that you can scroll the data up and down very quickly. In list box view, not all of the data is read into memory. In fact only one list box screen full is read in. It may therefore, be more practical to use a list box view when very large amounts of data are being used. For ways of improving performance with very large applications, see the topic Performance Programming in the Help.
The grid view of your database query might look like that in Figure 9-1.
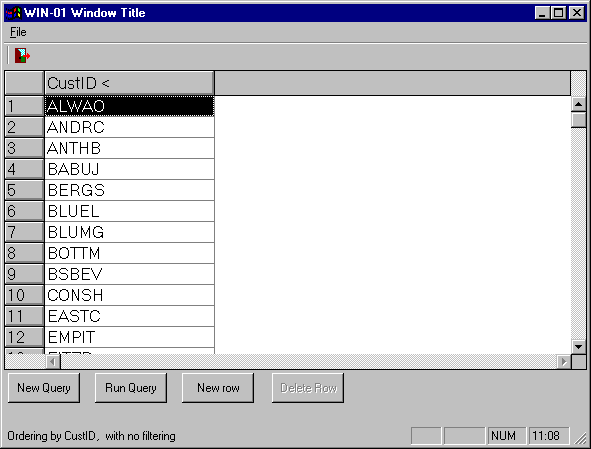
Figure 9-1: Grid View of Database Query
The list box view of your database query might look like that in Figure 9-2.
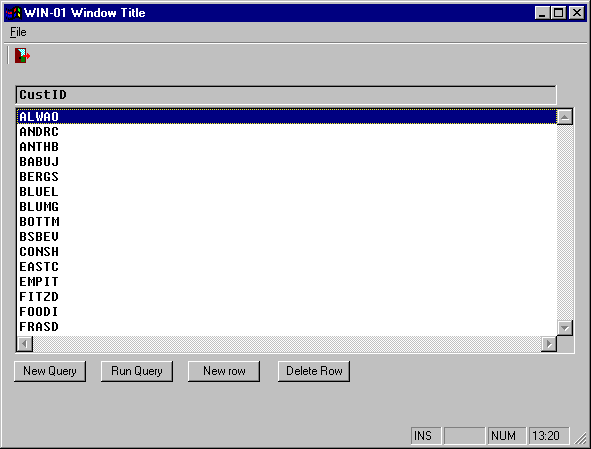
Figure 9-2: List Box View of Database Query
The status bar is at the foot of the screen and gives information about the object that the mouse is over. When the mouse is over the general part of the screen, this text, which is actually a message box, tells you which type of function you have selected. Message boxes also give you information about immediate errors, for example, trying to edit a key field.
You can perform the following functions:
| Grid View | List View | |
|---|---|---|
| Change data in a field | Select the field and specify the necessary changes, remembering that you cannot change key fields. If the edited field is in a column which has been sorted, your change may result in the whole row being moved to another part of the display. | Select the row to change and specify the necessary changes in the dialog box which opens. If the edited field is in a column which has been sorted, your change may result in the whole row being moved to another part of the display. |
| Move to the next column | Use either the mouse or the left and right arrow keys. | |
| Delete data in a field | Select the field and press the Delete key. | Select the row to change and specify the necessary changes in the dialog box which opens. If the edited field is in a column which has been sorted, your change may result in the whole row being moved to another part of the display. |
| Refresh the screen | Click Run Query. | Click Run Query. |
Note: Because concurrent versions of the same query can be open, Dialog System refreshes your query from disk before echoing any edits that you make to the data. This ensures that you see the most up-to-date version of the data.
| Grid View | List View | |
|---|---|---|
| Insert a new row | Highlight the row below the insertion point. When you click New Row, you see an empty grid and you enter the new data in the top row. | Highlight the row below the insertion point. When you click New Row, you see a dialog box with entry fields for each column except for key fields. There is no validation for any of the entry fields. |
| Activate the insert | Press F7. Status Bar reports the result of your update. | Press Enter. The Status Bar reports the result of your update. |
| View the new line in your query | Click Run Query. |
Note: Your new line may not be immediately visible. This could be a result of either of the following:
For both grid and list views, to delete a row of data, click the row number next to the data to be deleted and click Delete Row.
| Grid View | List View | |
|---|---|---|
| Search for data |
|
|
| Grid View | List View | |
|---|---|---|
| Sort data in a column | Click on the column heading bar. You see:
|
Right-click in the list box. You see a pop-up menu from which you select the column to sort. |
Copyright © 1998 Micro Focus Limited. All rights reserved.
This document and the proprietary marks and names
used herein are protected by international law.
| Windows GUI Application Wizard | Programming Your Own Controls | |