

| Tutorial - Adding an ActiveX Control | Fonts and Colors | |
The chapters Window Objects and Control Objects described how to choose bitmap graphics. This chapter shows you how to:
To change the shape of the mouse pointer, use the SET-MOUSE-SHAPE function. For example, you might want to change the mouse pointer to an hour glass or a clock to inform your user to wait until an operation is complete.
See the topic Dialog Statements: Functions in the Help for more information on the SET-MOUSE-SHAPE function.
The sample program Moudemo (available on your samples disk) changes the mouse pointer as it passes over different objects.
There is also an entry field used for text entry where the cursor shape changes to a text bar and a list box where each line can be selected and highlighted.
To test the Moudemo screenset you can:
You see the screen shown in Figure 23-1.
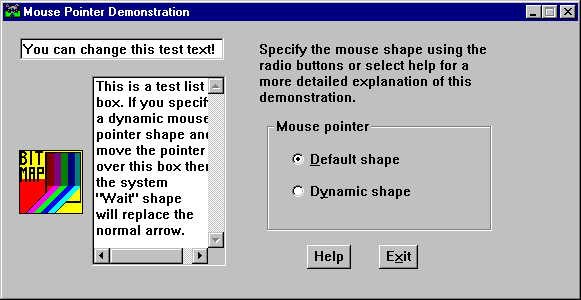
Figure 23-1: The Moudemo Screen
Global dialog is used to return control to the calling program if the escape key is pressed or the main window is closed:
ESC
    RETC
CLOSED-WINDOW
    RETC
When the screenset is initialized the static radio button is set on, and
a text string is placed into the entry field. The default mouse pointer
shape is set to SYS-Arrow :
SCREENSET-INITIALIZED
    SET-BUTTON-STATE DEFAULT-RB 1
    MOVE "You can change this test text!" TEST-TEXT-DATA
    REFRESH-OBJECT TESTTEXT-EFLD
    SET-MOUSE-SHAPE MOUSEDEMO-WIN "SYS-Arrow"
If the Exit button is selected, the Exit message box is displayed and the value of $REGISTER is checked. A value of 1 in $REGISTER indicates OK was selected, meaning the user wants to exit:
BUTTON-SELECTED
    INVOKE-MESSAGE-BOX EXIT-MSG $NULL $REGISTER
    IF= $REGISTER 1 EXITAPP
  EXITAPP
     RETC
Additional dialog is attached to each object as required. When the
static radio button is selected (default at screenset initialization), the
SYS-Arrow shape is used over the whole of the main window:
BUTTON-SELECTED
    SET-MOUSE-SHAPE MOUSEDEMO-WIN "SYS-Arrow"
When the dynamic radio button is selected, the shape of the mouse
pointer depends on the object it is positioned over. SYS-Move
are provided by the operating environment and pencil-ptr has
been created especially for this screenset:
BUTTON-SELECTED
    SET-MOUSE-SHAPE TESTTEXT-EFLD "SYS-Move"
    SET-MOUSE-SHAPE TESTMAP-BMP "pencil-ptr"
If the Help button is selected, the help dialog is displayed:
BUTTON-SELECTED
    SET-FOCUS HELP-DIAG
Clicking OK in the Help window removes the window from the display and returns control to the main window:
BUTTON-SELECTED
    DELETE-WINDOW HELP-DIAG MOUSEDEMO-WIN
There is no dialog attached to the list box or entry field.
If you installed the samples, a resource side file was loaded for the moudemo sample (moudemo.icn). Therefore you do not need to edit the ds.icn file to add the mouse pointer.
However, this section describes how to add the mouse pointer and bitmap to the standard ds.icn file.
The mouse pointer pencil-ptr has been created for use in
this screenset and placed in a DLL file. Therefore, you must make an entry
in the ds.icn file under the appropriate section heading:
pencil-ptr : dssamw32.dll 002
Mouse pointers must be placed in a DLL file. The procedure for doing this is described in the topic Bitmaps, Icons and Mouse Pointers in the Help.
You must also add an entry for the new bitmap stating the name of the bitmap and its location. It does not have to be in the same directory as the screenset. In the Moudemo sample screenset this bitmap is called colorful.bmp. The corresponding entry in ds.icn (under the appropriate section heading) would be:
colorful : dssamw32.dll 003
In Dialog System, a bitmap is a control that you can select. In this respect, a bitmap is like a radio button. What happens after the bitmap is selected depends on how you code the dialog.
Because a bitmap is represented by a graphic image, it can be more meaningful to users. Figure 23-2 shows a window with several bitmaps attached to it.
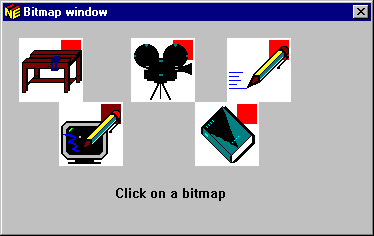
Figure 23-2: Window with Bitmaps Attached
To help you understand bitmaps, the following example contains five bitmaps representing different functions the user can perform. When the user selects a bitmap, return to the calling program and invoke the function represented by the bitmap.
These bitmap controls are named WBBMP, ANIMBMP, HELPBMP, SCREENBMP and EDITBMP. Each bitmap has a handle, that is, an internal identifier. The handle that is assigned to an object must be defined in the Data Block.
Handles for this example (and in fact all handles) are defined as:
WB-HANDLE                 C         4.00
ANIM-HANDLE               C         4.00
HELP-HANDLE               C         4.00
SCREEN-HANDLE             C         4.00
EDIT-HANDLE               C         4.00
The first thing you must do is save the handles of the bitmaps. The best way to do this is in global dialog using the SCREENSET-INITIALIZED function.
SCREENSET-INITIALIZED
    MOVE-OBJECT-HANDLE ANIMBMP ANIM-HANDLE
    MOVE-OBJECT-HANDLE EDITBMP EDIT-HANDLE
    MOVE-OBJECT-HANDLE WBBMP WB-HANDLE
    MOVE-OBJECT-HANDLE HELPBMP HELP-HANDLE
    MOVE-OBJECT-HANDLE SCREENBMP SCREEN-HANDLE
The MOVE-OBJECT-HANDLE function
moves the handle for the bitmap (ANIMBMP) to a
numeric field (ANIM-HANDLE).
BITMAP-EVENT is the only event associated with a bitmap. When the user clicks on a bitmap, the event is triggered and the handle of the bitmap is stored in $EVENT-DATA.
This dialog is attached to the window on which the bitmaps appear:
BITMAP-EVENT
    IF= $EVENT-DATA ANIM-HANDLE SET-ANIM
    IF= $EVENT-DATA EDIT-HANDLE SET-EDIT
    IF= $EVENT-DATA WB-HANDLE SET-WB
    IF= $EVENT-DATA HELP-HANDLE SET-HELP
    IF= $EVENT-DATA SCREEN-HANDLE SET-SCREEN
  SET-ANIM
    MOVE 1 FUNCTION
    RETC
  SET-EDIT
    MOVE 2 FUNCTION
    RETC
  SET-WB
    MOVE 3 FUNCTION
    RETC
  SET-HELP
    MOVE 4 FUNCTION
    RETC
  SET-SCREEN
    MOVE 5 FUNCTION
    RETC
Thus, when the user clicks on a bitmap:
FUNCTION.
Now your program executes the appropriate function based on the value in
FUNCTION.
For more information on adding bitmaps to your Dialog System interface, see the topic Bitmaps, Icons and Mouse Pointers in the Help.
Copyright © 1998 Micro Focus Limited. All rights reserved.
This document and the proprietary marks and names
used herein are protected by international law.
| Tutorial - Adding an ActiveX Control | Fonts and Colors | |