
 | Sample Programs | Tutorial - Using the Sample Screenset |  |
In this chapter you follow the steps for creating an application using Dialog System as described in the chapter Introduction to Dialog System.
In this tutorial, imagine you are a director of a road running race that members of the public can enter by sending in entry forms published in various newspapers and sporting magazines. You need to design an interface for a system that will process the entries and allocate a unique running number to each entrant. You also want to monitor the effectiveness of your advertising by recording the response from each advertisement.
The first screen of your interface needs to collect details such as name, address, age, sex, running club, and advertisement code.
To create the screenset for the race entry system, first start Dialog System in the usual way.
You do not need to create the data model for the sample screenset. A data model has been created for you, and this section will guide you through defining the data according to that model.
You need to define the Data Block and create master fields for the display fields you will set up as objects. Each entry field has an associated master field in which to store the data entered.
To define the Data Block:
Dialog System displays the Data Definition window.
The Data Type dialog box is shown.
Dialog System displays the Field Details dialog box.
This defines the Name field and is the master field for the object called D-NAME that you will define in the next step.
Now repeat the above process to define the following fields:
| Field Name
|
Field Type and Size
|
Field Usage
|
|---|---|---|
| MALE | 9(1) | flag field used to hold the state of the radio buttons. |
| ADDRESS | X(100) | master field for D-ADDRESS. |
| CLUB | X(30) | master field for D-CLUB. |
| AGE | X(3) | used in the age list box. |
| CODE | X(3) | master field for D-CODE. |
| FLAG-GROUP | Group start with 1 repeat. Used to hold flags. | |
| EXIT-FLG | 9(1) | flag used to indicate user has selected Exit. |
| SAVE-FLG | 9(1) | flag used to indicate user has pressed Save. |
| CLR-FLG | 9(1) | flag used to indicate user has pressed Clear. |
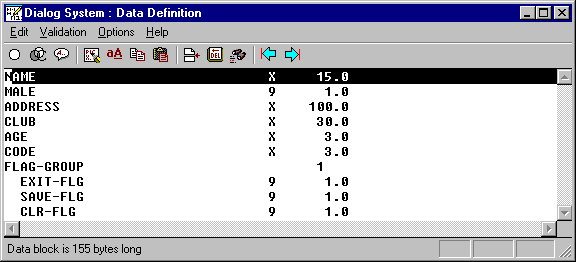
This completes the Data Block for the sample program. The Data Definition window should now look similar to the one shown in Figure 18-1.

Figure 18-1: Data Definition
The sample screenset has a single window containing various control objects, and a message box. You must define the window first, because you do not have access to control objects until you have defined a window on which to place them.
Before you start to define objects, set Auto properties to off, so that you can label objects as you create them:
Make the window larger than the Dialog System window.
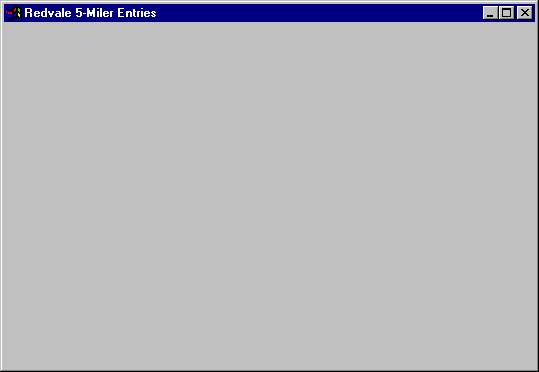
The screen now looks like the one shown in Figure 18-2.

Figure 18-2: Defining the Main Window
Now define the controls in the following list by:

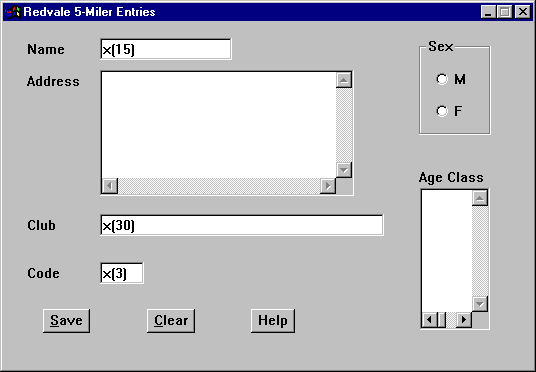
Figure 18-3: Adding Controls
Leave all the other properties as the default values.
Move and size the controls (and the primary window if necessary) to tidy your window.
To make the radio buttons work correctly, you need to place them in a control group. Similarly, the push buttons should be in a control group.
To define control groups:
Create a message box to present a help message when the user presses Help:
The Properties dialog box is displayed immediately.
This completes the object definitions for the sample screenset.
It is a good idea to save a screenset whenever you have finished a stage in the definition process. To save this sample screenset:
Dialog System displays a dialog box for you to enter the filename and directory under which you want to save.
After saving the sample screenset once, you can use Save whenever you want to save the screenset. If you want to try out different versions of the screenset, use Save As with a new name to create another version.
You can test your screenset even without dialog, to make sure that the desktop layout looks good and that you have set up the fields correctly. To test the sample screenset:
Dialog System displays the Screenset Animator window.
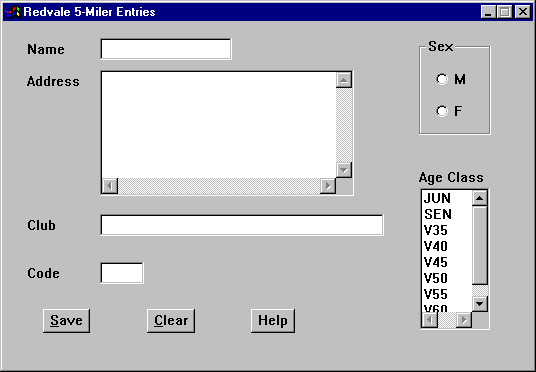
Your sample screenset should look similar to the one shown in Figure 18-4.

Figure 18-4: Running the Screenset from the Screenset Animator
Try entering some data into the fields. If you try to enter more than 15 characters into the Name field, Dialog System just produces a beep.
Notice that you can only select either M or F because the radio buttons are grouped as a control group and you can select only one age class from the list box.
The "RETC has just been executed" dialog box is shown.
The Screenset Animator is more useful after you have defined the dialog for the sample screenset.
The sample screenset would not be complete without dialog definitions. The following sections explain how to define the object and global dialog for the sample screenset.
To define dialog for an object:
Dialog System displays the Dialog Definition window. The default event BUTTON-SELECTED is already displayed in the Dialog Definition window.
Dialog System then prompts you for dialog entries in a similar way to when you define data.
Dialog System displays a dialog box for you to choose the type of line you want to enter.
For example, "Dialog System passes control to a procedure that handles creating or changing a record in the entry database".
A parameter dialog box appears.
The spaces for parameters 2 and 3 are disabled because they are not required with this function.
RETC does not have any parameters. It returns control to the calling program. The COBOL program that uses this screenset checks the Save flag and saves the contents of the screen if the flag is set.
In a similar way you can attach dialog to the other objects in the sample screenset.
Dialog System helps you by providing context menus. If you right-click on any of the dialog lines, Dialog System displays a context-sensitive menu of choices. For a more detailed explanation of context menus, see the chapter Window Objects.
The dialog for the remaining objects is described below.
 BUTTON-SELECTED
     SET-FLAG CLR-FLG(1)
     RETC
When the user presses Clear, Dialog System sets the Clear flag and returns control to the calling program. The calling program will clear the entry fields (effectively cancelling the entry).
 BUTTON-SELECTED
     INVOKE-MESSAGE-BOX HELP-MSG $NULL $EVENT-DATA
When the user presses Help, Dialog System displays the message box you created. This provides appropriate help text.
 BUTTON-SELECTED
     SET-FLAG MALE
When the user presses M, Dialog System sets the flag MALE to 1, meaning M (for male competitor).
 BUTTON-SELECTED
     CLEAR-FLAG MALE
When the user presses F, Dialog System sets the flag MALE to 0, meaning F (for female competitor).
 ITEM-SELECTED
     RETRIEVE-LIST-ITEM $CONTROL AGE $EVENT-DATA
When the user selects an age class from the list, Dialog System puts the value of the selected list item into the AGE field.
Now define global dialog for the screenset, by selecting Global dialog on the Screenset menu.
The default global dialog is as follows:
 ESC
     RETC
 CLOSED-WINDOW
     RETC
Add two lines to the dialog so it reads:
 ESC
     SET-FLAG EXIT-FLG(1)
     RETC
 CLOSED-WINDOW
     SET-FLAG EXIT-FLG(1)
     RETC
This dialog sets the exit flag and returns control to your application (the calling) program if the user presses Esc or uses the system menu to close the window.
Add the following dialog:
   REFRESH-DATA
     REFRESH-OBJECT MAIN
This dialog refreshes the main window whenever the calling program directs Dialog System to do so. The chapter Using the Screenset describes how your application program interfaces with the call interface.
Add the following dialog:
   SCREENSET-INITIALIZED
     SET-FLAG MALE
     SET-BUTTON-STATE RB1 1
This sets the first radio button (Male) on as a default. Whenever you enter a group of radio buttons, one of these has to be set on initially.
See the chapter Using Dialog for more information on how to use dialog.
Now save the screenset again, then try running the sample again. Enter data into the fields and choose the appropriate radio button and list item. This time, when you press Save after you have made these changes, Dialog System displays the Screenset Animator window again.
After you test the sample screenset again, you may want to make changes to it (for example, to improve the screen layout). You can repeat any of the steps described in this chapter until you are satisfied with the screenset.
In this chapter, you have:
Now you need to write the COBOL program that will use the user interface contained in your sample screenset. The DialogSystem\demo\entries directory contains a demonstration version of the sample screenset, called entriesx.gs.
The next chapter, Tutorial - Using the Sample Screenset, gives advice on writing the COBOL program for the sample screenset. The chapter contains sample code to produce a very simple program that will read the user inputs and store or clear them as indicated by the user.
Copyright © 1998 Micro Focus Limited. All rights reserved.
This document and the proprietary marks and names
used herein are protected by international law.
 | Sample Programs | Tutorial - Using the Sample Screenset |  |