

| Deploying an Application on UNIX | More Features | |
In this documentation we assume you have a basic knowledge of how to use your Windows operating system. This appendix briefly describes some techniques that are commonly used in the operating system interface and in applications.
Most windows have up to three buttons at the top right-hand corner, on the window's title bar. Buttons that can appear here are:
Often when you need to select a file, you are presented with a dialog box showing all the files and folders that are in a particular folder. The dialog box is said to be open at this folder. Examples are the commonly used Open dialog box, shown in Figure A-1, and the Add Files to Project dialog box.
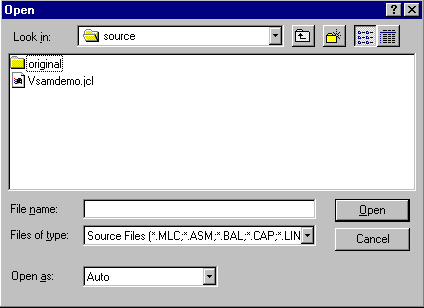
Figure A-1: The Open dialog box
Some or all of the following methods may have been implemented for moving around the hierarchy of folders:
In the kind of dialog box described in the section Changing Folder, you can usually carry out functions like creating folders, and renaming and deleting folders and files.
This means you can do these things from within whatever software you happen to be using, which is sometimes more convenient than going into another Windows session. For example, if you're using the IDE, and you want to create a folder, click Open on the IDE's File menu and do it via the Open dialog box. Then simply click Cancel to close the dialog box.
Hierarchical data, for example a list of directories and their subdirectories, is often shown in a tree view. This is a list of the top level, with a "+" on the left of each item. Click the "+" to expand the entry to show the items immediately subordinate to it. The "+" then changes to a "-", which you click to compress ("close") that part of the tree again. Or click an item and type "*" (asterisk) on your numeric key-pad, to show all items subordinate to the item.
A good example is Windows Explorer (right-click My Computer on your desktop, and then click Explore), where the left-hand pane is a tree view showing the drives and folders on your computer.
In the lists of files shown in (for example) the Open dialog box or Windows Explorer, file extensions that Windows recognizes may not be shown. Instead, the file type may be indicated by an icon or a description. If you want to change your Windows settings so that these the extensions are shown, you can do so via Windows Explorer, as follows:
You can now close Windows Explorer.
If you have a dialog box open while you are doing this, you may have to close it and reopen it before you see the change.
Sometimes you see a list with several columns, with column headings on a gray background. In Windows such a list is called a container. Figure A-2 shows part of such a list.
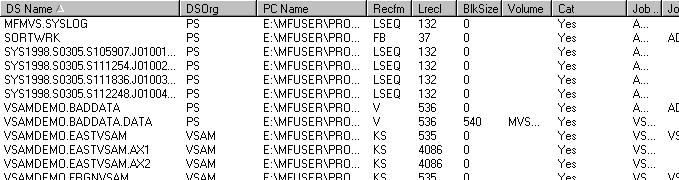
Figure A-2: Part of a Container
Some or all of the following methods may have been implemented for rearranging the layout:
Often you're presented with a list, and you need to select one or more items in the list before clicking a button to perform some action on the selected item or items. Examples are listboxes, the commonly used Open dialog box, shown in Figure A-1 above, and the Add Files to Project dialog box.
To select a single item you simply left-click on it, but in many cases you can also select multiple items. Some or all of the following methods may have been implemented:
Sometimes you see a field with a down-arrow ![]() on the right. The arrow indicates a dropdown list, listing possible values
you could enter into the field. Figure A-3 illustrates a field with a
dropdown list, and Figure A-4 shows the same field with its dropdown list
open
on the right. The arrow indicates a dropdown list, listing possible values
you could enter into the field. Figure A-3 illustrates a field with a
dropdown list, and Figure A-4 shows the same field with its dropdown list
open
![]()
Figure A-3: A Field with a Dropdown List
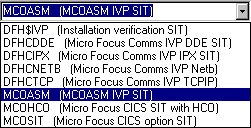
Figure A-4: The Same Field with its Dropdown List Open
Some or all of the following methods may have been implemented for entering a value into the field:
Often if you right-click on a window or object on the screen, a menu appears showing functions that are appropriate for that window or object. This is called a popup menu or context menu.
In many applications, you can move an item as follows:
Ctrl+C, Ctrl+X, and Ctrl+V are the shortcut keys for functions Copy, Cut, and Paste usually available on menus . It's usually quicker to use the shortcut keys. A few applications may use different shortcut keys for these functions.
You may find you can cut and paste text from the online version of this Getting Started book into the IDE. This can save typing when the book gives a path to enter into a field.
In many applications, you can move or copy an item by "dragging and dropping" it, or its icon in a list or tree view. You put your mouse pointer on it, then hold down the left mouse button while you move your pointer to the place you want to put the item. This is called "dragging" the item, and "dropping" it at the place where you release the button.
This might copy the item, giving you a copy in the new location but leaving the original where it was; or move it, deleting it from the original location. It depends on the application.
Often you can transfer an item between two lists or tree views in this way. A good example is Windows Explorer, where you can even have several copies of the same tree view, by opening Windows Explorer several times. You can drag a file to its new location in another copy of the tree view, if the whole tree view is too big for you to see both the source and target locations on your screen in one tree view.
Often you can operate on a group of items. You select them as described in the section Selecting Items in a List above, and then press down the left mouse button on any one of them and drag. Be careful not to release the button till your mouse pointer is on the target location, or you'll deselect them all.
The ways you can change the shape and size of windows, and reposition the panes within a complex window, are best shown through a short tutorial using the IDE.
The mouse pointer changes shape depending on where it is. It's not possible to illustrate the shape, as the shapes used depend on your Windows settings. On this border it has its standard shape (often an arrow). If it's lower, within the Output window itself, or higher, where the border of the Output window meets the border of the main pane above, it may be different.
An outline representing the Output window moves with the pointer. As the pointer crosses the right-hand border of the IDE, this outline changes shape.
Notice that the tip "Hold Ctrl to prevent docking" appears at the bottom of the IDE.
The Output window attaches itself to the right-hand border. This is called docking.
Thus you can widen the pane in the usual way.
This makes the Output window into a separate window outside the IDE. It is said to be undocked, or floating.
Copyright © 1998 Micro Focus Limited. All rights reserved.
This document and the proprietary marks and names
used herein are protected by international law.
| Deploying an Application on UNIX | More Features | |