 | Data Access Applications | Server-side Programming |  |
Chapter 6: Reusing Legacy Code
This chapter explains how you can reuse existing COBOL subroutines to create Internet applications.
6.1 Overview
The Internet Application Wizard enables you to turn an existing COBOL subroutine into an Internet application in a few minutes. You can use almost any COBOL program which is coded using the Linkage Section to accept parameters and return results. The Internet Application Wizard generates a bridging program which takes input from a form and calls the subroutine with it. The bridging program then displays the result returned from the program on either the same form or a different one. You may need to do a little recoding with some legacy applications to separate out the existing user interface logic, so that the input and output parameters for the application can be accessed through a Linkage Section.
When you run the Internet Application Wizard and choose COBOL source file as the Wizard Input, you are prompted to select a COBOL program to use as the basis of an Internet application. After this the Internet Application Wizard displays all the data declared in the Linkage Section which also appears in the USING phrase of the PROCEDURE DIVISION header. You can select any of these data items as either an input parameter, an output parameter, or both.
The Internet Application Wizard then generates the following for your application:
- An input form
- An output form (unless you specify that you want the input and output forms to be the same)
- A COBOL program which handles communication between the forms and the subroutine
You can choose to generate forms using HTML suitable for cross-platform use, or Dynamic HTML (for a discussion of the differences see the chapter Forms and HTML). The Internet Application Wizard creates basic forms for your application; you can edit the forms using Form Designer, to make them look the way you want.
To start using a subroutine, you follow these steps:
- Create a new NetExpress project, and add the subroutine as a program file.
- Start the Internet Application Wizard, and choose COBOL source file as the Wizard Input.
- Follow the prompts given by the Internet Application Wizard and enter the necessary information.
- When you reach the Parameter Assignments page of the wizard, select the input and output parameters (the wizard displays a list of parameters specified in the program's Linkage Section). For each parameter, you can select the type of control to represent it and whether the control should appear on either the input form, output form or both.
- When you reach the last page of the wizard, press Finish.
This step creates the files for the application and adds them to the NetExpress project.
- Optionally enhance the application by using Form Designer to modify the appearance of the forms created by the Internet Application Wizard.
- Optionally edit the generated code to add extra sophistication to the application, or to handle new controls added to the form in step 6.
- Rebuild the application.
This chapter takes you through each of the steps in the process, and also includes an example showing you how to create and edit an Internet Application Wizard program. The instructions in this chapter are not at the detailed level of "now click the OK button". They explain the overall process; detailed step-by-step instructions for the Internet Application Wizard and NetExpress are available in the on-line help. If you want to get a feel for the Internet Application Wizard and NetExpress before you start, run through the tutorials in Getting Started.
6.2 Beginning a New Internet Application
When you create a Internet Application, you need to decide the following before you start:
- Whether to generate forms using cross-platform output or Dynamic HTML.
- Whether to use the same form for input and output (a symmetric
application) or separate forms (an asymmetric application).
Symmetric and asymmetric applications are discussed in chapter Overview of Internet Programming.
The instructions below are at a high-level. If you need detailed step-by-step instructions, consult the Net Express on-line help. If you haven't used the Internet Application Wizard and Net Express before, Getting Started has sample sessions to help you.
To start creating an application with the Internet Application Wizard:
- Create a Net Express project, containing the source files for the legacy subroutine you want to use.
- Start the Internet Application Wizard.
- Choose COBOL source file as the Wizard Input.
- The wizard prompts you to enter the filename of the subroutine you are going to base your application on. You can enter this directly or press Browse.
- Choose whether to use the same form for input and output (symmetric interface) or separate forms (asymmetric interface), and whether to use cross-platform or Dynamic HTML.
- The wizard prompts you to enter titles for the input and output forms. It also shows you the default filenames for the files it is going to generate for the application. You have the option of changing the defaults.
- The wizard prompts you to map the parameters for the program to HTML
controls for generating a form.
This stage is covered in more detail in the next section, Selecting the Data.
- Click Finish to generate the forms, and a COBOL server-side program to link the forms to your original COBOL program.
6.3 Selecting the Data
When you reach the Parameter Assignments page, the Internet Application Wizard looks like this:
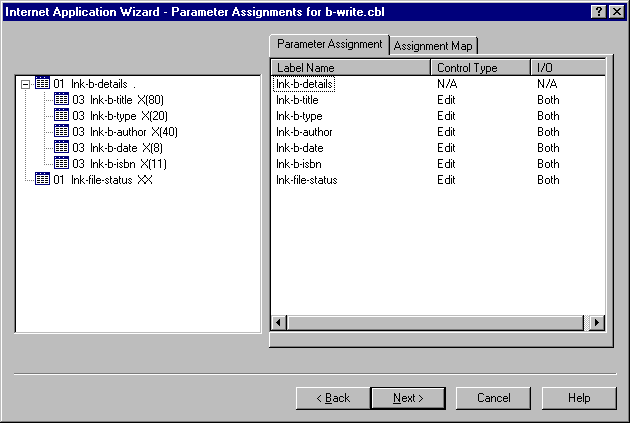
Figure 6-1: The Parameter Assignments page
The Linkage Section data items which appear in the USING clause of the PROCEDURE DIVISION header in the selected program are displayed in the tree view on the left, with the following information for each data item:
The Parameter Assignments pane on the right-hand side displays information about how the data is mapped to controls on the form. .
Initially, the data direction for all parameters is set to Both (or N/A for groups). To create your application, you need to specify a label, control type, and data direction for each data item you want the user to see or change on a form.
You can save your selections in an assignments file (extension .aht). If you need to refine your selections after generating the application, you can restart the Internet Applications Wizard using the same .cbl file, and reload the .aht file to carry on from where you left off.
6.3.1 Assigning a Field to an Entry Field
A text entry field is very straightforward to use. When data is sent from the form to the program, the contents of the entry field are moved into the corresponding COBOL data item. The Internet Application Wizard inserts a basic validation procedure into the generated code; if data entered by the end-user can't be converted successfully when the receiving data item is a numeric COBOL data item, the program returns an error message to the end-user's Web browser.
When data is sent from the program to the form, the contents of the data item are displayed in the entry field. The Internet Application Wizard generates any necessary code to convert numeric data to a literal which can be displayed in the entry field.
Password fields are handled in exactly the same way as text entry fields - the only difference is that the password field displays the text input by the user as asterisks. Labels and disabled edit fields are also handled in a similar way to entry fields, but the user can't alter their contents. Not all browsers support disabled edit fields. A hidden field is another variation - the browser simply does not display the field to the user at all.
6.3.2 Assigning a Field to a Radio Button
You can assign a group of radio buttons to a single COBOL data item. Each radio button has an associated value. When data is sent from the form to the program, the value for the currently selected radio button is moved into the COBOL data item. When data is sent from the program to the form, the radio button whose value matches that in the COBOL data item is selected. You set up the radio buttons and values on the Control Map tab which appears when you select Selects in the Control Type field.
It is your responsibility to select radio button values that are valid for the data item you are moving them into. For example, if you set up values of "X", "Y" and "Z" on a numeric data item, the end-user is returned a run-time error message whichever radio button is selected.
6.3.3 Assigning a Field to a Check Box
You can assign a check box with an associated value to a COBOL data item. When data is sent from the form to the program, if the check box is selected, the value is moved into the COBOL data item. When data is sent from the program to the form, if the COBOL data item matches the value for the check box, it is shown selected. You set up the label and value for the check box on the Control Map tab which appears when you select Checkbox in the Control Type field.
6.3.4 Assigning a COBOL table
You can assign COBOL data items declared with an OCCURS clause to text entry fields only (password, hidden, label and disabled fields are also considered as text entry fields). If the OCCURS data item is a group item, you can use the same subset of controls for the sub-items in the group.
Each of the controls in the COBOL table is placed in an HTML table, set up to repeat the entry fields according to the value of the OCCURS clause.
6.3.5 Assigning a Field to a Select Control
You can assign a select control to a COBOL data item. You add a set of label/value pairs to the control. The browser displays the labels inside the select control. When the form is submitting, the value corresponding to the selected label is returned to the COBOL data item.
6.4 Generating the Application
Once you have selected the data for your application, you can generate the files for it. When you click Finish on the last page of the Internet Application Wizard, the wizard generates the files listed in the table below.
The names in this table are the Internet Application Wizard defaults - you can change these on an earlier page of the wizard.
| File |
Description |
|---|---|
| program_server.cbl | Program to link the form and the original subroutine. |
| program_server.cpf | Copyfile for data to and from the form. |
| program_server.cpl | Parameter data for subroutine. |
| program_server.cpv | Conversion routines for converting data between browser and the subroutine. |
| program_server.cpy | Application data. |
| program_input.htm | The input form for your application. |
| program_input.mff | A Form Designer file for the input form. You can load this into Form Designer to make changes to the form layout provided by the Internet Application Wizard. |
| program_output.htm | The output form for your application (only if you selected a double form application) |
| program_output.mff | A Form Designer file for the output form (only if you selected a double form application). You can load this into Form Designer to make changes to the form layout provided by the Internet Application Wizard. |
Once the Internet Application Wizard has finished generating the files, you should have a fully working application. You can then modify the generated forms using the Form Designer, or edit the generated code.
6.5 Creating an Example Application
In this section we will create a small application using the Internet Application Wizard, based on two subroutines. The first subroutine, b-write.cbl, writes records to an indexed file. The second subroutine, b-read.cbl, enables you to retrieve records by key. The records are entries for a book catalog. Each entry has fields for:
- Title (secondary key)
- Author (secondary key)
- Type
- Publication date
- ISBN (primary key)
The instructions for this example are not at the detailed level of "now click the OK button". They explain the overall process; detailed step-by-step instructions for the Internet Application Wizard and NetExpress are available in the on-line help. If you want to get a feel for the Internet Application Wizard and NetExpress before you start, run the tutorials in your Getting Started.
The two subroutines are in \netexpress\base\demo\bookapp. First create the form and application for writing files:
- Start NetExpress and load the project bookwrit.app from folder \netexpress\base\demo\bookapp.
- Create a new Internet Application, and select the following options on
the Internet Application Wizard:
- COBOL Source File
- b-write.cbl as the COBOL source program.
- Single form style
- Dynamic HTML
- "Add Book Records" as the Input Title.
- The Parameter Assignments page of the Internet Application
Wizard displays two 01 data items:
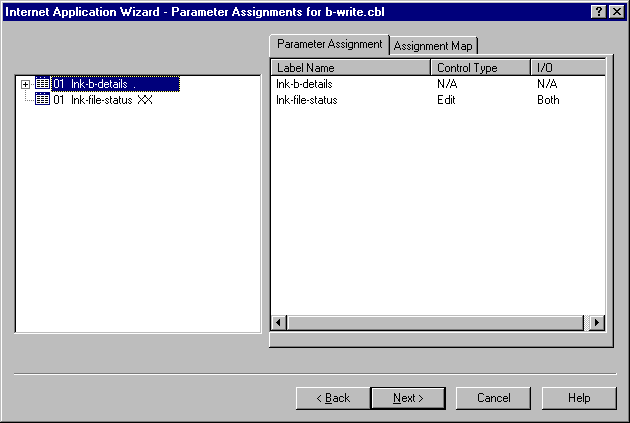
Figure 6-2: Internet Application Wizard display of linkage items - Change the label on LNK-FILE-STATUS to File Status, and set the data direction to Out.
- Click the + against LNK-B-DETAILS on the tree view to display its subitems.
- Set the field labels on the Parameter Assignment tab from top to
bottom as:
- Title
- Type
- Author
- Reprinting Date
- ISBN
- Set the data direction on all the fields to In.
- Right-click on any of the entries in the tree-view and click on Save
Assignment File on the pop-up menu, enter a filename and click OK.
This saves all the data assignments you have made; if you want to regenerate the application at a later time, you can reload the assignments file after you have loaded the COBOL subroutine. The Internet Application Wizard will automatically reload the assignments file if the assignments filename matches the subroutine filename.
- Click Finish on the last page of the wizard.
The Internet Application Wizard generates the files and adds them to the project.
- Click Rebuild on the NetExpress Project menu to build the application.
Now you can create the application for reading the file:
- Load the project bookread.app from folder \netexpress\base\demo\bookapp.
- Create a new Internet Application, and select the following options on
the Internet Application Wizard:
- COBOL Source File
- b-read.cbl as the COBOL source program.
- Single form style
- Dynamic HTML
- "Read Book Records" as the Input Title.
- Label LNK-FILE-STATUS as File Status, and set the data direction to Out.
- Click the + against LNK-B-DETAILS on the tree view to display its subitems.
- Set the field labels on the Parameter Assignments tab to:
- Title
- Type
- Author
- Reprinting Date
- ISBN
- Set the data direction on all the fields to Both (you will enter one of the fields as a key to search on, and the program returns data in all the fields).
- Save the assignments as b-read.aht.
- Click Finish.
- Rebuild the application from NetExpress.
You now have two simple applications, which enable you to update and read the book record file.
6.5.1 Testing the Example Application
In this section you can test the example application and use it to add records and read them back.
- You can start the application by starting a Web server, Web browser and
entering the URL for the application in the browser, or by starting it
through the NetExpress Animator:
- To start the application by starting the individual components:
- Start the Solo Web server.
If you want to use a different Web server, click Help Topics on the NetExpress Help menu, and on the Help Contents tab click Programming, Internet Application Programming, Debugging Internet Applications, How to, Animate Internet Applications, and follow the instructions.
- Enter the following URL in your Web browser's address field:
http://127.0.0.1/cgi-bin/b-write_server.exe
- Start the Solo Web server.
- To start the application through the NetExpress Animator, click Run on the Animate menu. If you have any breakpoints set in the source code, the application stops on the breakpoints, enabling you to debug the code.
Whichever way you start the application, your Web browser displays a form like the one below:
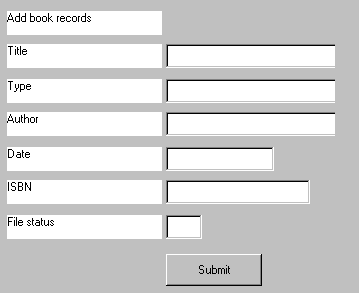
Figure 6-3: The Add Book Records form - To start the application by starting the individual components:
- Enter some details onto the form and click the Submit button:
Title Moby Dick Type Fiction Author Melville Reprinting Date 8feb96 ISBN 1 When you click the Submit button, the form returns after a pause with all the input converted to upper-case. The b-write subroutine converts all fields to upper-case to make key matching easier for the b-read subroutine. The File status field reads 00 if the record was added successfully.
- Make up information for a few more books, and add them as records.
Now that you have entered some data, you can try retrieving some records:
- Enter the following URL in your Web browser's address field:
http://127.0.0.1/cgi-bin/b-read_server.exeThis displays a form similar to the form for adding records.
- Type 1 into the ISBN field and click the Submit button.
This retrieves the record for Moby Dick.
6.6 Extending the Application
So far you have seen how to create a basic application, using a single subroutine to process some data taken directly from a form. In this section we look at how you can further extend an Internet Application Wizard application, by editing the forms and COBOL programs it generates.
6.6.1 Editing the COBOL Program
The Internet Application Wizard creates the following COBOL source code files when you generate an application:
| File |
Description |
|---|---|
| program_server.cbl | Program to link the form and the original subroutine. |
| program_server.cpf | Copyfile for data to and from the form. |
| program_server.cpl | Parameter data for subroutine. |
| program_server.cpv | Conversion routines for converting data between browser and the subroutine. |
| program_server.cpy | Application data. |
The only file you should edit is program_server.cbl - all the others are overwritten each time you regenerate the application from the Internet Application Wizard. File program_server.cbl contains:
- Declarations for all the form and subroutine data
- Logic to accept form input
- Logic to convert form input from alphanumeric strings to the format expected by the legacy subroutine
- A CALL to the subroutine
- Logic to convert subroutine output to alphanumeric strings for display
- Logic to output a form
You can add your own application logic to the program before and/or after the subroutine CALL. The Internet Application Wizard inserts "TO DO" comments into the code indicating these places.
6.6.2 Editing the Form
You can load the form generated into Form Designer and make changes to the default layout created by the Internet Application Wizard. You can also add extra controls to the form, in which case you need to add extra logic to the COBOL program generated by the Internet Application Wizard.
To edit the form, double-click on its .htm file in the Net Express Project window. This starts Form Designer and loads the form. When you save changes to the form, the copyfiles for your program are updated with data items for any new controls.
6.6.3 Enhancing the Example Application
The example application built earlier in this chapter returns the file status as a two-character code in an entry field. This is not helpful unless you happen to know the file status codes! In this section, you will change the application for reading records to return a message which reports one of the following:
- Record found
- Record not found
- File operation failed (any file status other than successful read or record not found)
You can make this change in three steps:
- Change the Internet Application Wizard assignments for subroutine b-read,
excluding the LNK-FILE-STATUS field.
When you regenerate the application, the form no longer has this field.
- Load b_read_server.htm into Form Designer, and add a new field for the message.
- Add code b_read_server.cbl to test the file status code returned from the subroutine, and send an appropriate message back to the form.
Changing the Internet Application Wizard Assignments
To change the Internet Application Wizard assignments for b-read.cbl:
- Start NetExpress and load the project bookread.app from folder \netexpress\base\demo\bookapp.
- Create a new Internet Application, and select the following options on
the Internet Application Wizard:
- COBOL Source File
- b-read.cbl as the COBOL source program.
- Single form style
- Dynamic HTML
- Enter "Read Book Records" as the Input Title.
- Right-click on any of the items in the tree-view on the Parameter
Assignments page. Click Get Assignments File on the pop-up menu, and
select b-read.aht on the Open File dialog box.
This reloads all the assignments you made when you created the application initially.
- Change the I/O assignment for LNK-FILE-STATUS to N/A.
- Click Finish on the last page of the wizard.
The Internet Application Wizard regenerates the copyfiles and forms for this application, omitting the LNK-FILE-STATUS field.
Add a field for the message
To add a new field to the form:
- Double-click on b-read_server.htm in the NetExpress project window to start Form Designer.
- Add a text box at the bottom of the form.
- Rename its ID to resultfield in the Component Tree View.
- Set the following properties:
- MaxLength to 30
- COBOL Picture to X(30)
- Save your changes and close Form Designer.
Changing the Example Program
To change the program to return an error message in the new field:
- Double-click on b-read_server.cbl in the NetExpress project window to start editing it.
- Locate the comment: "Add post-call application business logic here".
- Add the following code after the comment:
evaluate lnk-file-status when "00" move "Read OK" to resultfield when "23" move "Not found" to resultfield when other move "Operation failed" to resultfield end-evaluate - Rebuild the project.
- Rerun the application.
The application now returns a message indicating the file status.