

| Getting Started | Using Dialog System | |
This sample session will familiarize you with the Character Mode version of Dialog System.
Using the sample program Test1 you will learn the basic steps to define the data items for a screenset, design its on-screen appearance, test it, write a program to use it, specify the effects of keys, and set screen attributes.
All the features covered are described in detail later in this online book.
In Dialog System, data areas in memory (known in COBOL as data items) are referred to as fields. This same term is used for areas on the screen; for example data entry fields are areas where data can be entered.
A familiarity with the basic ideas of COBOL may be helpful in using this tutorial.
To start the Dialog System definition software, from the IDE, select UNIX, Dialog for UNIX.
There will be a moment's pause. Then the Dialog System banner will appear. The banner contains useful information about this release of the software.
After another moment, the main menu appears. You are now ready to define a screenset. This sample session will produce a simple data entry screen for entering the following product information:
The first step is to define the data.
Here you define the Data Block for your screenset. When your application calls the Dialog System run-time software, it passes the Data Block as a parameter. The Data Block contains all the fields that the application wishes to display on the various panels that make up a screenset.
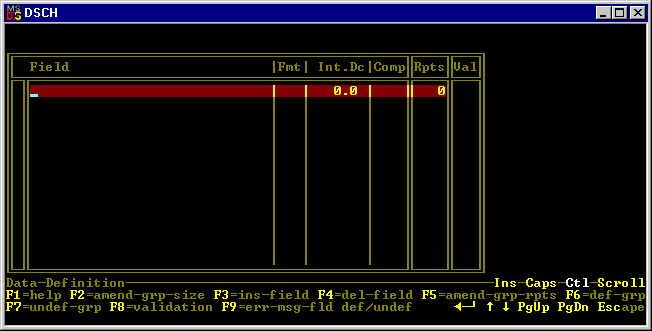
Figure 3-1: The Data Definition Menu
| Note: | During the following steps, if you type anything invalid, an error message will be displayed. Use the cursor-left, cursor-right, Tab and Back-tab keys to return to your error and correct it. |
Because the field you are defining is alphanumeric, type "X" under the Fmt heading.
There are three further columns in the list, called Comp, Rpts and Val. You do not need to use these in this session.
The list of fields should now be as shown in Figure 3-2.
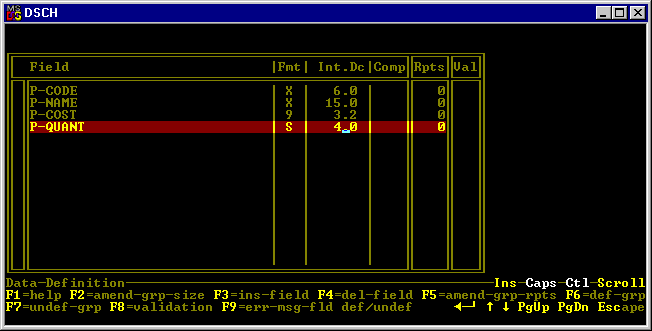
Figure 3-2: The Completed List of Fields
What you have just defined has disappeared from the screen, but it has not been lost. Generally, pressing Esc returns you to a higher level menu and retains what you have just defined. To confirm this, enter the Data Definition window again (select F2=data definition and then F2=data fields) to see it. Then press Esc twice to return to the main menu.
The next step is to save the screenset on disk.
The screenset has now been saved. At this point you could if you wished exit Dialog System and come back to this screenset later.
Dialog System saves all character mode screensets with the extension .S, so your screenset TEST1 is stored on disk in a file named TEST1.S.
Although you are not going to exit Dialog System at this point, why not clear the screenset from memory and then reload it from disk just to confirm that it has been saved successfully.
Initialize. Are you Sure? Y/N
The word "TEST1" changes back to "New set". You are now ready to start another screenset.
TEST1 is now loaded and you can begin further development of this screenset.
Now that you have defined the fields, you need to specify the visual aspects of the screen. You do this by painting a panel.

Figure 3-3: The Panel Menu
A highlighted character appears in the cursor position. Now move the cursor to row 15, column 70. The entire rectangle thus marked out becomes highlighted. This area is going to be your working panel.
The panel has now been defined and a border is drawn around it.
The menu has now changed to the Panel Painting menu shown in Figure 3-4. You are in panel painting mode and the cursor is now restricted to being inside the panel. The row and column numbers are now relative to the panel.

Figure 3-4: The Panel Painting Menu
The word "STOCK" appears at the left-hand end of the status line. The menu has a single line drawn along the status line instead of the double line in the main menu.
If you press Esc, you return to the Panels menu again. If you do this by accident and you want to return to painting the Stock panel again, select F3=panel-list from the Panels menu. This brings down a list of panels — it will have just one entry, Stock — with a highlighted selection bar. You select a panel by using the cursor-up and cursor-down keys to move the selection bar and pressing Enter at the required panel.
First add the accompanying text. Move the cursor to row 3, column 10 (remember these numbers are now relative to the panel) and type "Product Code".
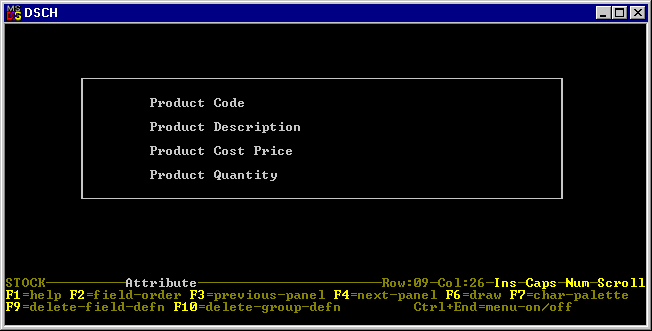
Figure 3-5: The Panel With Text Added
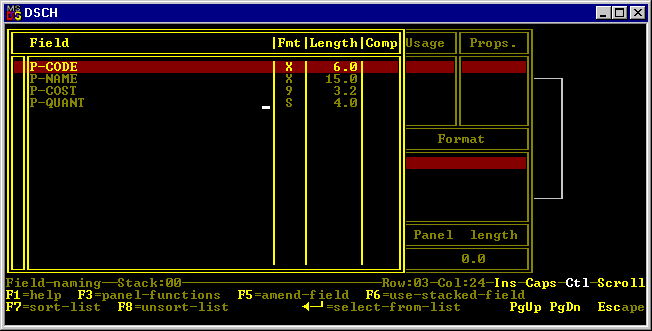
Figure 3-6: The Field Selection Panel
The highlighting now surrounds the Usage part of the Field Selection panel. This part of the table contains a selection bar too. You can now specify the usage of P-CODE, that is, the purpose for which P-CODE will be used. (Do not confuse this usage with the USAGE clause in COBOL. )
One of the entries in the Usage list has the symbols > and < beside it. This entry is the currently selected usage. The default usage is IN, which means this field is to be used for input.
To select a usage, move the selection bar to it and press the space bar. Only one usage can be active at a time. The usage you want for P-CODE is in fact the default, IN, so select this. Then press Tab.
You can select a property by moving the selection bar to it and pressing the space bar. Several properties can be active at one time. You can de-select a property by pressing the space bar again.
Make sure that AUTO is the only property selected. Then press Tab.
You can have only one format active. The use of formats will be discussed later. Make sure that ALPHANUMERIC is selected. Then press Tab.
Make sure that the entry in Panel Length is 6.
The Field Selection panel at this point should be as shown in Figure 3-7. If you have got any of it wrong use the Tab and Backtab keys to move around and correct it.
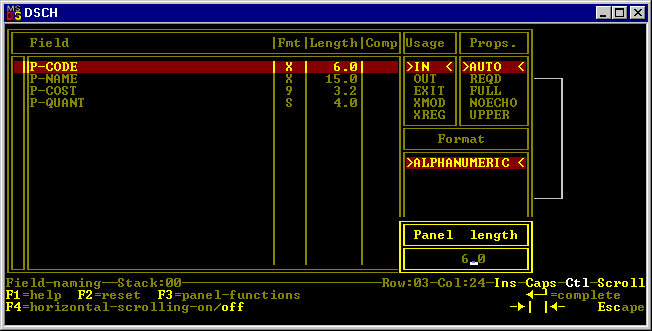
Figure 3-7: The Completed Field Selection Panel
You now want to position P-NAME.
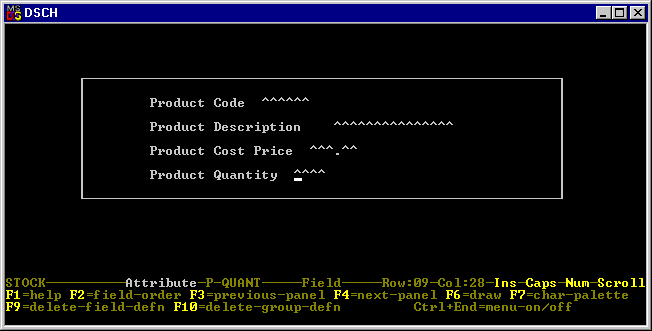
Figure 3-8: The Panel With Entry Fields Added
To make the panel look neater, you can align the data entry fields.
You can move the cut block to anywhere on the panel. You want to keep this field in line with its prompt "Product Code", but move it to the right by 6 character positions so you can line all the fields up underneath each other.
Figure 3-9: The Panel After Tidying Up
You can run the screenset without writing a program. This will allow you to evaluate and test its behavior, and to alter it by simply returning to the screenset definition. This is useful for prototyping your interface.
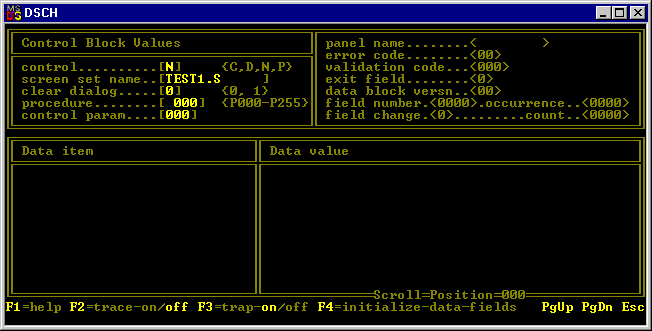
Figure 3-10: The Trap Screen
These will allow you to move through and from field to field in either direction.
Note the effects these keys have. Some keys do nothing but beep. The section Dialog later in this chapter will explain how to define effects for keys.
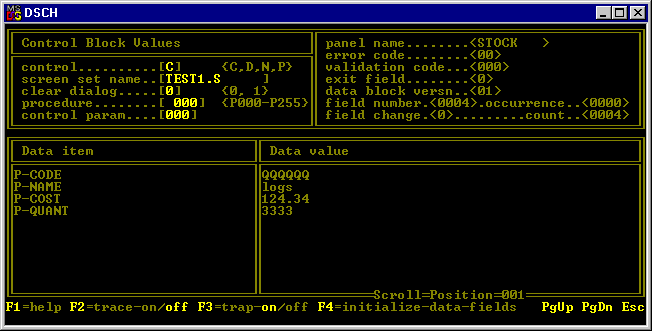
Figure 3-11: The Trap After Running the Screenset
If you have not returned to the Trap window, you probably accidentally pressed F3=trap on/off when you were first in the Trap window. Simply press Ctrl+Break followed by Esc in this case.
This window has changed in several ways (see Figure 3-11):
This takes you back to the trap. A message to show that Ctrl+Break has been pressed is shown.
Dialog System handles the interface between a COBOL application program and a user using screen and keyboard. This means an application program only needs to be concerned with basic data processing tasks, and thus it becomes smaller, simpler and much easier to code and maintain.
In the first section Creating a Screenset , you developed a user interface consisting of a panel and four data entry fields. Now you will develop and animate a COBOL program to use this interface.
Use an editor to enter the program test1.cbl below.
$set ans85
 working-storage section.
     copy "ds-cntrl.mf".
     copy "test1.cpb".

 procedure division.

 main-process.
     perform program-initialize
     perform call-screen-manager
     stop run.

 program-initialize.
     initialize test1-data-block
     initialize ds-input-fields
     move ds-new-set to ds-control
     move test1-data-block-version-no to
           ds-data-block-version-no
     move "test1" to ds-set-name.

 call-screen-manager.
     call "DSRUN" using ds-control-block,
                        test1-data-block.
This program refers to two COPY-files. They are called ds-cntrl.mf and test1.cpb.
ds-cntrl.mf is provided with the Dialog System software and defines the Control Block that your program passes to the Dialog System run-time software. The control block contains basic information about running the screenset. It is a fixed part of Dialog System and applies to all screensets.
test1.cpb defines the fields passed between your program and Dialog System. These items are called the Data Block. The Data Block is specific to each screenset. Most of the information in the Data Block is information that you entered when you defined your fields using the definition software. You generate test1.cpb from the definition software.
To run your program, you need to compile it first.
From the IDE, select File, New, and double-click Project from the list.
You want to create an empty project with a name of test1, and select the \UNIX\dschar\demo directory as the folder to contain the project.
Select Project, Properties and then click IDE, Import, Import. Click on COBCPY and then OK. COBCPY is then displayed. Double-click on this, so that it is shown in the Variable and Value fields at the bottom of the dialog box.
Insert \Program Files\MERANT\net express\UNIX\dschar\source; at the beginning of the entry in the Value field, and click Set and OK, OK.
Now right-click in the left-hand pane of your project window to add files to the project. Select test1.cbl and click Add.
Click the Rebuild icon, and click Yes to rebuild the whole project.
Now you can select the Run icon to run your program.
This section shows how to improve the screenset's functionality by defining the effect of particular keys.
You do this by defining a dialog. The dialog defines procedures and/or functions to be executed when the user presses a key. Functions include functions to move between fields, cursor functions, and keyboard functions. Dialog can be local to a panel or global to the screenset. You can specify which of these types of dialog is to be resolved first.
For example, the next section describes the global dialog associated with the event generated when the Esc key is pressed. The global dialog defines the default behavior whenever Esc is pressed. However, if you define a different local dialog for Esc in one panel, this behavior normally overrides that of the global dialog. (You can change the order in which dialogs are resolved. You change the default setting using the screenset switches option reached from the main menu, Alt+F5.)
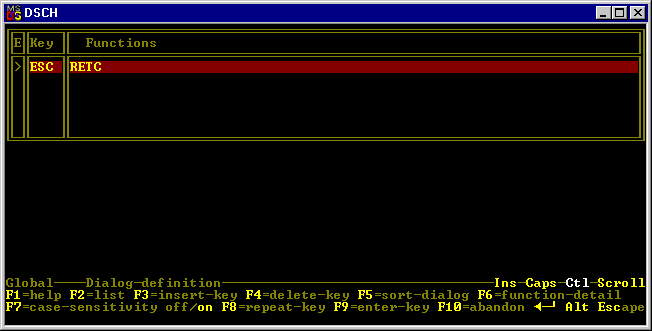
Figure 3-12: The Dialog Definition Screen
There is one line already defined in the dialog. This defines that the event ESC (pressing the Esc key) will cause the action RETC (return to calling program). You have already seen the result of this definition, when you pressed Esc in the running screenset and it returned to the trap.
A dialog entry consists of an event (for example ESC) and one or more functions to be performed if the event occurs. A complete list of Dialog System functions can be found in the chapter Function Code List.
The selection bar is currently in the top line of the dialog list. Press Enter to move it down one line.
A list appears, from which you can select the key that you want.
Alternatively, you can simply type the mnemonic TAB yourself, or you can select F9=enter-key followed by the key you want (Tab).
The Function Definition panel appears. This is where you define the function or functions to be executed when the Tab key is pressed. Each function consists of a function mnemonic and up to three parameters. The cursor is currently in the Function column.
This gives you a list of allowable functions. Move down this list until you find SKNF (the Skip to Next Field function). Select it by pressing Enter. The function name SKNF appears in the key column and the list disappears.
You could also use the name of one of your data fields for this parameter. The skip would then skip to next field as many times as the value in your specified data field at run time.
Many functions have parameters such as panel name or field name. When a parameter is needed, you are forced to enter it. Again, pressing the F2 key provides you with a list to select from.
The SKNF mnemonic has been placed in the list beside TAB, but its parameters are not visible. This allows you to inspect the functions quickly without bothering about the details of the parameters.
Your dialog window should now be as shown in Figure 3-13. The order of the items in the dialog does not matter. You can re-order the items using F3=insert-key and F4=delete-key if you wish.
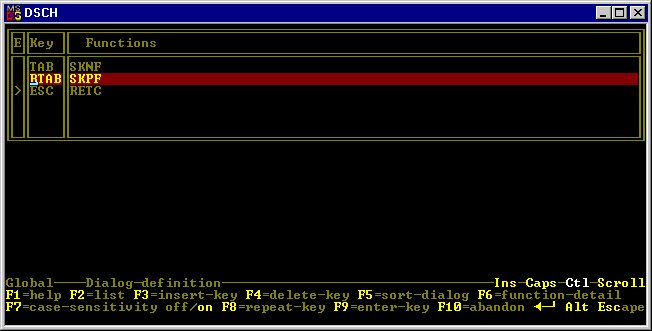
Figure 3-13: The Dialog You Defined
(The >symbol shown against ESC means it is an event key.)
The panel you have created is rather plain. If you are using a color screen, it would be good to improve the panel's visual effect. When you painted the panel earlier, you might have noticed that the status line on the Panel Painting menu contained the word Attribute. This refers to the color on a color screen, and the attributes of highlighting and underline on a monochrome screen.
In this section, we assume you are using a color screen. If you are using a monochrome screen, changes of color described in this section will appear as changes of highlighting and underlining.
You can see that the color of the word changes. There are six different colors for the word. These colors make up your current attribute palette.
The current attribute palette contains six active attributes. One of the six is the default background attribute and the other five are called the roll attributes. These six attributes are preconfigured to behave reasonably on both a color and monochrome screen. You can change the attributes to any of the 256 found on your personal computer.
Your panel is probably a mess now, so return to the main menu and reload the screenset from the clean version of Test1 on disk. Then go to the Panel Painting Menu again.

Figure 3-14: The Attributes Menu
Using the cursor-left and cursor-right keys or Tab and Backtab, move the cursor left and right along the set of attributes and watch the effect.
The attributes shown against these function keys, together with the default attribute, make up the current attribute palette.
This is the end of the Dialog System Character Mode sample session. There are additional examples in the chapter Tutorials.
Copyright © 2000 MERANT International Limited. All rights reserved.
This document and the proprietary marks and names
used herein are protected by international law.
| Getting Started | Using Dialog System | |