

| Introduction to Dialog System | Window Objects | |
The following sections describe the steps needed to create an application with Dialog System.
As you have seen in the chapter Introduction to Dialog System, the first step in developing a Dialog System application is to design a data model which you can use to create the data definition. This data model defines the basic data items your screenset must pass to the calling program when you run your interface.
You should base the data definition on the data model of your calling program. Before you start to create the data definition, identify the data to be captured by the user interface. This data becomes the basic data items your screenset must pass to the calling program. Also, decide on any validation criteria for these items.
In this step of the development cycle, you first create the data model for both input and output data. This should include data characteristics such as:
When you have created the model, you can begin to define the data that passes between Dialog System and your program.
There are also some design considerations concerning the whole of your screenset. See the section Controlling the Use of Screensets in the chapter Using the Screenset for further details.
To pass data between the interface and your application program, you associate some objects, such as entry fields, with data items (master fields) defined in your application program. These are the data definitions.
A master field holds the data that users enter in an entry field. You make the association by selecting the appropriate master field when editing the control's properties.
Dialog System allows for inexperienced users by providing a prompted mode of data entry. The differences are:
It is good practice to place comments in your data definition. Any line starting with an asterisk character is treated as a comment, with no validation or reformatting performed. For example:
* This is a comment line
Follow the steps below to create a data definition:
The Data Block contains the data items that you define in the Data Definition window of Dialog System. Each screenset has a unique Data Block that is incorporated into the calling program as a copyfile.
At run time, the calling program moves user data to this record before it calls Dialog System. User input placed in the Data Block by Dialog System can be used by the program when control is returned.
Related data items can also be placed in groups, and mapped onto objects such as list boxes.
You can view, define, and edit the Data Block in the Data Definition window. To invoke the Data Definition window:
A simple example of a Data Block is shown below:
| Fieldname |
Format |
Length |
Validations |
|---|---|---|---|
GROUP-ITEMS |
Group | 10 | |
FIELD-1 |
9 | 4.00 | R |
FIELD-2 |
X | 10.00 | R |
FIELD-3 |
9 | 6.00 | R |
GROUP-POSITION |
9 | 2.00 | |
S-FIELD-1 |
9 | 4.00 | |
S-FIELD-2 |
X | 10.00 | |
S-FIELD-3 |
9 | 6.00 | |
COMMENT |
X | 40.00 | |
COMMENTS-TITLE |
X | 25.00 | |
ARRAY-SIZE |
9 | 2.00 | |
OBJECT |
OBJ-REF |
The format of the Data Block is controlled by Dialog System.
If an error occurs, you will be prompted to re-key the line. All entries in the data definition are converted to upper case.
Note: OBJ-REF does not require an entry under length, as it is fixed length.
The data definition is copied when you generate the COBOL copyfile for your screenset. This copy file, named screenset-name.cpb forms the Data Block which is passed between the calling program and Dialog System. When you run your screenset, the calling program moves data to the Data Block before it calls Dialog System. Dialog System can move data to the Data Block before it returns control to the calling program.
The Data Block copyfile contains a description of the screenset data items and associated field numbers.
The copyfile is a COBOL record definition that is incorporated into the calling program when it is compiled and is entirely dependent on the data items you defined as part of the screenset. If these change, your program will need to change to match.
A checking mechanism is used to ensure this. The format of the Data Block copyfile is as follows:
All data items defined in the data definition are global in the screenset and can be freely referenced in the screenset dialog.
Typical data items might map onto an entry field or a list item. Data items are categorized according to type, and can be placed in groups and mapped onto an object such as a list box. Data items can also be set up as flags, which can be referenced by dialog or can carry values to your calling program.
Each data item in the Data Block must have the following:
| Data type code |
Meaning of size field |
|---|---|
| X or A | Number of characters. |
| 9 or S | Number of digits before and after the decimal point. |
| C or C5 | Number of bytes stored. The size determines the
range of numbers that can be stored: 1.00 to 255 2.00 to 65, 535 4.00 to 4,294,967,295 8.00 to 18,446,744,073,709,551,615 Note that in some circumstances, Dialog System handles only the last 18 digits of a value. |
| N or G | Number of characters. Each character occupies two bytes. |
| OBJ-REF | The size of object references is fixed. You cannot specify a size for an object reference. |
The following examples show the maximum and minimum ranges you can enter for numeric and signed numeric data items:
    LARGEST-VALUE             9     18.0
    SMALLEST VALUE            S     0.9
The following example shows a Data Block entry for a numeric data item with three places before the decimal point and two after:
ARBITRARY-DATA-NAME 9 3.2
The appearance of a data item is controlled by the picture string of the presenting entry field.
The following example shows how to define an object reference:
MAIN-WINDOW-SBAR-OBJREF OBJ-REF
Data groups are used for multiple occurrences or repetitions of a set of homogenous data items. The data items in a data group are referenced by a subscript in the Data Block and the calling program. Data groups are seen by the calling program as contiguous data items, each item being accessed relative to its position in the group using the subscript as an index. If a data group is defined as having only one repetition, the data items will not have subscripts in the calling program (but you must still use subscripts in Dialog System).
A group entry consists of a group name and a number of repeats, for example:
GROUP-1 150
Data items belonging to a group are listed under the group name and indented, for example:
   GROUP-1                    150
        DATA-ITEM-1            X    10.0
        DATA-ITEM-2            X    10.0
        DATA-ITEM-3            X    10.0
It is not possible to change the order of data items in the Data Block other than by deleting and redefining them or using the Copy, Paste and Delete functions from the Edit menu in the Data Definition window.
A dependency is the term used to describe the relationship between data items, objects and dialog. Dependencies fall into two categories:
You can query the dependencies of any named object by selecting Dependencies from the View menu in the main window or by selecting View Dependencies from the Options menu in the Data Definition window.
The Dependency Query dialog box showing the dependencies for the Customer sample screenset is shown in Figure 3-1.
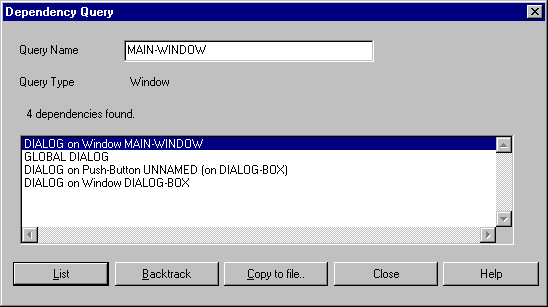
Figure 3-1: Dependency Queries Dialog Box
If you query dependencies from the Data Definition window, the dialog box describes dependencies for the data item on the line currently highlighted in the Data Definition window. If you query dependencies from the main window, the dialog box describes the dependencies for the object highlighted in the main window.
When you are in the Dependency Query dialog box, you can list the dependencies of a data item or object displayed in the dialog box. Highlight the relevant line, then click List. This feature enables you to follow a chain of dependencies if you need to.
Dialog System enables you to validate user data input via entry fields against specified criteria.
Validation only occurs when you use the VALIDATE function in your dialog. For example, to validate all entry fields in the main window, you can use:
VALIDATE MAIN-WINDOW
If you added any selection boxes to the main window, this function would also validate these. You can also validate a single entry field or selection box.
If a validation fails, a VAL-ERROR event is generated. You can use the VAL-ERROR event in a number of ways. For example, you can set the input focus back onto the field that failed validation. In this case, the $EVENT-DATA register will contain the identity of the entry field that failed validation:
    VAL-ERROR
        SET-FOCUS $EVENT-DATA
To display an error message, you can use a message box. You can either define a message box that displays just that one message, or define it so that it can display different messages by moving the appropriate error message text to the message box.
To display an error message using the second method, you need to define
an error message and an error message field in your data definition. The
Customer sample screenset uses ERR-MSG as the error message
field. When a VAL-ERROR event occurs, the following dialog is processed:
    VAL-ERROR
        SET-FOCUS $EVENT-DATA
        INVOKE-MESSAGE-BOX FIELD-ERROR ERR-MSG $EVENT-DATA
The message box FIELD-ERROR is used to display the
contents of ERR-MSG. The $EVENT-DATA register in the third
line of dialog is used to contain a code indicating which button the user
clicked to acknowledge the message box (for example OK or CANCEL).
You can use any combination of the following validation criteria:
Three data items are validated in the Customer sample screenset:
For more information on the VALIDATE function and the VAL-ERROR event, see the topics Dialog Statements: Functions and Dialog Statements: Events in the Help.
When you specify a data validation, you have the option of associating an error message to be placed in an error message field defined in the Data Block if a validation fails. The way you use error messages will depend on your requirements.
The following rules apply to error message definition:
To associate an error message with a validation, highlight the item to be validated in the Data Definition window. Use the Validation menu to display the relevant validation dialog box and click Errors. The Error Message Definition dialog box is displayed.
The default error message file is dserror.err. You can create a new error file, or load an existing error file by selecting File.
For the Customer sample screenset, there is an error file customer.err already defined. Select this file and click OK to return to the Error Message Definition dialog box.
The Customer sample program error file has three error messages:
Use for a validation error on the data item C-AREA.
Use for a validation error on the data item C-LIMIT.
Use for a validation error on the data item C-ORD-DT.
To specify a new error message, specify a number in Error number and the error text in Error text, then press Insert.
To select an error message to associate with the validation, highlight the message and click OK. You return to the validation dialog box. The number of the error message you selected is displayed in Error message no.
If validation fails on any of the data input to the data items in the list of error messages just described, a VAL-ERROR event is generated and the appropriate error message is placed in the error message field ERR-MSG.
You can also use the Error Messages dialog box by selecting Error Messages on the Screenset menu in the main window. This enables you to edit error messages and error message files, but not to associate a message with a validation.
For more information about creating an error message file and defining error messages, see the topic Data Definition and Validation in the Help.
The next step in the application development process is to select the objects that are appropriate for your application. Objects are the building blocks of Dialog System and you can find them described in the two chapters Window Objects and Control Objects.
Further information on data definitions can be found in the topic Data Definition and Validation in the Help, specifically on using data groups, the internal size of data groups, and detailed information on the contents of the generated Data Block.
Copyright © 2000 MERANT International Limited. All rights reserved.
This document and the proprietary marks and names
used herein are protected by international law.
| Introduction to Dialog System | Window Objects | |