

| Data Access | Multiple Screensets | |
In this chapter you see how to tailor User and ActiveX Controls to use with your Dialog System application. The topics covered are:
Throughout this chapter, we use the term control program. This is a COBOL source program that creates and manipulates the user interface object or control.
Using a control program, any object can be manipulated using programmed functions appropriate to that object. You can perform actions on that control such as refreshing, deleting or updating data associated with the control:
Dialog System provides programs that enable you to include the following controls in your application:
The source code for each control is designed to be as generic as possible. You can tailor and re-use the code with the minimum of changes. The extent to which this is possible, however, varies according to the control itself.
You need to tailor these versions to meet your own requirements. Each of these controls, however, has generic code that does not need changing and you will find references to modifying the programs documented in the section User Controls.
The control programs are implemented using calls to the Net Express class libraries.
The following diagram illustrates the architecture used to implement controls using Dialog System and the class libraries.
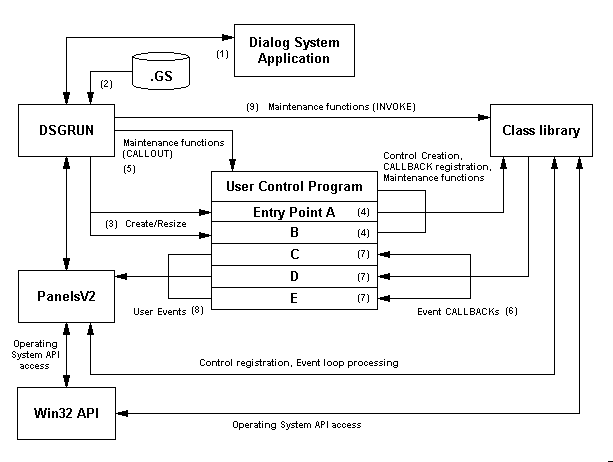
Figure 10-1: Controls Implementation Architecture
When you create an ActiveX or user control:
As part of the control creation process, code exists in the generated control programs to enable the registration of callbacks for events in which the program is interested. This associates program entry points with the occurrence of defined system events.
As you saw in the chapter Control Objects, ActiveX Controls are supplied by third-party vendors and can be integrated into Dialog System. When you use an ActiveX Control in your interface, you need to customize it to suit your own requirements.
There are three types of ActiveX design-time properties:
These are the properties which must be defined when you select an ActiveX Control.
Select Properties on the Edit menu, or double-click on the control.
Select the ActiveX Control in your screenset to display this automatically.
Right-click on the ActiveX Control. This includes the general properties in the general property list above. Not all ActiveX Controls have property pages implemented.
In many cases, the default properties will not suit your application. For example, the default properties for a spreadsheet ActiveX Control may only have two columns and two rows. On the other hand, some ActiveX Controls, such as the Dialog System clock ActiveX Control, has mainly acceptable defaults.
You should refer to the documentation for the ActiveX Control to determine the properties that you need to set. The changed property data is stored in your screenset.
The steps that you need to take to tailor your ActiveX Control are:
To specify the ActiveX Control directly from Dialog System's menu:
An icon representing this control appears on the ActiveX toolbar. You can select this ActiveX Control directly from the ActiveX toolbar whenever you need to re-use it.
The ActiveX Control Properties dialog box is automatically shown as in Figure 10-2.
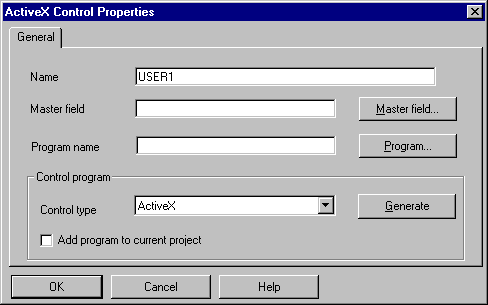
Figure 10-2: ActiveX Control Properties Dialog Box
In the ActiveX Control Properties dialog box:
This will be the controlling program for the ActiveX control in your screenset.
An example of a customized ActiveX Control program is located in the folder Net Express\DialogSystem\Demo\Activex\Custgrid. The file custgrid.txt describes how to run the demonstration.
Customizing a control program to work with your ActiveX Control involves:
To tailor your ActiveX Control you need to explore the methods, properties and events that your ActiveX Control supports. The Programming Assistant simplifies this task by providing a visual environment from which you can extract the pre-defined functions that your program requires. It provides you with code to:
An ActiveX Control has properties or attributes, for example, the background color, which you can read or change:
property name statement to find out the
current state of the property.
property name statement to change a
property.
Methods are a set of pre-defined functions provided by the ActiveX control. These pre-defined functions instruct the control to perform some action, during the course of which they can either send parameters or return values or do both.
Events are provided by the ActiveX control to indicate that an action has occurred. The event may send parameter information which describes the details of the event. This information is received and recognized by the application program which is using the ActiveX control.
Registering a callback causes a block of your COBOL code to be
executed when an event occurs on your control. For example, when an
ActiveX grid row is to be deleted, call the program entry point
detailed in MessageName. The entry point code exists in
the controlling program source file.
For example, the following code registers a callback to be executed when an ActiveX grid data row is to be deleted by a user's interaction.
The name of the event generated by the ActiveX:
MOVE z"RowDeleted " TO MessageName
The entry point name to be executed on occurrence of the event:
MOVE ProgramID & z"DeletedRow" TO CodeName
The Callback registration:
INVOKE anActiveX "SetNamedEventToEntry" USING
          MessageName
CodeName
To access the Programming Assistant:
The ActiveX Programming Assistant dialog box is shown in Figure 10-3.
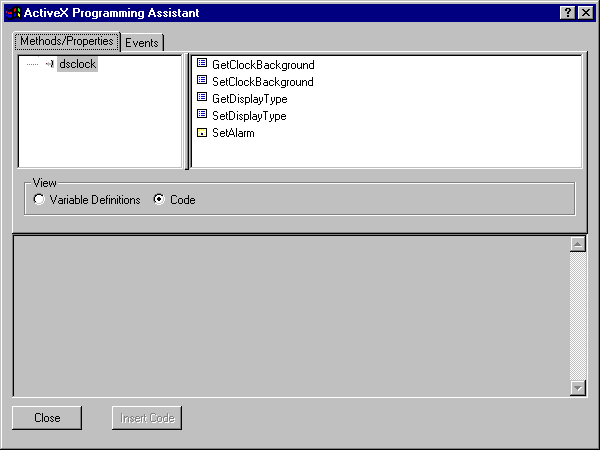
Figure 10-3: ActiveX Programming Assistant Dialog Box
There are two tab pages available in this dialog box, enabling you to insert the code relating to methods and properties or events directly into your open COBOL program.
Selecting the Methods/Properties tab displays the screen shown above in Figure 10-3.
The left-hand pane displays the ActiveX control and exposes its run-time object hierarchy. The right-hand pane displays the methods and properties that this control provides.
When you select a Method or Property in the right-hand pane, the associated COBOL code appears in the pane in the lower part of the dialog box.
To insert this code into the program which creates the ActiveX at run time:
There is no clearly commented place to insert this code, as methods and properties insertions depend entirely on your program logic. The code can be used in the context of control initialization, event callback or simple run-time manipulation.
The created code contains all required parameters and return values needed for the function you selected.
ActiveX Controls can have associated sub-objects, each of which has its own methods and properties which can be viewed or edited. To see these, click on the + sign connected with the ActiveX Control in the left-hand pane.
Sub-objects generally do not have related events. These are globally handled in the ActiveX Control.
Selecting the Events tab displays the screen in Figure 10-4.
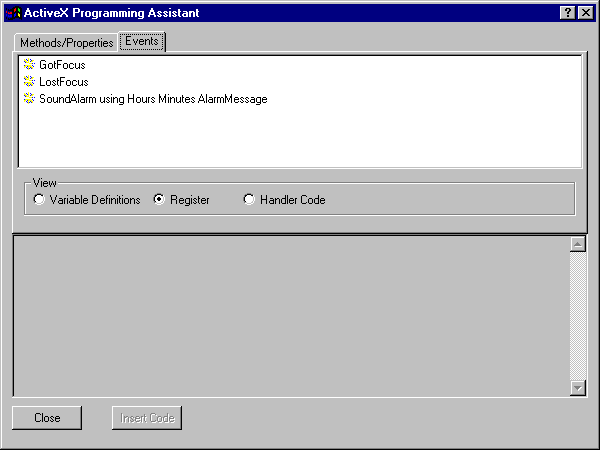
Figure 10-4: ActiveX Programming Assistant Dialog Box - Events
The upper part of the dialog box shows a list of event names. Next to each event name there may be parameters which are passed by the event to the ActiveX controlling program.
As with the methods and properties view, the lower pane displays the code associated with the event selected in the upper pane. The radio buttons' functions are described below.
When the Variable Definitions button is selected, you can see the variables connected with the event selected in the upper pane. These variables:
Parameters must be retrieved into the defined variables in the event handler code before being accessible to the controlling program.
Selecting the Register button displays the code which your controlling program needs in order to register a callback for the selected event. Registering an event callback performs two tasks:
The generated name of the entry point is Program ID+On+event name. For example, if the event name is BeforeDeleteRow the generated entry point name would be Program IDOnBeforeDeleteRow.
Note: The generated entry point name is prefixed by the program ID to ensure the uniqueness of the entry point across different control programs. For example, you may have the same event name in different ActiveX controls. Without the program ID attached to the entry point, the OLE class library would not know which control program to call.
You need to insert this code in the Register-Callbacks section of your controlling program which is executed on creation of the control.
When you select the Handler Code button:
When this is selected, the code displayed for the event includes:
You insert the event handling code at the comment
*Add your event handler code here.
Sample code is available in the generated control program.
To insert this code:
There is a clearly commented place to insert this code. The code can be used in the context of control initialization, event callback or simple run-time manipulation.
The created code contains all required parameters and return values needed for the function you selected.
The Programming Assistant for ActiveX controls significantly reduces the ActiveX control familiarisation process, as well as the time taken to produce the code you need.
When you use a User Control in your interface, you need to customize it to suit your own requirements. The steps that you need to take to tailor your User Control are:
The User Control object allows you to add a Net Express Class Library GUI object to your screenset.
To create the User Control:
The User Control dialog box is shown as in Figure 10-5.
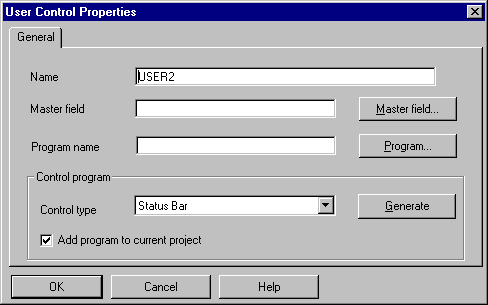
Figure 10-5: User Control Dialog System Properties Dialog
Box
You should choose a name which is different from any of the Class Programs defined in the Net Express class library. Once you have chosen a new name for the tailored control program, you can start to modify it to provide the functionality that you require.
This will be the controlling program for the user control in your screenset.
In all circumstances you will need to import the Data Block definitions listed in the funcdata.imp file found in your DialogSystem\Source directory. Select the Dialog System File/Import/Screenset menu choice and select funcdata.imp for import on the resulting dialog box.
The following sections detail the changes you need to make to successfully use the generated programs with your screenset.
No COBOL code changes are required. Simply implement a USER-EVENT dialog event on the parent window of your spin button, to respond to the event posted by the generated program. Your dialog code can then ensure your Data Block master field is updated to the new value passed by the control program.
USER-EVENT
     XIF=$EVENT-DATA 34580 UPDATE-MASTER
     UPDATE-MASTER
     * The User control program updates the NUMERIC-VALUE
     * field. This code updates the field I want
     MOVE NUMERIC-VALUE(1) MY-NUMERIC-FIELD
No COBOL code changes are required. You simply need to implement the following points, which are covered in more detail in the Tutorial chapters later in this book.
This procedure is covered in detail in the chapter Tutorial - Adding and Customizing a Status Bar.
When using the generated TreeView control program, first import the tviewdata.imp file, to populate the required entries in your screenset Data Block.
To use the TreeView control program, simply populate the ATVIEW-PARMS Data Block group with the data you want to insert into the Created Tree control. See your Help for details.
Callback registration and event handler examples are provided in the generated program. You can adapt them to meet your own needs.
When using the generated Toolbar control program, first import the tbardata.imp file, to populate the required entries in your screenset Data Block.
To use the Toolbar control program, adapt the menu and toolbar button definition used by the program: do this by editing one WORKING-STORAGE copyfile that defines the structure to be used.
Next simply write code to respond to menu/ button choice selection by the user, and take whatever action you require, including execution of existing menu choice dialog which is already defined in your screensets.
When creating the User control object, you can generate a generic skeleton control program, which provides the structure for you to create any control you choose.
The generated programs you produce will compile and run successfully without change. You can now change the code to perform any additional functions you require in your application, or, as you have seen, you can use the generated code unchanged.
The intention is to produce a full suite of control programs which provide access to all class library controls via the same procedural COBOL interface. This process will be completed in future releases of Dialog System in Net Express.
Copyright © 2000 MERANT International Limited. All rights reserved.
This document and the proprietary marks and names
used herein are protected by international law.
| Data Access | Multiple Screensets | |