
 | Using the Screenset | Data Access |  |
The previous chapters have given you an introduction to the basic elements of Dialog System. This chapter describes how the new Windows GUI Application Wizard provides you with:
This is done by selecting the data access option and defining an SQL query in the Wizard.
As well as creating a new screenset, the Wizard process automatically generates associated COBOL programs configured to the functionality you have requested. Both the screenset and associated COBOL programs are automatically added to your project if required.
Note: The programs and files that are output as a result of using the Windows GUI Application Wizard are meant as a starting point for developing your own applications. They are not intended to be universally applicable to all situations, but are provided so that you can learn to use the basics. You can then adapt the code provided to suit your own needs.
The chapter Creating a Windows GUI Application in the Getting Started on-line book is a tutorial which includes practical details on how to use this wizard.
There are three ways of starting the Windows GUI Application Wizard:
Note: If you open the Wizard from the IDE, and you do not have a project open, the Wizard creates a new project. You need to supply the project's name and location.
This section gives you a brief description of the features in each step of the Wizard.
The Wizard offers you a name for your new screenset. You can change this. You do not have to append .gs to the screenset name, as this will be done automatically.
Here you select whether your new screenset is to have a Multiple Document Interface (MDI) or a Single Document Interface (SDI). If you require an MDI application, you specify how many MDI children the interface is to have. If it is an SDI, you specify how many primary windows are required.
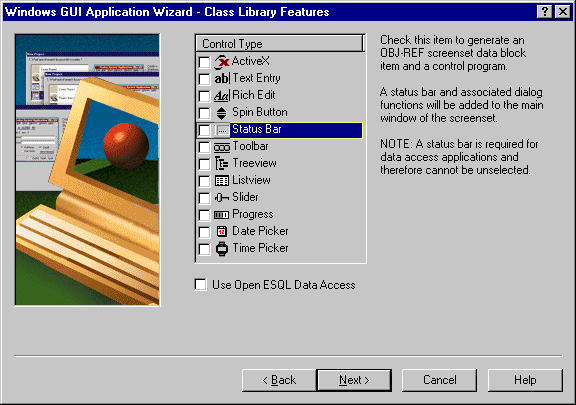
You can select features for your new screenset such as a Status Bar and a Main window toolbar. For all of the features requested, appropriate Data Block, Dialog and controlling programs can be generated. This step in the Wizard is shown in Figure 8-1.

Figure 8-1: Class Library Features
Selecting Use OpenESQL Data Access enables you to access any installed ODBC datasource and to set up queries as described in the next step. If you leave this option unchecked, you skip the next step and go directly to Step 5.
When you select Use OpenESQL Data Access, a status bar is automatically selected for your screenset.
If you have not selected Use OpenESQL Data Access in Step 3, you skip this step and go directly to Step 5.
Note: If you did not install the ODBC Drivers at installation time, you need to do so before you can use this part of the Wizard.
In this step you can:
Access to installed data sources uses the OpenESQL Assistant technology.
If you haven't set up any data sources yourself, you can use one of the sample data sources that is set up automatically when you install Net Express. One of these, NetExpress Sample2 points to a sample Microsoft Access database, sample.mdb which is supplied with Net Express and is installed in the base\demo\smpldata\access directory.
If you double-click on a database name, you see a list of tables contained in the database. Select a table from this list by double-clicking on the table.
When you select a table, the table expands into columns. Double-click on a column to select it. When selected, an EXEC SQL statement is added into the right-hand Query pane.
If you double-click on a subsequent table, the Table Added To Query dialog box tells you how the tables will be joined. If you want to use a different join, click No and use the Search Criteria tab.
Once you have selected the columns, you can run the query by clicking RunQuery on the toolbar and view the query results to verify the data that will be accessed by your generated application.
Note: You must select at least one primary key. If you do not select a primary key, one is automatically selected for you.
The screen for this step in the Wizard is shown in Figure 8-2.
This screen is used to build and test queries for use in your generated application. You can activate it independently from the Tools, OpenESQL Assistant menu in the IDE.
For further details about database access and how to use SQL, see the chapter OpenESQL in the Database Access on-line book.
In this step you set up parameter blocks in your Data Block to enable the use of any of the Dialog System extensions that you may need for your screenset. Each extension has different requirements.
Selecting any of these options causes the relevant dialog code to be inserted into your generated screenset.
Click Help for full details on each option.
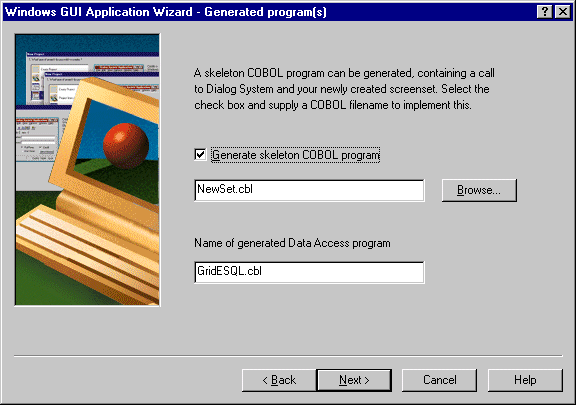
If you select Generate skeleton COBOL program, Dialog System will generate a skeleton COBOL program, which starts the application with a call to dsgrun. A default name is provided but you can enter a new name for this program.
The screen for this step in the Wizard is shown in Figure 8-3.

Figure 8-3: Generating Programs
You will see an entry for Name of generated Data Access program only if you selected Use OpenESQL Data Access in Step 3.
In this step you validate the options that you have selected in the previous steps. You can return to earlier steps to amend any selections. After accepting your selections, the screenset and programs are created.
The files which are output from the Windows GUI Application Wizard depend on the options you selected, but typically will be one or more of the following:
To use the output from the Windows GUI Application Wizard to view, query or change the database details:
Now that you have generated a data access application, you can manipulate the data. See the following chapter, Data Access for details.
Copyright © 2000 MERANT International Limited. All rights reserved.
This document and the proprietary marks and names
used herein are protected by international law.
 | Using the Screenset | Data Access |  |