

| Using Net Express | Introduction to Web Applications | |
You use the Data Tools in Net Express to convert, browse, edit and create data files used by an application.
You need to have read the chapter Start Here for the Tutorials and worked through the first session, Using Net Express, before you do this session.
Using the Data Tools, you can examine data files to see how an application has updated them, or create and edit a file to provide test data for an application. Files can be in any COBOL format and you can view them at both the record and field levels. You can convert between formats and character sets.
The demo application used in this session consists of a data file and the COBOL source program that maintains it. The data file is a variable length sequential file, containing details of staff in three record types: employee, manager and executive. In this session you convert it to a variable length indexed sequential file, and then view it in various ways, formatted and unformatted, using Data File Editor.
If you have closed Net Express, open it as before. If any project window or other windows are open, close them.
To save you creating a project, we have supplied one - click Open on the File menu, and open d:\Program Files\MERANT\Net Express\Base\Demo\Dtoldemo\dtoldemo.app. You'll see the .cbl and .dat files in the project window.
In this session you:
To make an indexed sequential copy of the supplied sequential file:
The details for the the input file and the output file are initialized with the information read from the file header for datavseq.dat.
| Filename | d:\Program Files\MERANT\Net Express\Base\Demo\Dtoldemo\staff.dat |
|---|---|
| Format | Micro Focus |
| Organization | Indexed Sequential |
The field to be used as the key is at the beginning of the record, and is seven bytes long.
The Data File Convert dialog box reappears so you can convert more files.
To view the file you just created:
A message box appears, explaining that all edits to indexed and relative file types are applied immediately.
A Data File Editor window appears displaying the contents of staff.dat, as shown in Figure 6-1.
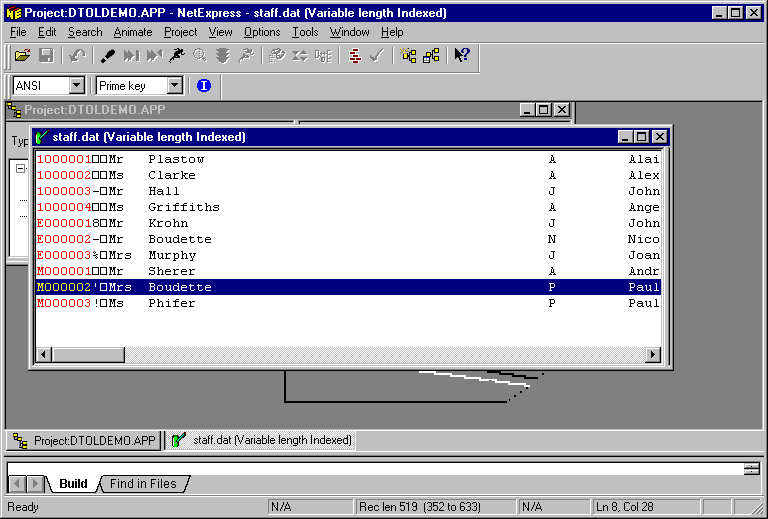
Figure 6-1: The IDE with a Data File Editor Window
Each record is shown as one line. Because Data File Editor does not know
the lengths of the fields in the record, each line is simply a continuous
line of text - the records are unformatted. Non-character fields such as
COMP items generally display as non-standard characters or, if they don't
correspond to any printable character, as ![]() .
.
You can edit the file by typing over the existing data. There are many editing facilities available. For example, the Data Tools option on the Search menu offers four ways of searching a data file:
The status line at the bottom of the IDE shows various statistics, depending on the file details:
The Data File Editor window may have a right-hand pane visible, displaying "A record layout file must be loaded before using this window". We'll see in a later section what this is for.
You can see the file's properties in full:
The File Information window displays information such as the file format and organization.
Data File Editor can display file contents formatted, if it knows the layout of the fields. You create a record layout file from the Data Division of a COBOL program that uses the file. You must have compiled the program to create the necessary information.
Our data file staff.dat has three record types: employee, manager, and executive. You have to tell Data File Editor the layout of each type of record, and how to identify the type. You define one type to be the default. The others are called conditional.
To create a record layout file:
A Record Layout Editor window opens. This window displays a tree view of the data division of dfdstaff.cbl.
To create the default record layout:
Default Layout should be set automatically as you have not yet defined a default layout.
A folder for EMPLOYEE-REC-DEFAULT appears in the right-hand pane.
To create a conditional record layout:
Conditional Layout is set automatically as you have already defined a default layout.
A folder for MANAGER-REC appears in the right-hand pane.
You now need to specify the field and condition that identify the record type.
The Field Properties dialog box appears.
M indicates a Manager record type. The two characters below the dotted line are the hexadecimal equivalent, arranged vertically. They should be "4" and "D", since M in ANSI is hex 4D.
A small red IF appears by 03 MN-POSITION in the right-hand pane.
To save the record layout file:
The Save As dialog box appears. The folder defaults to d:\Program Files\MERANT\Net Express\Base\Demo\Dtoldemo.
The filename defaults to dfdstaff.str, which is the COBOL program name with a .str extension.
When Data File Editor loads a data file, it looks in the same folder for a record layout file with the same name as the data file but extension .str. Our data file is named staff.dat. (Remember, we used the Data File Converter to convert datavseq.dat to staff.dat.)
When you open a data file, if a record layout file with the same name (apart from the extension) is present in the folder, that record layout file is used automatically. To apply a record layout file to a data file that is already open, or whose name does not match that of the record layout file, you must load it explicitly. This is called creating an association. Once you've created an association, that record layout file will be always used for that data file even if a record layout file with a name matching the data file is also present.
To load a record layout file:
A new right-hand pane appears. The left-hand pane contains the unformatted view of multiple records, one per line, that you had before.
In the right-hand pane, Data File Editor has applied the formatting information from the record layout file. This pane shows a formatted view of a single record. The record layout name is at the top of the pane. At the top right are two navigation controls: the small up-arrow takes you to the previous record and the small down-arrow takes you to the next record.
You can edit a record by clicking in the Value column and typing over the existing data. The editing facilities mentioned earlier for the unformatted view are available in the formatted view too.
Notice how the formatted view alters, matching the record types as you move through the file.
You can find out the record layout file associated with a data file and review the conditions that you set up for the different conditional layouts:
The File Information window opens. Because a record layout file is now associated with the data file staff.dat, the File Information window has a new tab Record Layouts.
This window displays information about the record layout file staff.str associated with staff.dat. The top of the window displays the name and location of the record layout file.
The Conditions box underneath shows that, for Manager records, the field MN-POSITION equals M.
The Conditions box shows that, for Executive records, the field EX-POSITION equals E.
You can use Data File Editor to view and edit your data in hexadecimal:
New panes appear at the bottom of the window. The left-hand pane shows the selected record from the top left-hand pane, with the hex beneath. For elementary field items only, the right-hand pane shows the selected field from the top right-hand pane, with the hex beneath. Otherwise, the right hand pane displays a text description such as Group item.
Each pair of hex digits is arranged vertically. For example, when you edit ANSI data, an M is shown in hex as "4" with a "D" beneath. If you can't see both lines of hex, make the window bigger by dragging its bottom edge downward.
The check mark by this menu item disappears, and the hex panes disappear.
You can print a data file from Data File Editor using the Print function, or use the Print Preview function to display it on screen as it would appear when printed. You can choose the formatted or unformatted view. You can choose whether to print the current record, all records or partial records.
To preview a print of the unformatted view of a data file:
and select:
A Preview window appears. You can use the buttons on the toolbar to zoom in and out, move around the window, and print.
As with many of the editors in Net Express, you can use Data File Editor to edit several files at once, choosing various ways to position their windows within the IDE.
To edit two data files, putting their windows one above the other:
A new Data File Editor window opens for datavseq.dat. Only the unformatted pane appears, as no record layout is associated with this file.
You can now see the Data File Editor windows for both datavseq.dat and staff.dat
To create a fixed length sequential file:
The Create file dialog box appears.
Since a fixed length sequential does not have a file header, Net Express prompts you to save the file header details you have just entered in a profile file. Creating a profile saves you having to enter the file header details next time you open the data file.
Net Express saves the profile in a profile file in the same directory as the data file. Profile files have the same filename as the data file with a .pro extension. Therefore, the profile file for this new data file is named newfile.pro.
A Data File Editor window appears. It displays "File Empty".
Let's add and delete a few records.
The cursor is positioned at the start of the file.
A copy of the above record is added to the file.
The new record is deleted from the file and the cursor is positioned on the previous record.
To make an EBCDIC copy of the supplied sequential file:
The details for the the input file and the output file are initialized with the information read from the file header for datavseq.dat.
The character set for the output file, shown in the lower half of the dialog box, changes from ANSI to EBCDIC.
The converter needs to know where the non-text data items (items such as COMP fields) are, so as not to convert them. So you need to specify a record layout file. You have already created one describing datavseq.dat.
The new file ebcvseq.dat has been added to the project.
When Data File Editor is open, the IDE has an extra toolbar, which includes a dropdown list to switch the Data File Editor window between ANSI and EBCDIC. To display the EBCDIC file you just created:
Garbage is displayed because Data File Editor is expecting ANSI.
The file is displayed correctly.
This field on the toolbar affects only the current display in the Data File Editor window.
To look at the file in formatted view, you cannot use the record layout file you created earlier because the comparisons to determine record type would use ANSI. You need to change Data File Editor's default character set to EBCDIC and create a new record layout file.
This makes Data File Editor read and write all files in EBCDIC. You can now if you wish create and use a new record layout file, in the same way as you did earlier in the sections Creating a Record Layout File through Viewing a Data File Formatted.
If you normally use the ANSI character set, you need to keep this option normally set to ANSI.
Close the project. If you want to take a break before going on to the next session, you can close Net Express.
Return to the Tutorials Map in the chapter Start Here for the Tutorials and choose which session to go on to next, depending on your interests.
Copyright © 2000 MERANT International Limited. All rights reserved.
This document and the proprietary marks and names
used herein are protected by international law.
| Using Net Express | Introduction to Web Applications | |