

| DB2 Applications (SQL Option) | Windows Tips | |
You can use the SQL Wizard to maintain a DB2 database. You can do things such as adding and updating tables and defining queries.
You need to have installed SQL Option to do this session. We assume you are familiar with SQL and with DB2 on a mainframe.
You also need to have read the chapter Start Here for the Tutorials and worked through the first session, Using Net Express, and the session DB2 Applications (SQL Option), before you do this session.
This session shows you how to use the SQL Wizard to define and maintain tables and queries in an existing DB2 database.
In this session you use the Wizard to add a Pensioner table to the supplied database called Tutorial, and to create and run a query on this table.
Although the SQL Wizard and the sample database used in this session are not related to any project, you must have a project loaded to enable the relevant IDE menu functions. It must be a project where the SQL check box was checked. We will use the project created in the chapter DB2 Applications (SQL Option).
This demo uses the project you created and built in the chapter DB2 Applications (SQL Option).
In this session you:
To start the SQL Wizard:
The SQL Wizard appears, containing a Catalog Browser dialog box as shown in Figure 16-1.
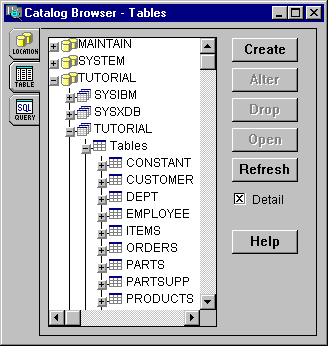
Figure 16-1: The Catalog Browser Dialog Box.
To create a table:
The bottom part of the dialog box is for defining the fields to appear in the table. We will define three fields.
| Field Name | PensionerId |
|---|---|
| Data Type | Char |
| Length | 5 |
| Not Null | Unique |
| Field Name | PensionerAddress |
|---|---|
| Data Type | Varchar |
| Length | 100 |
| Not Null | True |
| Field Name | PensionerAge |
|---|---|
| Data Type | Varchar |
| Length | 3 |
| Not Null | False |
To define the primary key for the table:
The Create Index dialog box appears.
This moves this field across to the list of Index Columns.
You should now have the dialog box shown in Figure 16-2.
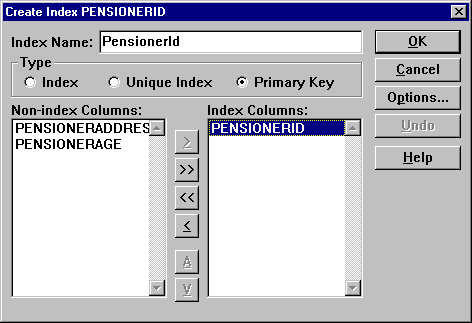
Figure 16-2: The Create Index Dialog Box for the Primary
Key
This adds the primary key +PensionerId to the list of Indexes and Keys. You should now have the dialog box shown in Figure 16-3.

Figure 16-3: The Create Table Dialog Box
To define a secondary index for the table:
The Create Index dialog box appears again.
You should now have the dialog box shown in Figure 16-4.
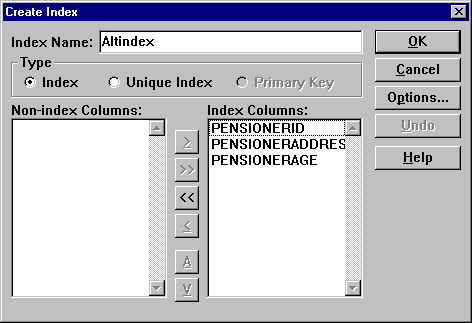
Figure 16-4: The Create Index Dialog Box for the Secondary
Index
This adds the index +AltIndex to the list of Indexes and Keys.
To view the SQL which will be used to create this new table:
To finish creating the table:
The new table called PENSIONERS has been added to the list of tables in the database called Tutorial. You may have to pull the slider down to see it.
To store some data in this table:
The Result Table window appears. This table displays the records in the table, but there are none at present.
This enables you to enter records into the table.
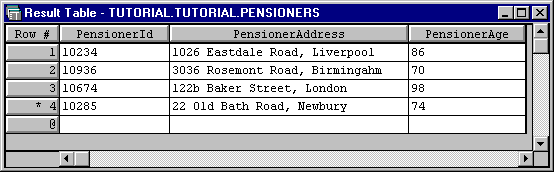
Figure 16-5: The Pensioners Result Table
To create a query against this table:
The Add Table dialog box appears.
The PENSIONERS(P1) window appears.
Notice how your entry changes
The produces the window shown in Figure 16-6.
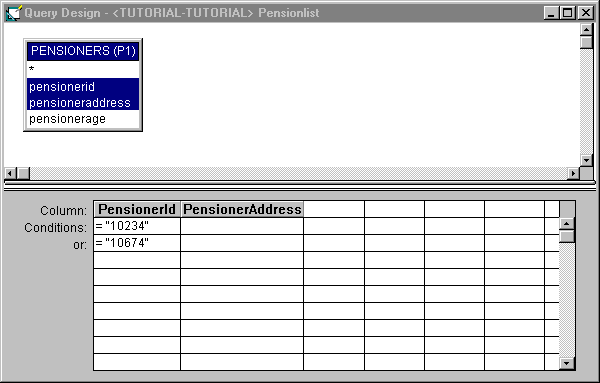
Figure 16-6: The Query Design window.
The new query called Pensionlist has been added to the list of queries in the database called Tutorial.
To run the query:
The result table appears, showing records that match the criteria you specified in the query.
Close the SQL Wizard and the SQL server.
Close the project. If you want to take a break before going on to the next session, you can close Net Express.
Return to the Tutorials Map in the chapter Start Here for the Tutorials and choose which session to go on to next, depending on your interests.
Copyright © 2000 MERANT International Limited. All rights reserved.
This document and the proprietary marks and names
used herein are protected by international law.
| DB2 Applications (SQL Option) | Windows Tips | |