

| Creating New Applications | Reusing Legacy Code | |
This chapter describes how you can create a working SQL application in minutes with the Internet Application Wizard. It also explains how you can extend an application once it has been created.
The Internet Application Wizard can generate all the HTML forms and server-side code to access an SQL database. The wizard uses the Open ESQL Assistant to generate the code for a SQL query, which it embeds in a server-side program. A data access application generated by the Internet Application Wizard can give the end-user access to any of the following database functions:
You decide when you are creating the application which functions to make available.
You can generate two different views onto the database:
A form which shows each column in the query in its own entry field. This is the only view from which an end-user can actually update the information in the database.
Shows a group of records on the screen in a table. You can decide how many records to display at a time when generating the application. The default is ten.
Each view is handled by a separate form and server-side program. The server-side programs generated are symmetric, using the same form for input and output.
When you generate an application which has both a single record view and a list view, the two views link to each other. The form for a single record has a pushbutton to display the list view, and each record displayed on a list view includes a hypertext link to display the single-record view.
For more information about COBOL and SQL applications, please see the online book Database Access.
The easiest way to understand how to create data access applications with the Internet Application Wizard is to try it. What we will do is use the Internet Application Wizard to create two programs. One queries a table of customer information, to provide customer details, and the other queries an order table, to get order details.
Having generated the two basic programs, with all the ESQL code needed to access the data, we will modify them to create an order processing system. This involves linking from a customer record directly to the orders for that customer. This shows you not only how you can generate simple database access applications using the Internet Application Wizard, but how you can customize and extend an application which has been generated for you.
In this section you will generate two simple applications:
The customer query enables the end-user to query the customer information in the database. The order query and update enables the end-user to retrieve and update orders.
Before you start, close the currently open project in Net Express (if there is one). The Internet Application Wizard adds all files generated to the current Net Express project. We want all the files for this application held in a single separate project; if no project is open, the Internet Application Wizard prompts you for the name and location of a new project.
The instructions in this chapter are not at the detailed level of "now click the OK button". They explain the overall process. If you want to get a feel for Form Designer and Net Express before you start, run the sample sessions in Getting Started.
To generate the Customer Query:
| Project name | orders |
| Project path | \Program Files\MERANT\Net Express\base\workarea\orders |
| Base name for files | customer |
| Title for generated forms | Customer Details |
The Internet Application Wizard generates the application. The wizard prompts you if any of the files it is going to create already exist, so that you can choose to keep the file or overwrite it.
If you want to see the results of the query, click on the Run Query button to see the results.
The Internet Application Wizard generates the following files:
At this point you have a complete application which you can run to query the database.
Note: If you decide to regenerate the application with a different SQL query, delete the .cbl files first. To avoid losing any changes you make to the business logic, the generator does not overwrite existing .cbl files. If they aren't present, they are regenerated from scratch.
You can now build and run the application:
HTTP://127.0.0.1/cgi-bin/customerlist.exe
This runs the customer list server-side program, and displays the first 10 records in the customer database. You can page through 10 records at a time by clicking the < or > buttons, and to the beginning or end by clicking the << or >> buttons.
To see a single customer record, click the CustID in the left-hand column. This displays the Form View. From the Form View, you can modify the database, and also change filtering options.
For example, to see all the customers in New York state:
You can either page through them one at a time, or click Table View to display them in list form. If you use the Table View, you can see its status line has changed to indicate that filtering is now by Region.
To add a record:
The form should be redisplayed, with a status line telling you that the record was successfully inserted.
To update a record:
The form should be redisplayed, with a status line telling you that the record was successfully updated.
To delete a record:
Now let's generate a second form set, to query and update order records.
| Base name for files | order |
| Title for generated forms | Order Details |
The Internet Application Wizard generates a second set of files, for displaying order information.
In the next section, we are going to modify this application to connect the Customer and Order query forms together.
The server-side programs which access the database are written in COBOL, so you can edit them to add extra functionality. And you can edit the HTML forms using Form Designer. In this section, we will show you how to modify the example application.
Currently you have two pairs of forms; one queries the database for customer information, the other queries the database for order information. We are going to add a pushbutton on the customer query form that links you directly to the list of orders for that customer.
The new pushbutton starts the orderform.exe server-side program, and passes it the CustID for the customer currently displayed.
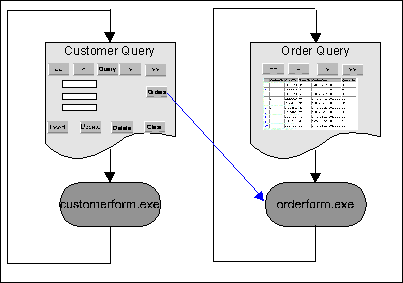
Figure 5-1: Linking the customer query to the order list
Adding this new functionality means modifying the forms and the server-side programs. The next two subsections show you how to do this.
You need to provide a link on the Customer Query form, which runs the orderlist.exe server-side program. You also need to pass the following information to orderlist.exe:
You can pass information to a server-side program through the link that starts it. The information is passed as name/value pairs, in the same way as the data from the controls on a form. You can make all the changes needed to pass the information across by editing customerform.htm and orderlist.htm with Form Designer.
The changes you need to make are:
This link will also send Customer ID and instructions to OrderList to make it filter by customer.
When you save orderlist.htm, Form Designer regenerates all the form variables and code used by orderlist.cbl to accept data from the form. Because data is passed to the server-side program as name/value pairs, the server-side program accepts data sent to it when started through the hyperlink in the same way as data submitted to it by form. By adding a dummy entry field with the same name as the parameter sent through on the command line, you automatically generate all the code needed to accept the customer ID. You will use a hidden field as the dummy, as this isn't displayed on the form.
To edit customerform.htm:
window.location.href="orderlist.exe?CustID=:A-CustID&Action=cquery"
Note: The control names, CustID and Action, are case sensitive. Enter them exactly as they are printed here.
This is equivalent to setting a hypertext link of orderlist.exe?CustID=:f-A-CustID&Action=cquery each time the pushbutton is pressed. The first part of the link, orderlist.exe, is a request to the server for resource orderlist.exe. The question mark indicates that a list of name/value pairs follows. The ampersand (&) is a separator between name/value pairs.
How do we know which COBOL variable is used to set the value of a form field? Click the field for the CustID on the form. Its Name property is set to A_CustID. This generates two variables in the server-side program: A-CustID and f-A-CustID (underscores are converted to hyphens because underscores are not legal in COBOL data names). The variable with the same name as the control is the one you manipulate inside the COBOL program, and has the picture string set by the COBOLPicture property for the control.
The variable prefixed with "f-" is the one used to move data between the form and the COBOL program, and always has a PIC X(n) picture string - because form data is always a string literal. The generated code always includes a set of routines to move the data between the two data items on input and output, together with any conversions needed.
All the Submit buttons on orderlist.htm have the Group name property set to Action. The Action variable is passed to the server-side program with the value of the Submit button which was clicked to run the program. When orderlist.exe is started by this link, it checks the value of COBOL data item Action to see which button was pressed. This code makes it think that a button with the value of "cquery" was pressed on a form; we can add code to orderlist.cbl to get it to run a query filtering on Customer ID when the action is set to "cquery".
To modify orderlist.htm:
When you save the form, this sets up a data item called CustID, together with the code to read its value from a variable called CustID.
This regenerates not only the form, but all the code in the associated server-side program (orderlist.cbl) for input and output of form data, so that a value for CustID is read into COBOL variable CustID if present.
You now need to change the server-side program orderlist.cbl. Two things must be added to this program:
Normally, these are set up by the orderform.exe server-side program, and stored in the state file. But when orderlist.exe is started from the customerform, none of this data is set up.
To edit the server-side program:
when "cquery"
    perform DoQueryByCustomer
 DoQueryByCustomer section.
     move "A.CustID" to s-filter-field *> The application logic
                                       *> is case sensitive
                                       *> Enter "A.CustID" in same
                                       *> case as shown here
     move "=" to s-filter-op
     move custID to filter-A-Custid
     move "??" to search-op
     move low-values to sort-spec
     perform Do-SQL-Query
     perform SQL-Open
     perform Next-DataTable
     if no-data
         perform setup-status
         string
            " - no data to display" delimited size
            into frmesStatus pointer stat-index
     end-if
     exit.
The code above sets up variables so that Do-SQL-Query builds a query to search the database filtering on the CustID field. The variables have the following meanings:
| Variable
|
Description
|
|---|---|
| s-filter-field | The column to filter on. The value is "A.columnname". The "A." prefix is to allow for future enhancements in which you can construct queries which join tables |
| s-filter-op | The matching criteria. You can set one of the following: "=", ">=" ">" "<=" "<" or "!=" |
| filter-A-CustID | The value of CustID to filter on. There is a filter field corresponding to each column in the query you set up through the data wizard. The filter fields are named "filter-A-columnname". |
| search-op | The direction of the search. "??" is an instruction to find the first match. "?>" and "?<" find the next and previous matches. The next and previous matches are defined by the column for the search order, and the contents of the state record for the application. |
| sort-spec | Specifies the ordering for the table. Set to either DESC or spaces. |
For more information, consult the Generated CGI Code Reference. Click Help Topics on the Net Express Help menu, then on the Contents tab. Select Reference, Generated CGI Code, Data Access CGI.
You can now run the modified application:
http://127.0.0.1/cgi-bin/customerform.exe
Your Web browser displays the customer form view.
This displays the list of orders for the selected customer.
Copyright © 2000 MERANT International Limited. All rights reserved.
This document and the proprietary marks and names
used herein are protected by international law.
| Creating New Applications | Reusing Legacy Code | |