

| Editing Form Designer Output | Form Validation | |
This chapter explains how you can process events in a form, and do other processing, without running a server-side program.
The online help contains detailed step-by-step descriptions of how to use the features described in this chapter. Click Help Topics on the Net Express Help menu, then on the Contents tab click Programming, then Internet Application Programming, Form Designer, JavaScript and Event Handling, then Overview - Script Assistant.
This book mainly focuses on writing server-side programs that process data from a form, and return a result. However, you can also put interactive code into the form itself. You do this using JavaScript, a simple scripting language supported by Netscape Web browsers, or JScript, a variant of JavaScript supported by Microsoft's Web browsers. When you add interactive code to a form, you write JavaScript or JScript functions and link them to events on the form. A function linked to an event is known as an event handler. For example, you can write an event handler to display an image when the end-user clicks a particular check box.
One obvious use of interactive code in a form is to perform validation on input data. However, for many common types of validation you do not need to write any JavaScript or JScript code, because Net Express provides built-in validation functions that you can invoke as necessary. This is explained in the chapter Form Validation.
Form Designer's Script Assistant provides you with a point and click way of creating event handlers. You can add useful event handlers to a form this way, without knowing JavaScript or JScript. For example, you can add code to set default data on a form, or to send the end-user to a different location.
The code generated by the Script Assistant obeys the syntax rules of both JavaScript and JScript, but code that works with Microsoft Internet Explorer might not work with Netscape Navigator, and vice versa. This is because the two browsers have different Document Object Models.
Event handler code can be quite complex; for example, it can include conditional statements and loops. However, if you want to include more advanced code, you need to learn more JavaScript or JScript than this chapter covers. If you are writing mainly for users of Internet Explorer, you should consult the Microsoft JScript Documentation on the Microsoft Web site. If you are writing mainly for users of Netscape browsers, you should consult the Netscape JavaScript Documentation on the Netscape Web site. There are some cross-platform compatibility considerations that you may need to take note of.
All references to JavaScript in the rest of this chapter apply equally to JScript.
JavaScript is an object-based language, in which statements act on objects that can have methods, properties and styles. The objects are not just the controls on your form, but all text elements, the document itself and the window that it appears in. A method is an action that the object itself can perform, such as losing focus or becoming selected. Properties and styles are attributes of objects. With the advent of Dynamic HTML, you can change a wide range of appearances and behaviors, from setting the contents of fields to changing the colours of text and background, calling up new windows and creating extra HTML elements on the fly.
You can write event handlers for both HTML controls and ActiveX controls. When you write an event handler for an HTML control, JavaScript appears in your HTML document in two places:
When you write an event handler for an ActiveX control, JavaScript only appears in one place, within <SCRIPT> and </SCRIPT> tags, in the <HEAD> part of the document.
You can also write event handlers for Java applets, and you can invoke methods and get and set styles and properties that belong to applets. JavaScript code for an applet only appears in one place, within <SCRIPT> and </SCRIPT> tags, in the <HEAD> part of the document.
As an alternative to storing your JavaScript code inside the HTML document, you can store it in a separate file, with an extension of .js. The advantage of using a separate file is that the code can be called from more than one form. One form can both call functions in a separate .js file and include embedded functions.
The Script Assistant automatically creates JavaScript code in the right parts of your document.
The Form Designer Script Assistant helps you set up event handlers that:
The Script Assistant has five tabs:
The Events, Methods, Properties and Styles tabs provide you with a point and click method of creating event handlers, while the Scripts tab enables you to enter and edit your code directly.
The contents of the tabs and the behavior of the Script Assistant vary depending on whether you are working with HTML controls or ActiveX controls.
The Events, Methods, Properties and Styles tabs are similar in appearance, with four panes. The following three panes are the same on all four tabs:
The fourth pane, in the top right-hand corner, contains views of events, methods, properties or styles, depending on the tab selected. The help pane provides information about the selected event, method, property or style.
Each tab also provides one or more controls that enable you to interact with the tab.
Figure 10-3 shows you the Events Tab for a form containing HTML controls.
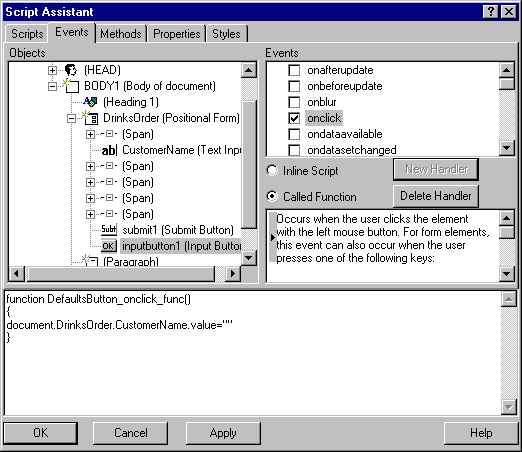
Figure 10-1: The Events Tab
The Events tab provides controls that enable you to:
These controls are dimmed when you first see the Events tab. You need to select an object and an event before you can select New Handler.
The figure below shows you the Methods Tab.
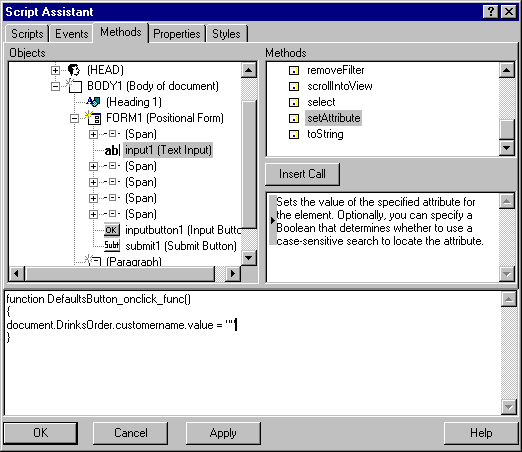
Figure 10-2: The Methods Tab
The Methods tab provides a control that enables you to insert a call to a method. This control is dimmed until you select a method.
The figure below shows you the Properties Tab. The Styles tab is identical except that the top right-hand pane lists styles rather than properties.
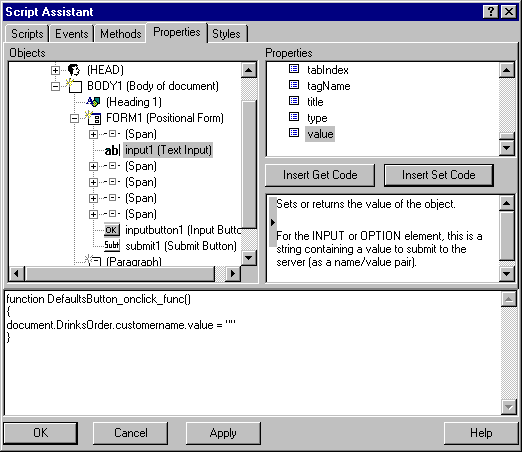
Figure 10-3: The Properties Tab
The Properties and Styles tabs provide controls that enable you to:
These controls are dimmed until you select a property or style. There are some properties that you cannot set.
The following sections provide more detail about the following views:

Figure 10-4: The Objects View
The Object View shows all elements of your HTML document as a tree. Clicking on a plus sign (+) next to an element drops down the elements that are subordinate to that element.
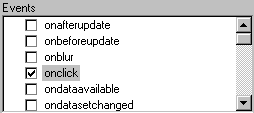
Figure 10-5: The Events View
The Events View lists all the events that are available on the form control that is selected in the Object View. The figure above shows the first few events for an HTML radio button.

Figure 10-6: The Methods View
The Methods View lists all the methods that are available on the HTML element that is selected in the Object View. The figure above shows the first few methods for a radio button.
Invoking a method on a control causes it to do something. For example, if you invoke the blur method on an input text field, it loses focus.
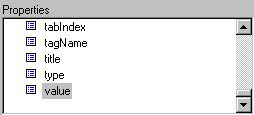
Figure 10-7: The Properties View
Properties contain information about the state of a control. You can set a property to change a control's state, or get a property to discover its state. For example, most ActiveX and HTML controls have a Value property. To retrieve the contents of a text field, you get the Value property. To set the contents to something else, you set the Value property. The figure above shows the first few properties for a radio button.
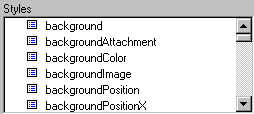
Figure 10-8: The Styles View
Styles contain information about the appearance of an element. Just as with properties, you can set a style to change an element's appearance, or get a style to discover its appearance. For example, most ActiveX and HTML controls have a style called background color. To find out what the background color is, you get the backGround color style. To set the color, you set the background color style. The figure above shows the first few styles for an HTML pushbutton control.
When you set properties and most styles, you specify what you want by entering a string in a dialog box. But when you set a color style, you see a color palette containing 48 basic colors and 16 custom colors. You can define new custom colors. However, JavaScript supports a limited range of colors, and if you define a custom color that is not supported, the nearest supported color will be used instead. See your Netscape or Internet Explorer references for a list of supported colors.
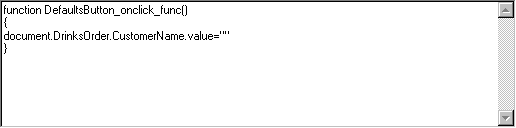
Figure 10-9: The Event Handler View
The Event Handler View shows you event handler code for the event currently selected in the Event View. The figure above shows you the JavaScript event handler for the Click event on a push button. This code is setting the value property on another control (a input text field) to spaces.
When you click on an event in the Object View, the Event Handler View displays the code currently set up to handle that event. You can update the code in either of two ways:
The code to handle an event on an HTML control consists of both the function itself and the call to the function. You can switch between these two views of the code.
function controlname_event_func()
{JavaScript code
}
where:
controlname is the name of the control subject to the event
event is the event in question
Javascript code is the code you create to invoke methods or get and set properties, or to carry out other processing
For example:
function DefaultsButton_onclick_func()
{CustomerName.value=""

}
The parentheses () may contain one or more parameters, depending on the event. The Script Assistant provides placeholders for these, and you must replace the placeholders with your own values.
The code to handle an event on an ActiveX control consists of just the code that invokes the method, gets or sets the property or style, or performs other processing if you have entered the code yourself. There is no line beginning 'function' or call to the function.
Notes:
The Scripts tab gives you direct access to your JavaScript functions. You can use the Scripts tab to:
We recommend that when you are new to JavaScript you create your code using the point and click methods provided on the other tabs.
The Scripts tab looks like this:
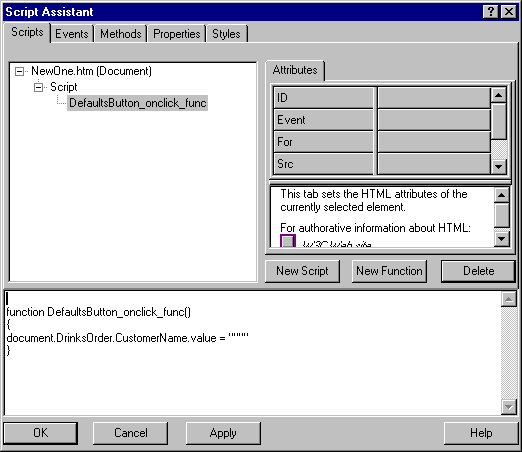
Figure 10-10: The Scripts Tab
The Scripts tab has four panes:
Note: If you have invoked any of the built-in validation functions, as described in the chapter Form Validation, the invoked functions will also appear in the Scripts View. The functions are held in a number of separate .js files, and they make use of a number of common functions, held in the file mfcommon.js.
If you want to write code that will work on both Netscape and Microsoft Web browsers, you need to take note of the following areas of incompatibility:
You may also need to consider the possibility that some users may be using earlier versions of Web browsers that do not support Dynamic HTML and the Document Object Model.
This section shows you how to add a simple event handler to the drink order form used as an example in Chapter 4, Creating New Applications. First you add a second push button to the form, and then you add an event handler to set defaults on the form when the button is clicked. The new form looks like this:
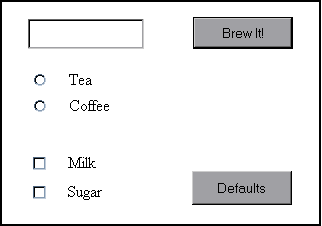
Figure 10-11: Drink Order Form with a New Pushbutton
The defaults set are:
In this example we will show you how to add the event handler to an HTML form. If you did not work through the example in chapter Creating New Applications, you can find the HTML version of the application by loading \Program Files\MERANT\Net Express\base\demo\bevord_h\bev_h.app.
function DefaultsButton_onclick_func1()
{
}
The cursor is positioned immediately before the close brace
document.DrinksOrder.CustomerName.value = ""
Each time the end-user clicks the Defaults button, this code is run and clears the CustomerName field.
document.DrinksOrder.DrinkSelected(1).Checked = True
Each time the end-user clicks the Defaults button, this code is run and sets the Coffee radio button to selected. You don't need to add any code to set the Tea button to false, since these radio buttons are in the same group - selecting one automatically deselects the other.
At this point, the Event Handler View should look something like this:
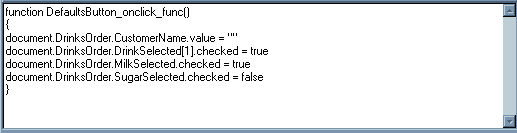
Figure 10-12: Event Handler View with Code
This section shows you to how to add a simple event handler to get a property and then set a property of another control to the same value. First you create a new form containing two text input fields and a push button, and then you add the event handler. The new form looks like this:
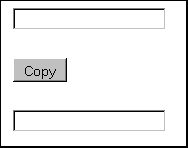
Figure 10-13: Form for Get a Property Example
To create the form and event handler:
function CopyButton_onclick_func1()
{
}
The cursor is positioned immediately before the close brace.
document.all.FORM1.CopyName.value = ""
document.all.FORM1.CopyName.value = document.all.FORM1.InputName.value
This section shows you to how to add a simple event handler to change the color of a button when the user moves the mouse over it or away from it. First you set the starting background color of the CopyButton control in the previous example, and then you add the event handler.
To update the form and event handler:
function CopyButton_onmouseover_func()
{
}
The cursor is positioned immediately before the close brace.
document.all.FORM1.CopyButton.style.backgroundColor = 0x0000FF00
function CopyButton_onmouseout_func()
{
}
The cursor is positioned immediately before the close brace
Copyright © 2000 MERANT International Limited. All rights reserved.
This document and the proprietary marks and names
used herein are protected by international law.
| Editing Form Designer Output | Form Validation | |