 | Panel Painting |
| Panel Groups |  |
The third step in developing your Dialog System application is to
position data fields on panels. This is the step where you specify where
your data fields will appear on your panel for subsequent input or output.
There is a limit of 512 data fields in a screenset, and 200 panel fields
in any panel.
This chapter explains:
- How to position the data fields you previously defined onto your
panels
- How to define screen characteristics to be associated with a field
Pressing F3=field from the Panel Painting menu accesses the
Panel Field menu, shown in Figure 7-1, and a popup panel containing the
list of defined fields. Position the cursor where you would like your
field to begin, and press F3. You can use this menu to modify the
field characteristics of a selected field, and place, remove, modify, and
relocate fields on the current panel.
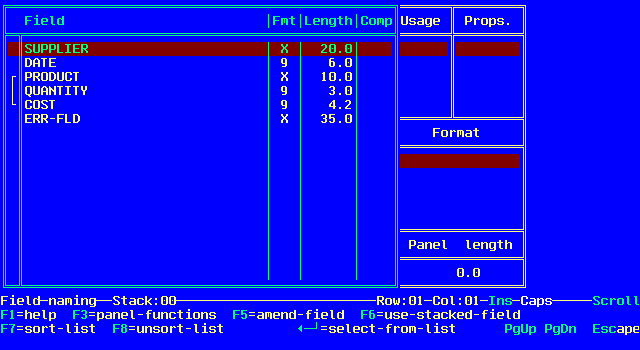
Figure 7-1: Panel Field Menu
You can use the popup panel to view and change the relevant
characteristics of the required fields. The left half of the panel lists
the data fields, their format, and their length, which you specified
during data definition (see the chapter Data Definition). To
select a field to work on, position the selection bar on the required
field and press Enter. The cursor moves to the right side of the
panel.
The right half of the panel contains field detail panels that enable you
to change the characteristics of that field on the panel. The field detail
panels are:
- Usage
- Properties
- Format
- Panel Length
- Delimiter
If the format of the field is a date format, the Delimiter panel is
displayed; otherwise, the Panel Length panel is displayed.
In the field detail panels, you can choose from the existing default
values, or select a different characteristic. Use the <right-arrow>|
and |<left-arrow> keys to move between the characteristics and press
the space bar to select one. The characteristics selected are highlighted
with > and < symbols.
To return a field characteristic to its default value after you change
it, press the F2=reset function. This function is available from
each of the field detail panels and also some of the Panel Field submenus.
When you have completed your selection, press Enter . Your field
is placed at the cursor position on the panel as a series of caret
characters. The following screen field characteristics are available:
| Usage
|
Specifies how a panel field is
used at run time. You can select one of the following mutually exclusive
options: |
|
|
IN
|
Input field. This prefills the field with
the current data field value and enables the entry of data at run time.
This is the default type of usage. |
|
|
OUT
|
Output field. This prefills the field with the current
data field value and protects it from input at run time. |
|
|
EXIT
|
Exit field. This is an input field that forces return
to the calling program when the field is exited by any key defined in
the dialog, provided that the field has not failed any validations.
|
|
|
XMOD
|
Exit modified field. This is an exit field that forces
return to the calling program if the field contents have changed,
provided that the field has not failed any validations. |
|
|
XREG
|
Exit regardless field. This is an exit field that
forces return to the calling program when the field is exited,
regardless of whether the field has failed validation. However, the
status of the validation is given in the control block. |
|
|
XENT
|
Exit on entry. This exits to the calling program
immediately when the field is entered. So, for example, if you skip from
the previous field to this field, return to the calling program is
forced before any values are entered. |
| Properties
|
Enables you to define
properties for the selected field to adopt at run time. These properties
are not valid if the field is defined as an output field. |
|
|
AUTO
|
Autoskip. Forces the cursor to move automatically to
the next field when the field is filled at run time. This is the default
property. |
|
|
REQD
|
Required. Prevents the cursor from leaving the field
if it is empty at run time, that is, if the field contains spaces in an
alphabetic or alphanumeric field, or contains zero in a numeric field.
For a date field, prevents the cursor from leaving the field if the day
or the month are empty.
Although the cursor cannot leave the field, an error message is not
produced at run time unless you have defined a data validation.
Validations are defined at the data level (see the chapter Data
Definition) and are applied whenever that data item is used,
whereas the REQD property is applied only at local screen level. |
|
|
FULL
|
Prevents the cursor from leaving the field if an
alphabetic or alphanumeric field has any leading or trailing spaces, or
a numeric field has any leading zeros at run time. You cannot use this
property for date fields.
Although the cursor cannot leave the field, an error message is not
produced. The FULL property is applied at local screen level; to force
a field to be full whenever this field is used, you must define
validation rules for it at the data level. |
|
|
UPPER
|
Changes any lower-case characters in alphabetic or
alphanumeric fields to upper case when they are entered.
NLS
is supported, for the folding of alphabetic characters. This
feature is optional, and is controlled by either setting NLS in the
sidefile dsdef.cfg, or by linking dsnlsrtn.obj as well
as the COBOL system file cobnlsmg.obj when creating the
executable application. |
|
|
LOWER
|
Changes any upper-case characters in alphabetic or
alphanumeric fields to lower case when they are entered.
NLS is supported, for the folding of alphabetic characters. This
feature is optional, and is controlled by either setting NLS in the
sidefile dsdef.cfg, or by linking dsnlsrtn.obj as well
as the COBOL system file cobnlsmg.obj when creating the
executable application. |
|
NOECHO
|
Prevents keystrokes entered from being displayed on the screen at
run time. Any characters entered cannot be captured by any facilities
that look at the screen buffer, such as a Print Screen key on the
keyboard. This provides a secure way of entering passwords and related
functions.
By default, a non-echoed field displays spaces when data is entered.
You can configure Dialog System to use some other character; see the
chapter Setting Up the Configuration File. |
| Format
|
Specifies how the field is displayed at
run time. The formats you can choose from depend on the format of the
field defined during data definition (A, X, 9, or S). For example, if
you defined a numeric field, you can choose zero suppression in the
display, or if you defined a date field, you can choose from several
date display formats. Again, the choice depends on the length of the
date field in the data definition.
Formats are mutually exclusive and only formats that are valid for
the selected field are displayed on the popup panel. Possible formats
are: |
|
ALPHABETIC
|
All upper-case and lower-case alphabetic characters, plus the space
character, can be entered. |
|
ALPHANUMERIC
|
All upper-case and lower-case alphabetic characters, the space
character, and all the other ASCII keys, including the extended
characters entered using the Alt key, can be entered. |
|
NUMERIC
|
All numeric characters and the decimal point can be entered. |
|
SIGNED
|
All numeric characters, the decimal point, and the "+"
and "-" signs, for positive or negative values, can be
entered. |
|
SUPPRESS
|
Provides zero suppression for input and output, and right justifies
data entry and display. The last zero in the number is always displayed.
|
|
99/99 |
Places four-character dates in DD/MM, MM/DD, MM/YY, or YY/MM
format. |
|
99/999 |
Places five-character dates in YY/DDD format, where DDD is the day
number from 1-365. |
|
99/99/99 |
Places six-character dates in DD/MM/YY, YY/MM/DD, or MM/DD/YY
format. |
|
99/AAA/99 |
Places seven-character dates in DD/MON/YY format, where MON is a
three-letter mnemonic for the month (see the chapter Data Definition
for valid month mnemonics). |
|
99/99/9999 |
Places eight-character dates in DD/MM/YYYY format.
If your applications need to work with the year 2000 and beyond, you
should use this format. You might need to revise your existing
screensets. |
|
When the cursor enters the Format panel, the additional
menu option F4=specify-user-format is displayed, which enables
you to select a user-defined format rather than the fixed formats
described previously. Pressing F4 displays a popup panel where
you can enter a format number in the range 1 through 4, where the format
number corresponds to one of up to 4 user-defined formats. If you select
a user-defined format, you must write a program, named dsusrfmt.cbl,
that handles the format, before you can use the resulting screenset. See
the chapter Programming for more information about the dsusrfmt.cbl
program.
|
| Panel Length
|
Enables you to choose a panel length for the field that
is less than the true data field length. You cannot choose a length
greater than the true data field length. You can use this characteristic
to set a field up as a scrolling field.
When you enter the Panel Length panel, the additional menu option
F4=horizontal-scrolling-on/off is displayed, which enables you
define the field as a scrolling field. Specify the panel length for
the display field, then press F4 to toggle the scrolling on. A
scrolling field uses two extra character positions on the screen for
indicators at either end of the field to show whether scrolling is
possible in either direction.
|
| Delimiter
|
Enables you to specify a date delimiter when the field
is a date format. You can use any character, such as "/", "-"
or ".", as a delimiter or separator. The default is "/".
|
The facilities provided in the Panel Field menu are described in the
following sections.
Enables you to select the field whose characteristics you wish to set.
Use the <up-arrow> and <down-arrow> keys to position the
selection bar on the required field and press Enter from the Panel
Field menu. The cursor moves to the right-hand side of the popup panel,
where you can specify usage, properties, format, and panel length or
delimiter, as described in the previous section.
Pressing F3=panel-functions from the Panel Field menu returns
control to the cursor in the panel and invokes the Panel Functions menu,
shown in Figure 7-2. This menu enables you to use the facilities for
storing field definitions when you copy or move existing fields. This
option is also available from the Amend Field and Use Stacked Field menus,
described later in this chapter.

Figure 7-2: Panel Functions Menu
The Cut To Stack and Copy To Stack options in this menu work in a
similar way to the block manipulation facilities described in the chapter
Panel Painting. If you use these options to place a field in a
stack, you can restore that field to the screen using the F6=use-stacked-field
function described later in this chapter.
When you select F3, the cursor moves from the popup panel to the
panel screen. This can be useful if you wish to define field
characteristics but you have not positioned the cursor where you require
it in the panel screen before you accessed the popup panel. You can select
F3 to return to the panel screen and reposition the cursor, then
press Escape, which exits the Panel Functions menu and returns
control to the popup panel.
Pressing F4=cut-to-stack from the Panel Functions menu deletes
the field at the cursor position and places it in the field stack. The
status line indicates the number of fields in the stack.
Pressing F5=copy-to-stack from the Panel Functions menu copies
the field at the cursor position into the field stack, leaving the
original field in its place on the panel. The status line then indicates
the number of fields in the stack.
Pressing F5=amend-field from the Panel Field menu displays the
Amend Field menu, shown in Figure 7-3, which enables you to change the
characteristics of an existing field. Position the cursor on the field you
want to amend and press F5. The selection bar is positioned on the
appropriate entry in the data list and the characteristics currently set
for the field are displayed. You can change the usage, properties, format,
and panel length or delimiter as described in the section The Popup
Panel earlier in this chapter.

Figure 7-3: Amend Field Menu
To delete a field rather than amend it, you must use the F9=delete-field-defn
option in the Panel Painting Ctrl menu (see the chapter Panel Painting).
Pressing F2=reset from the Amend Field menu resets the field
characteristics in the highlighted field details panel to their default
values.
Pressing F3=panel-functions from the Amend Field menu invokes
the Panel Functions menu described earlier in this chapter.
If you select F3=panel-functions from the Amend field menu to
reposition the cursor before you finalize the field characteristics, a
copy of the field is placed on the panel in the new position, and the
original is left unchanged. You cannot position a field on top of an
existing field or a group.
Pressing F6=use-stacked-field from the Panel Field menu places
the details of the field currently on top of the stack onto the popup
panel and displays the Use Stacked Field menu, shown in Figure 7-4. You
can use this menu in the same way as the Amend Field menu to modify the
characteristics of the field selected from the stack before you place it
on the panel.

Figure 7-4: Use Stacked Field Menu
Pressing F2=reset from the Use Stacked Field menu resets the
field characteristics in the highlighted field details panel to their
default values.
Pressing F3=panel-functions from the Use Stacked Field menu
invokes the Panel Functions menu described earlier in this chapter.
Pressing F7=sort-list from the Panel Field menu sorts the field
name list into alphabetical order, which might make it easier to locate
the field you want. The groups in the data list remain together as a body,
but the fields in each group are sorted alphabetically.
Pressing F8=unsort-list from the Panel Field menu reverts the
field name list back to the original order, that is, the order in which
you defined the fields in data definition (see the chapter Data
Definition for details). The fields will occur in this original order
in the generated Data Block.
Copyright © 1999 MERANT International Limited. All rights reserved.
This document and the proprietary marks and names
used herein are protected by international law.
| Panel Painting |
| Panel Groups | |