 | Screens |
| Panels |  |
This chapter introduces the Screens utility by means of a tutorial.
This will help you learn the major facilities available in Screens.
The following section is a step-by-step tutorial provided to familiarize
you with some of the features of the Screens utility. This section will
show you how to:
- Design the sample form
- Alter attributes
- Define fields
- Define groups
- Define and manipulate a block of text
- Define an input field acceptance order
- Generate COBOL for the sample form
To invoke Screens, enter the command line,
DOS and OS/2:
On DOS and OS/2:
screens
Windows:
On Windows:
screensw
UNIX:
On UNIX:
cobrun screens
Windows and OS/2:
Alternatively, on Windows and OS/2, if you have created a group for COBOL,
you double-click on the appropriate program icon to invoke the component.
Having invoked Screens, use text characters and the cursor movement
keys to create on your screen the form shown in Figure 10-1.
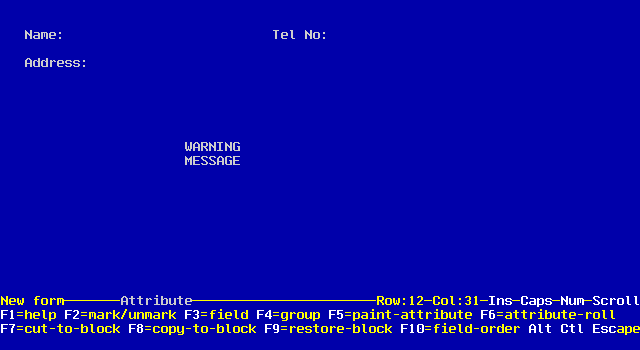
Figure 10-1: Screens Sample Form
We will now change the attribute of the message.
- Position the cursor under the W in WARNING MESSAGE.
- Press F6 repeatedly to roll through the available attributes.
Notice how the word "Attribute" changes on the information
line.
- Select the desired attribute and press F5. This assigns the
desired attribute to the character at the cursor position and moves the
cursor one character to the right.
Continue to press F5 until WARNING is displayed with the new
attribute setting. Move the cursor to the M of MESSAGE and press F5
until this is displayed with the new attribute setting.
You can set the attributes for "Name:", "Tel No:", "Address:"
and any other part of the screen by following the steps outlined above.
- Position the cursor at the first character position after "Name:".
- Enter carets (^ ) to begin defining the "Name:"
field. Notice that the carets (^ ) that you are entering are
displayed in the current attribute setting. This screen now appears as
shown in Figure 10-2.
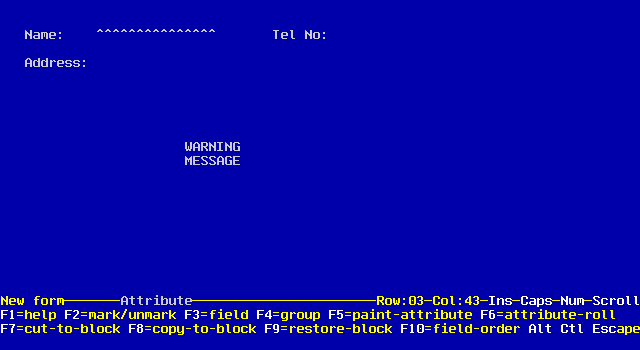
Figure 10-2: Form with the Name Field
- Position the cursor in the carets for the Name field.
- Press F3 to define the carets as a field.
The carets are replaced by a COBOL picture-string (X's), and a popup
menu of
Screen Section clauses appears. The word "Field"
appears on the information line, as shown in Figure 10-3.
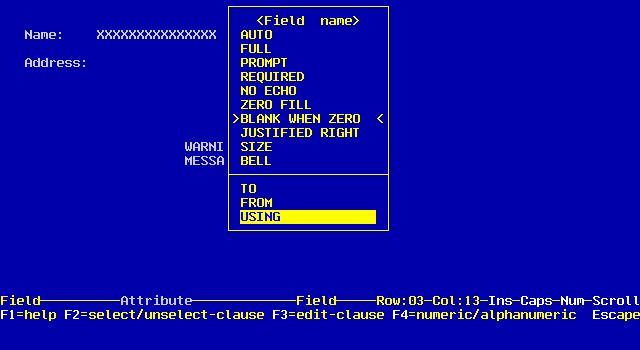
Figure 10-3: Form with Screen Section Clauses
We will use the AUTO clause as an example of how to select Screen
Section clauses to be included in your program. (Information about
this clause is found later in this chapter and in your Language
Reference.)
Note: You can select more than one Screen Section clause to be
included in your program. Some require additional input (for example, a
COBOL identifier for the TO clause). You can also assign a Screen Section
name to the current field by selecting <Field name> in
the popup menu. See the section Field later in this chapter for
details.
- Use the <up-arrow> key to move the pointer (">"
and "<") to the AUTO clause in the popup menu.
- Select the AUTO clause by pressing F2.
- Use the <down-arrow> key to move the pointer to the USING
clause.
- Press F3 to edit the USING clause.
- Enter ORDER-NAME as the name of this field and press Enter.
- Now press Escape to return to the main menu. The selection of
the AUTO clause is saved. The COBOL picture-string is replaced by
carets.
- Now define the "Tel No:" and "Address:" fields
following the steps outlined above. Note that you might want to define
the "Tel No:" field with numeric characters. This option (F4)
is available on the Field menu. You can also define any legal COBOL
picture-string.
We will now define the "Address:" field as a group. Note
that before you can define groups, you must define all fields that are to
be repeated; there must be at least one.
- Define the Address field immediately after "Address:" by
following the steps outlined in the section Defining Fields
above.
- Position the cursor at the first caret in the "Address"
field.
- Press F2 to activate the mark option. A reverse video
attribute is painted over the character at the cursor position.
- Use the <right-arrow> key to move the cursor to the right so
that it expands the marked area to cover the entire "Address:"
field.
- Press F4. This defines the marked area as a group and invokes
the Group menu, as shown in Figure 10-4.
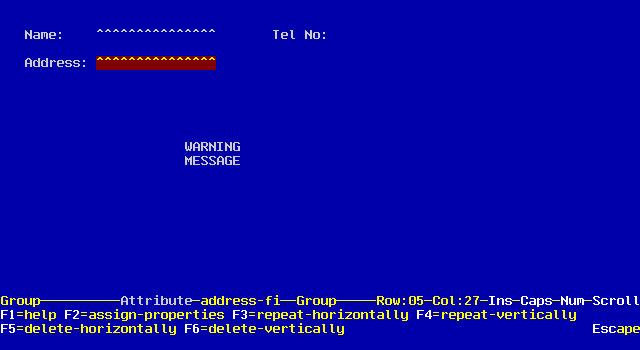
Figure 10-4: Form with the Group Menu
- Press F4 four times to vertically repeat the defined area to
a total of five lines.
- Press Escape to fix the group definition and return to the
main menu. This removes the highlighting and restores the field to its
original attribute setting.
We will now move the highlighted WARNING MESSAGE down one line.
- Position the cursor on the W in WARNING MESSAGE.
- Press F2 to set the mark option. A reversed video
attribute is painted over the character under the cursor.
- Use the <right-arrow> and <down-arrow> keys to expand the
marked area to cover all of the characters.
- Press F7. The marked area is now separated from the rest of
the form although its appearance does not change. The Block menu appears
on the screen, as shown in Figure 10-5.
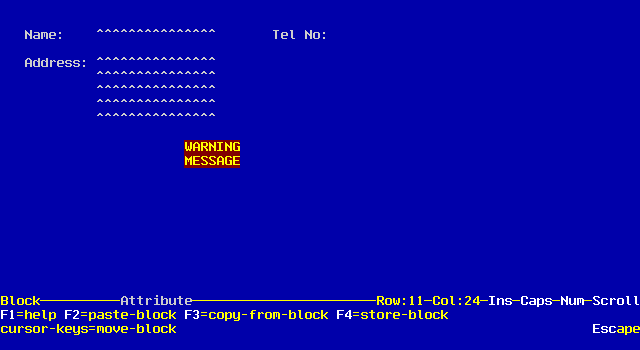
Figure 10-5: Form with the Block Menu
- Use the <down-arrow> key to move the block down one line.
- Press F2 to paste the block to its current position. The
highlighting disappears and you are returned to the main menu.
If more than one input field exists on a form, you can define the
order of field input when the form is accepted. To demonstrate this, we
will enter the fields in the following order: Name, Address, Tel No.
- Press F10 to set the field input order. The three defined
fields display 5's by default.
- Position the cursor inside the "Name:" field.
- Press 4. This field now displays 4's and will be accepted
before the other two fields at run time.
- Now position the cursor on the "Tel No:" field.
- Press 6. The "Tel No:" field displays 6's and will
be the last field accepted at run time.
- Now press F10 to turn off the field-order option. The order
is saved.
You can now generate COBOL code for the form you have just created.
- Press Alt+F5. The filename prompt appears at which you enter
the name of the COBOL file you want to generate.
- Type myform and press Enter. The Generate-COBOL menu
appears.
- Press F3 from this menu. This generates the skeleton program
myform.cbl for the form you have just created.
The program contains a DISPLAY statement. It also contains an ACCEPT
statement since the form contains defined fields. Two other files are
also created in the process: a file with generated Working-Storage
data (myform.wks) and a Screen Section copyfile (myform.ss).
You can now syntax check and run this skeleton program.
After this program is generated, the system returns you to the main
menu and displays the program-name myform at the beginning of
the information line.
The Screens facility also lets you generate an entire COBOL program
based on a screen that you design. The program generated allows you to key
data into the screen. The data is then stored as records in an indexed
sequential file.
An indexed sequential file is a data file for which an alphabetic index
is automatically maintained. The index is based on a prime key (and
optionally three alternate keys) that you specify on your screen form.
In addition to storing data, the index program lets you recall any
record from disk, change or delete records, and conduct an alphabetic
search through the file regardless of the order in which files were
entered.
The Screens index generator can produce two different versions of the
index program. The first (marked IDX on the generation menu)
generates code that relies purely on the Screen Section. The second
(marked advanced-IDX on the generation menu) generates code that
produces more efficient indexed files. You select the version by using the
F8 toggle within the Generate-COBOL menu.
This toggle only works with Micro Focus add-on products.
- Press F7 in the Generate-COBOL menu. This will take you into
the mark-fields submenu.
- Using the cursor keys, move the cursor onto the "Name:"
field. Press F2. You will notice that the field has been marked
as the PRIME KEY field. Now, when the index program is generated it will
store the records in NAME order.
- Using the cursor keys move the cursor onto the "TelNo.:"
field. Press F3. You will notice that the field has been marked
as the ALT2 KEY field. Now, when the index program is generated it will
still store the records in NAME order but you will have the option of
retrieving them in TEL NO. order.
- If you had more fields on your screen you could now go on and mark up
to a further two alternate key fields.
- If you mark a key field incorrectly you can remove the mark using the
F6=unmark-key-field option.
- Press Escape to return to the generate-COBOL menu.
- Press F5 to generate the index program. The program will be
named myform.cbl.
- You can now leave Screens. The program you have generated can be used
to create and maintain your index program. You might also find it useful
as an example of indexed file handling.
You can now save your form to be used at another time.
- Press Alt+F4 from the main menu. The filename prompt appears
and displays myform.srn (The extension .srn is assigned
by the system as the default file extension for a form created with the
Screens facility.)
- Press Enter to save the form. The system once again returns
you to the main menu.
Copyright © 1999 MERANT International Limited. All rights reserved.
This document and the proprietary marks and names
used herein are protected by international law.
| Screens |
| Panels | |