| Structure Animator | Directives for Animator |
The UNIX Session Recorder enables you to record keystrokes entered into, and screen output from, COBOL programs compiled with this COBOL system. You can then playback the recording and use it either to demonstrate how a product works or to perform automatic program testing.
There are two separate components to the UNIX Session Recorder: the Keystroke Recorder which enables the recording and play back of keystrokes, and the Screen Recorder which enables you to record screen output.
You can play back a Keystroke Recording, which replays all the keystrokes made during the recorded session. You can also combine the UNIX Session Recorder with the use of Animator to make a powerful debugging tool. See the section Using the UNIX Session Recorder with Animator later in this chapter for details.
You access the UNIX Session Recorder from the COBOL system. An environment variable, COBSES, indicates the use of the UNIX Session Recorder to the run-time system.
In addition to the UNIX Session Recorder, there is a stand-alone UNIX Screens Compare utility which is used to play back screen recordings. This is used in a different way from the UNIX Session Recorder, and is explained in the section Using the UNIX Screens Compare utility.
You can use the UNIX Screens Compare utility to compare the Screen output recordings from more than one run of a COBOL program. This determines if differences exist between screen output from each run and can be useful in finding minor differences between modified versions of the same program.
The UNIX Session Recorder has the following functions:
The UNIX Session Recorder is machine independent, meaning that you can work on any UNIX environment on which you would normally install this COBOL system.
Among the many different uses of the UNIX Session Recorder you can:
As a result of using the UNIX Session Recorder you make Session files. These Session files are in turn made up of two types of files: the Keystrokes file from the Keystroke Recorder, and the Screen file from the Screens Recorder.
To use the UNIX Session Recorder you must:
Note: To produce a linked executable file for use with the UNIX Session Recorder, you must specify:
-I SESSION
on the cob command line
If you require more information see the chapter Running in your Object COBOL User Guide.
You must set the COBSES environment variable to the appropriate values in order to use the UNIX Session Recorder, then export the values to the shell.
The COBSES environment variable signals the run-time system that UNIX Session Recorder is being used so that the appropriate operations take place.
Note: You should only set COBSES when you invoke the UNIX Session Recorder.
You set the COBSES environment variable as follows:
COBSES={option[file-name]}...
export COBSES
where the options are:
option |
One or more of the following flags:
Note that these flags are all case sensitive. Also, you cannot
combine the You can find more information about these options in the section Using the UNIX Session Recorder. |
||||||||||||
file-name |
The name of the file that you require and is subject to the rules given in the section Session File-names. |
Warning: You must unset COBSES when you have finished using the UNIX Session Recorder, or it will interfere with the running of your COBOL programs. To do this, set COBSES to spaces, then export this setting to the shell.
If you do not specify a file-name in COBSES, the name of the application
is taken as a base name, with the appropriate extension. Keystroke files
are given a .key extension. Screen files are given a .sc1
extension (unless you are making a multi-user recording, in which case the
value of the last digit of the extension is controlled by the -t
flag). If the base name generated by the UNIX Session Recorder plus the
file extension is too long (normally in excess of 14 characters) it will
be truncated so that the full extension is kept.
You can specify the file you wish to use to record Keystroke files, Screen files or to play back Keystroke files (but the length of the file-name must be valid for your operating system). For example, if you want to record keystrokes in the file myfile.abc, you set COBSES as:
COBSES=-rmyfile.abc
export COBSES
You can specify a number of values in COBSES; for example, if you want to record keystrokes in myfile1 and screen output in myfile2 you set COBSES as follows:
COBSES=-rmyfile1-smyfile2
export COBSES
Note: If the file-name includes a hyphen, you must precede it by a backslash ( \ ), or the UNIX Session Recorder may try to read the characters following the hyphen as a separate flag. You can also specify the path-name when giving a specific file-name.
The UNIX Session Recorder makes Screen and Keystroke files independently of the terminal on which they were made. The UNIX Session Recorder records the input to and output from a COBOL application, but does not take any account of the hardware or the operating system. This allows session files created on one terminal to be used or compared with files created on a different terminal.
The following limitations apply when using UNIX Session Recorder:
We reserve the right to change the sequence of codes output in order to achieve the required screen display. This may result in session files created on one release of COBOL for this system not giving the same result or comparison with files created on a later version. Multiple sequence keys, for example function keys, which are not defined in the terminfo database will not be recorded in a generic manner.
Therefore, attempting to use the UNIX Session Recorder with COBOL programs that call COBTERMMODE will give undefined results.
You can use the UNIX Session Recorder to record and play back keystrokes as well as record screen output from a COBOL application. You can either use the components of the Session Recorder, the Keystroke Recorder and Screen Recorder, alone or in combination. You can also use the UNIX Session Recorder in conjunction with the Animator. All of these functions are fully described in the following sections.
The keystroke recording facility allows you to record and play back keystrokes. There is also a facility to make multi-user recordings for applications. The following sections explain how to perform these functions.
To record keystrokes you must set the COBSES environment variable to
-r. All data and function keys which you then enter into
your COBOL application will be recorded into the keystrokes file. This
file will be overwritten with every subsequent COBOL invocation. If you do
not specify a file-name, the keystrokes will be recorded in a file in the
current directory with the same name as your COBOL program with the .key
extension.
Ensure when making a single user recording that you have not set the
-t flag or the recording will not work.
In order to play back a keystrokes file, you must set COBSES as described below. Any COBOL application which you then run will read all keyboard input from the keystrokes file rather than from the keyboard.
You can play back keystrokes in two modes:
-p flag in COBSES to play back at normal
speed (the speed at which the keystrokes were originally entered). The
keystrokes held in the Keystroke file are entered into the application
you invoked. The attributes and time delays will also be shown when
played back in normal speed mode.
-f flag in COBSES to play back at fast
forward mode (the fastest speed at which the UNIX Session Recorder can
play back the keystrokes). Again the keystrokes held in the keystrokes
file are entered into the application you invoke. If you do not specify a Keystroke file-name, the UNIX Session Recorder will look for a file with the same name as the COBOL program you execute with a .key extension.
When playing back keystrokes, you must ensure that:
Note that the -t flag has no valid setting under
single-user mode.
The multi-user function enables you to record the keystrokes from up to 15 terminals into one keystroke file. The name of the keystroke file specified in the COBSES environment variable must be the same for each terminal, as the keystrokes are recorded onto the same file. In multi user play back, each terminal will keep the same relative position as the order in which keystrokes were originally keyed in.
To record screen output from more than one terminal you must specify the
terminal number in COBSES for each terminal (you can use up to 15
terminals). To specify a terminal you use the -t flag
followed by the terminal number. For example, to record keyboard input and
define the recording as being for terminal 3, you set COBSES as:
COBSES=-r-t3
export COBSES
Note: You cannot specify the same terminal number more than once.
To simultaneously record more than one terminal using the same
application, you must make sure the terminal numbered 1 (-t1)
is the first to execute the program. If you try to start the recording
with a terminal other than 1, the process will wait until terminal number
1 has started, as this initializes the file. You specify the number as 1
to 15, but the screen file is created with the extension as hexadecimal,
that is, one character.
The recording consists of information not only about the keystrokes entered into the COBOL application, but also which terminal they were made on.
When playing back a multiple keystroke file, you must make sure that you use exactly the same number of sessions that you used to make the recording. This is because each keystroke is played back on the session number on which it was entered. If the Keystroke Recorder cannot play back a keystroke because the terminal does not exist, the play back will "hang" at that point. Since the session numbers are logical numbers, it is possible to play back more than one session from the same physical terminal by setting COBSES and running applications in the background.
Note: When playing back a multi-user keystroke file you must have write permissions to that file.
The Screen Recorder enables you to record the screen output from running COBOL applications. In addition you can also make multi-user recordings, taking the output from up to 15 terminals. To play back the recordings you must use the UNIX Screens Compare utility, described in the section Using the UNIX Screens Compare utility. The following sections explain how to use the recording functions.
In order to record screen output you set the -s flag. If
you do not specify a file-name, the screen output will be recorded in a
file with the same name as the COBOL program you execute but with a .sc1
extension.
You can record screen output in conjunction with any of the following uses of the keystroke file:
To record screen output from more than one terminal, you must either
specify different file-names for each terminal or use the default
file-name (see the section Session File-names earlier in this
chapter for details). You can use up to 15 terminals. To specify a
terminal you use the -t flag followed by the terminal
number. For example, to specify terminal 3 you set COBSES as:
COBSES=-t3
export COBSES
Note: You cannot specify the same terminal number more than once.
The terminal number you set affects the number used in the default file extension. For example, if you recorded the screen output from terminal 3 without specifying a file-name for application mapping, the Screen file would be recorded in myprog.sc3. If you are using more than nine terminals, the default screen file-name will use hexadecimal notation to define the terminal number; for example, the file from the fifteenth terminal would be myfile.scf.
You will find that when using the UNIX Session Recorder you can achieve useful results when using the Keystroke Recorder in conjunction with the Screen Recorder. For example, if you intend to make changes to the application stock which is provided with this COBOL system.
COBSES=-r-s
export COBSES
COBSES=-f-snewstock.sc1
export COBSES
You can run steps 2 through 4 as many times as you require.
You can combine the use of UNIX Session Recorder with Animator so that you can run the Animator using input from a Keystroke file. Alternatively, you can record the Animator keystrokes as well as the keystrokes from the application.
If you want to use the Keystroke file as a way of entering data into the program when running Animator, you should record the keystrokes as described earlier. Then when using Animator you can run through the animation of the application without having to re-key the data. This would involve using the UNIX Session Recorder to play back the keystroke file as described earlier.
You can also record the whole animated session, including keystrokes
made to the Animator as well as keystrokes entered into the COBOL
application. To do this you must set COBSES to the -a flag
to record the Animator and application keystrokes. If you do not name this
file, the default name will be either the name of the COBOL application if
Animator is invoked via the +A switch, or cobol.key
if Animator is invoked via the anim command. Note that the -a
switch must be specified as well as the -p, -f,
-r, and/or -s flags.
Combining the Animator with the UNIX Session Recorder makes a particularly useful tool for finding difficult to reproduce errors in a COBOL program.
For further information on Animator, see the chapter Animator in your COBOL System Reference.
The UNIX Screens Compare utility works in conjunction with the UNIX Session Recorder to play back and compare Screen files. You can use this facility with any Screen file created using the UNIX Session Recorder.
One of the uses of the UNIX Screens Compare utility is to establish if any differences between the screen output from two or more sessions exist. For example, if you change a program, you can use the UNIX Screens Compare utility to compare screen output produced before and after the modification to check if the display changes.
The UNIX Screens Compare utility works in two modes:
To use the UNIX Screens Compare utility you must first have created the
appropriate number of screen output files (one for Playback mode and two
for Compare mode) using the UNIX Session Recorder. See the section Using
the UNIX Session Recorder earlier in this chapter for more
information. All of the flags with the exception of -m are
only valid in Compare mode. You invoke the utility by using the command:
compare {option[file-name]}...
where the parameters are::
option |
One or more of the following:
|
For example, to play back the Screen file myfile you type:
compare myfile
or to compare the Screen file screen.sc1 with the second Screen file myfile with the option to write the final outcome to the file myfile.out, you type:
compare -Pmyfile.out screen.sc1 myfile
Screen files can record any character generated by this COBOL system. Each record defines the attribute, the position on the screen and the character shown.
If the two Screen files you are comparing have no differences, the screen shows a fast replay of the first screen file with a final message:
Screens match
If differences are found, and you did not specify -s, the
Compare menu appears on the screen, with a brief display of a status
message indicating the type of difference found. See the section Menus
for details of the Compare menu. You continue with the comparison until
the process is complete. At this point, you see a final message indicating
the concluding state of the comparison. These are listed alphabetically in
the section UNIX Screens Compare utility Final Messages. You can
use the -P{file-name} flag to write the final
message to the specified file.
You can speed up the comparison by using these options when you invoke the UNIX Screens Compare utility:
-s |
Gives you the facility of suppressing the screen display (but status messages and return code are not affected). By suppressing the display you can speed up the rate of the comparison |
-S |
Suppresses all screen display. Once again this will increase the rate of the comparison |
When you are comparing two Screen files, both the characters and the attributes are compared. They are compared in strict sequence, the first character on the first Screen file is compared with the first character on the second Screen file, and so on. This can mean that more differences may be found than you anticipated. For example, if the first file had the following display:
abcdef
and the second file had this display:
acdef
then five character differences would be found. Only the letter a
would be found to compare successfully. Also the UNIX Screens Compare
utility has no way of determining if the characters are from different
records or even files. The sequence is restricted to the order in which
characters and attributes are displayed on the screen.
The way the terminal is configured will affect the way the file is played back. For example, if the terminfo database for a terminal did not contain a definition for screen highlighting, but the application attempted to display highlight, the output of Compare would not include the highlight attribute. However, the highlight attribute, as recorded in the Screen File, will be compared.
The Compare menu is displayed if differences between the Screen files are found. Before you see the menu, the screen displays a Welcome Screen containing copyright notices and software version numbers. The Welcome screen also displays information on how you can access help screens and the Maphelp facility. See your Release Notes for further details of key mapping.
The Compare menu has three sections: the first is the status line which displays:
The second section of the Compare menu shows the options, each with an associated function key and letter. To select the required option, you can either press the function key for that option or its associated letter. For example, to select the Information option you could press either F2 or i (you could press i or I; it is not case sensitive).
The third section of the Compare menu is the message area; a single line displays messages, both the status messages as the comparison progresses, or a final message at the end of the comparison.
The Compare menu shown in Figure 12-1 is for a two-file comparison where differences between the Screen files have been found. If no differences are found, or you have selected no menu output when invoking the utility, you will not see this menu. When in Playback mode (using only one file) the last three options, screen-swap, differences and compare are not available, and the status line indicates it is the playback menu.

Figure 12-1: Compare Menu
The following sections describe the functions available from the Compare menu.
Select the Help option by pressing F1=Help or h from the Compare menu to see help information. This briefly summarizes the function of each of the menu options.
If you want to check information for the Screen file you are using, you can select the information option by pressing F2=Information or i from the Compare menu to view information on the current file.
To view information for the file you must make it the current file (the Screen-swap option can be used to change from one file to the other).
The current Screen file information consists of:
On first entering the Compare menu, the Screen file is output in forward mode. This can be changed to backward by pressing F3=screen-Backwards or b. When you change direction, you will see the direction change on the status line on the menu. You can change the direction again by pressing screen-Forwards or f.
If you want to clear the Compare menu from the screen, you can press F5=Menu-on/off or m. This suppresses the display of the status line and menu options. This option is a toggle, so that by pressing F5 or m again the full menu is shown. However, even when the full menu is not shown any status messages will be shown.
You can decide to suppress the screen displays when you invoke the UNIX
Screens Compare utility by specifying the -m flag.
If you want to move quickly through the screen file to the end result, you can press F6=Zoom-to-end or z. This will quickly display the file, in the current direction, until either the start or end of the file is reached.
The UNIX Screens Compare utility will show the output from only one of the files you are comparing at any one time. If you want to view the second file, you press F7=Screen-swap or s from the Compare menu. The name of the current file is that shown on the status line.
As you run the UNIX Screens Compare utility, the system halts and displays a brief message whenever a difference between the two screen displays is encountered. To have a visual display of the differences, press F8=Differences or d from the Compare menu. This will show the Differences Screen, which illustrates exactly where on the display differences have been found, and of what type they are. These are indicated by the following characters:
| Character |
Meaning |
|---|---|
| A | Attributes differ at this point on the screen |
| C | Characters differ at this point on the screen |
| B | Both characters and attributes differ at this point on the screen. |
When the UNIX Screens Compare utility reaches a difference in the comparison between Screen files, the comparison normally comes to a halt and a status message is displayed. If you want to continue with the comparison, press F9=Compare or c from the Compare menu.
The UNIX Screens Compare utility enables you to extend or clip the physical size of the screen on which a recording was made if the Screen files being compared are recorded on screens of a different physical size.
If the screens are different sizes, they are assumed to be aligned at the top left-hand corner. Therefore, there are three possible areas where a larger screen "exists" but a smaller screen does not. Consider the example in Figure 12-2 showing one screen overlaying another.
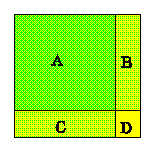
Figure 12-2: Example screen overlays
This example shows that:
Note: You cannot compare a wide screen (Areas A and B) with a long screen (Areas A and C).
By default, when two screens are being compared, if one screen has one or more extended areas, the UNIX Screens Compare utility logically extends the smaller screen's virtual screen map to make it the same size as the larger screen. The extended area consists of space characters set to the NORMAL attribute. The comparison then takes place.
Alternatively, specifying the UNIX Screens Compare utility -c
flag clips the larger of the two screens so that the extra areas in the
larger screen's virtual screen map are not compared. This causes all
characters outside the area of the smaller screen to be ignored. You can
further specify if the screen should be clipped horizontally by adding an
'x' to the -c flag, or vertically by adding a 'y'.
In addition to comparing two screen files, you can use the UNIX Screens Compare utility to play back a single screen recording (Playback mode) by entering:
compare file-name
You see the menu shown in Figure 12-3.

Figure 12-3: Playback Menu
Using this facility you can run the file forward or backward, looking at file information, toggling the menu on or off, and run the file in fast forward (Zoom) mode.
When using the Compare facility with a single file, most of the options,
such as suppressing status messages, will be irrelevant. If you include a
flag such as -s in the command line when you invoke the
utility, you will see a warning message on the last menu line telling you
the flag has been ignored.
On completion of the UNIX Screens Compare utility, a final message is
given. This is normally sent to standard output unless you set the -P
flag when you invoke Compare to place it in a specified file. The
following list gives all the possible messages that could be given, listed
in alphabetical order, with an indication of the type of situation from
which it would arise.
Copyright © 1999 MERANT International Limited. All rights reserved.
This document and the proprietary marks and names
used herein are protected by international law.
| Structure Animator | Directives for Animator |