

| Editor� 1 | Library: Command Line Interface | |
This chapter describes how to use the Forms-2 utility to design, create and edit interactive screen layouts for use with Object COBOL application programs that use enhanced ACCEPT/DISPLAY syntax. See the chapter Adis for a full description of enhanced ACCEPT/DISPLAY syntax. The Screens utility provides equivalent functionality for applications that use Screen Section. See the chapter Screens in your Programmer's Guide to Creating User Interfaces for more information on the Screens utility.
Most application programs are written separately according to individual requirements, but Forms-2 can automatically produce a powerful user-oriented indexed data entry and filing system maintained by use of the screen layouts (forms).
If you want to produce an automatic indexed filing system program and then use it, read the sections Forms-2 Basics, Initialization Phase and Work Phase, and then proceed straight to the section Index Program before trying the comprehensive sample run in the section Index Program Example.
If you want to produce some screen layouts, read the sections Forms-2 Basics, Initialization Phase and Work Phase, and then try the comprehensive sample run in the section Screen Generation Example.
The sections Data Descriptions, The Checkout Program and Screen Image Files are descriptions of Forms-2 output file contents and relate directly to optional features that you can use. Read these sections if you require the features described.
It is recommended that, in any case, you run the demonstration programs supplied with your version of Object COBOL before using Forms-2.
The Forms-2 utility is an extension to the Object COBOL software development system that enables you to interactively create and edit data entry screens for applications programs at a terminal. It provides four powerful facilities to aid you in the design and development of interactive applications written in Object COBOL:
This section explains some of the basic concepts you need to know before using Forms-2. It covers the following areas:
You access Forms-2 by entering the following command line:
forms2
You should ensure that the full path-name of the COBDIR environment variable is not longer than 34 characters before running Forms-2. Results are undefined if the COBDIR path-name exceeds this limit. See the appendix Micro Focus Environment Variables in your Object COBOL User Guide for more information on the COBDIR environment variable.
This displays the initialization screen I01, shown in Figure 8-1 later in this chapter.
Forms-2 processing is divided into a number of logically distinct units, but two main phases can be identified: the initialization phase, and the work phase.
The initialization phase is performed only once and establishes the characteristics of a particular run of the program. It is a series of screens containing self-explanatory prompts to which you reply as necessary. See the section Initialization Phase for details of this phase.
Once you have completed the initialization phase you enter a work phase. At least two work phases are performed for each data entry screen that you design.
You can think of the Forms-2 screen as a paper form, where the printed fixed text is used as a guide to entering the variable data in the space provided. To the human eye it is obvious where the variable data entry areas occur on the form, but a computer needs to have these areas defined explicitly. There are, therefore, two types of work phase: one in which you specify fixed text, and one in which you specify variable data fields. See the section Work Phase for details of this phase.
In a work phase there are two modes: command and edit. In command mode, two underscore (_) characters in the top left corner of the screen constrain the movement of the cursor, with the only allowed input being a command. See the section Command Mode for more information on this mode, as well as descriptions of the commands available.
Edit mode is the mode in which you are free to move the cursor to any part of the screen, enabling you to make entries for either fixed text or variable data. See the section Edit Mode for more information on this mode.
Forms-2 is written in COBOL and uses the extended ACCEPT and DISPLAY verbs in Object COBOL. See your Language Reference for descriptions of these two verbs.
Advantages of this terminal interface are:
In edit mode you can move the cursor quickly and easily about the screen. The functions of the cursor control keys are summarized below:
| Key |
Function |
|---|---|
| <right-arrow> | Moves the cursor right one character. |
| <left-arrow> | Moves the cursor left one character |
| <down-arrow> | Moves the cursor up one row. |
| <up-arrow> | Moves the cursor down one row. |
| Home | Moves the cursor to the start of the first line. |
| Tab | Moves the cursor to the start of the next line. |
| Backtab | Moves the cursor to the start of the line, or the start of the previous line if already at the start of a line. |
You can correct text either by overtyping or by switching into command mode and using the editing commands.
You can choose any valid combination of the facilities provided by Forms-2, and depending on the options you select from the W01 screen, Forms-2 automatically produces some or all of the following four types of disk output file. See the section Work Screen W01 for information on selecting which output files are created. The four file formats available are:
filename.DDS.
filename.chk.
filename.snn.
filename.gen.
The initialization phase of the Forms-2 utility is the first step in the execution of the program, and is only done once in any one run of Forms-2. In this phase you are asked to reply to questions asked on the two initialization screens I01 and I02. The following two sections show these two screens and describe the options they offer.
The initialization screen I01 is displayed when Forms-2 is invoked. This screen is shown in Figure 8-1.

Figure 8-1: Initialization Screen I01
Initialization screen I01 prompts for four pieces of information. If you press Enter during this screen, all entries you have made are accepted, and any information left unanswered takes the default value. Do not press Enter until you are ready to move on to initialization screen I02, having made all the required entries for the following:
The purposes of these four pieces of information are described in the following sections.
The filename base that you key in at this point is used in the following ways by Forms-2:
| File |
Description |
|---|---|
filename.DDS
|
Contains Object COBOL data description statements. See the sectionData Descriptions for more information on .DDS files. |
filename.chk
|
Contains a checkout program. See the section The Checkout Program for more information on checkout programs. |
filename.s |
Contains screen images, where nn
= 00, 01, ..., 99. See the section Screen Image File for
information on this type of file. |
filename.gen
|
Contains an index program. See the
section Index Program for information on index programs. |
Only one .DDS file is output per Forms-2 run, whereas a separate screen image file is output for each screen built.
You can use Forms-2 with screens of 22, 23 or 24 lines. The default for this entry is 24 lines. If your terminal has fewer than 24 lines, Forms-2 does not function correctly with this value. With some terminals you might have to specify one fewer than the number of lines actually present on the screen to avoid the problem where the screen is scrolled up when an entry is made on the last line.
When selecting G from initialization screen I02 (see the section Initialization Screen I02), the number of lines per terminal should be 23. This takes into account the extra line at the bottom of the screen to be displayed as well as Adis messages to prevent scrolling.
When selecting C from initialization screen I02 (see the section Initialization Screen I02), the number of lines per terminal should be 24 if the actual number of lines on the screen is 25. The extra line is not displayed with this selection.
This entry enables you to override the default currency sign, the dollar sign ($). Forms-2 generates an appropriate entry in the Special-Names paragraph in either the checkout or index program. You should use the specified currency sign when specifying numeric edited fields in the work phase, and Forms-2 uses it in the generated data description statements.
The character that you specify here is validated. See your Language Reference for a list of valid characters.
This entry enables you to specify the character to use to represent a decimal point. The default is the period (.) but you can change it to be the comma (,). If you specify the comma, Forms-2 produces the following clause in the Special-Names paragraph of the checkout or index program:
decimal-point is comma.
You should use the specified decimal point character when specifying numeric edited fields in the work phase, and Forms-2 uses it in the generated data description statements produced when you submit your program to the Object COBOL system.
The initialization screen I02 is displayed immediately after you terminate screen I01 entries by pressing the Enter key. This menu is shown in Figure 8-2.
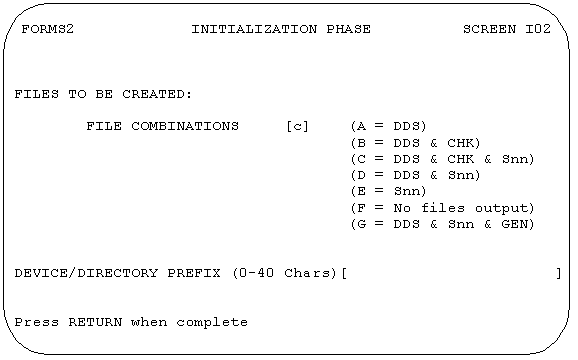
Figure 8-2: Initialization Screen I02
Initialization screen I02 asks you to specify two pieces of information. Pressing Enter on initialization screen I02 causes the information you have entered to be accepted and starts a work phase. Once you have finished the initialization phase you can no longer change information specified on initialization screens I01 and I02. The information you enter on initialization screen I02 is:
These entries are described in the following sections.
Forms-2 offers seven combinations of files, shown on initialization screen I02 (see Figure 8-2). The extensions used on the menu are as follows:
If you select option G from initialization screen I02, at some stage before termination of the second work phase you must position the cursor at the first non-key variable data position and enter the work phase command *. Failure to do this results in Forms-2 continually returning you to edit mode until you the * command is carried out, or you enter the ! command to terminate the Forms-2 run and abandon the work in progress.
When selecting G from initialization screen I02, the number of lines per terminal, set using initialization screen I01, should be 23. This takes into account the extra line at the bottom of the screen to be displayed as well as Adis messages to prevent scrolling.
When selecting C from initialization screen I02, the number of lines per terminal, set using initialization screen I02, should be 24 if the actual number of lines on the screen is 25. The extra line is not displayed with this selection.
If you enter the Q command (see the section Work Phase) at this point, Forms-2 quits back to screen I01, enabling you to amend the information given there. This can be useful if you inadvertently pressed Enter before completing screen I01. This command is not mentioned on the screen.
You define the screen layouts (forms) to be used in a Micro Focus COBOL application by entering text at the keyboard to produce model forms on the screen. You can define as many forms as you want in a single Forms-2 run. To define one form requires at least two distinct work phases: one to define the fixed text of the form, and another to define the variable data entry fields.
There are two work phase screens you encounter in the work phase. The following sections describe these screens and the options they offer.
Work phase W01 is displayed after the completion of each work phase and is also used to terminate a Forms-2 run. This screen is shown in Figure 8-3.
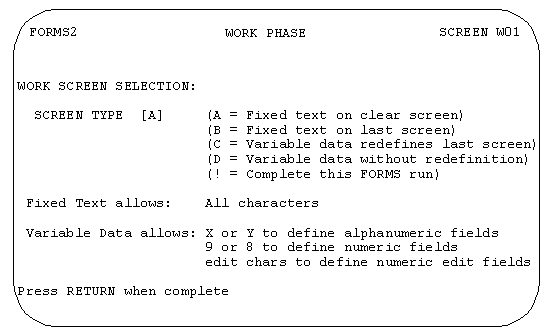
Figure 8-3: Work Phase Screen W01
Usually you use the first work phase to specify the fixed text form and the second work phase to specify the variable data fields in the form. However, this need not always be the case, and Forms-2 needs to know which type of text you are going to input in a particular phase. Work phase screen W01 presents the various options that are available.
The following sections describe the options available from work phase screen W01.
Fixed text selections offered from this screen are as follows:
| Option |
Description |
|---|---|
| A | The terminal screen is cleared to spaces in preparation for you to enter the fixed text for a new form. This is the default. |
| B | The previous screen is redisplayed to help
you in defining additional fixed text.
Text from the previous screen is used only as a background in this case, and is not included in the record definition for the fixed text you are about to key in. You must therefore ensure that if any part of the previous screen is inadvertently overkeyed, the original characters must not be replaced but cleared to spaces. |
Variable data selections offered from this screen are as follows:
| Option |
Description |
|---|---|
| C | The previous screen is redisplayed to help you in the redefinition of the form to incorporate variable data field specifications. In the application the data is keyed into the fixed text form itself. |
| D | The previous screen is redisplayed to help you in the definition of variable data area in the application program. This is sometimes useful, even though it results in larger application programs. |
You must use screen type D when using windowing commands if the start of the window is not going to be the first line on the screen.
After you have selected the screen type, you are presented with the appropriate work screen for that text to be entered; for example, if you selected option A (fixed text on clear screen), a blank screen is displayed. For the other options, the previous screen is redisplayed to allow correct alignment of the current input.
Entering the exclamation point (!) for the screen type causes the Forms-2 to terminate.
On termination, Forms-2 closes the .DDS file and displays an identification message. If you requested the checkout facility during initialization, Forms-2 write the checkout program to disk, closes the .chk file, and displays an identification message.
Forms-2 terminates automatically after the second work phase if an index program is being produced (see the section Index Program).
Entering the F work screen manipulation command displays the work screen W02. See the section Work Screen Manipulation Commands for more information on the F command. This screen is shown in Figure 8-4.
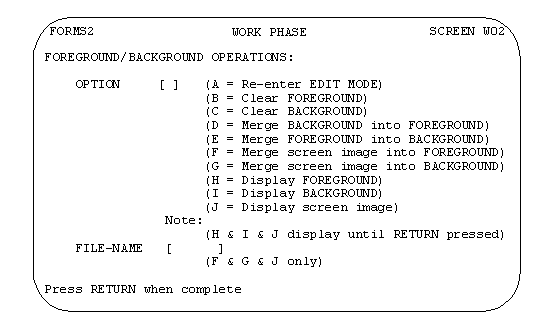
Figure 8-4: Work Phase Screen W02
In order to process only the data entered in a particular work phase, Forms-2 must keep this data separate from previously entered data, that is displayed purely for alignment purposes. Forms-2 does this by constructing the displayed work screen from two separate data areas, termed background and foreground. The foreground holds the data entered during the current work phase; the background holds previously entered data that has been retained for alignment of the data entered in the current work phase. At the end of each work phase Forms-2 processes the foreground data only.
Work phase screen W02 presents you with a number of options governing the use of foreground and background.
Foreground/background selection options available from this screen are as follows:
| Option |
Description |
|---|---|
| A | Returns to edit mode. Both foreground and background are cleared to spaces in preparation for you to enter a new form. |
| B | Clears the foreground of the form to spaces, leaving the background unchanged. |
| C | Clears the background of the form to spaces, leaving the foreground unchanged. |
| D | Overlays the background of the form onto the foreground. |
| E | Overlays the foreground of the form onto the background. |
| F | Overlays a screen image file onto the foreground. Enter the name of the screen image file at the filename prompt. This option enables you to alter forms defined in previous Forms-2 runs. |
| G | Overlays a screen image file onto the background. Enter the name of the screen image file at the filename prompt. This option enables you to alter forms defined in previous Forms-2 runs. |
| H | Displays the foreground of the form. This option displays only the foreground of the work screen for examination. The full work screen is restored on return to edit mode. Press to Enter remove the display. |
| I | Displays the background of the form. This option displays only the background of the work screen for examination. The full work screen is restored on return to edit mode. Press Enter to remove the display. |
| J | Displays a screen image file. Enter the name of the screen image file at the filename prompt. This option displays the specified screen image file without corrupting the current foreground or background. |
You can override this automatic work screen preparation for the next phase by using the O work screen manipulation command. See the section Work Screen Manipulation Commands for more information.
Generally, you enter text into the foreground from the keyboard, and it is moved into the background only from the foreground.
While entering data into the work screen (that is, foreground), you can work in either of two modes:
These two modes are explained in the following sections.
Edit mode is the mode in which you are free to move the cursor to any part of the screen by use of the cursor control keys. You can also make entries into any part of the screen, in accordance with the screen type that you selected at the start of this work phase.
In the design of the fixed text of a form; that is, the fixed fields analogous to the pre-printed text on a paper form, you can enter any legible characters anywhere on the screen. This text is displayed as prompt text during a data entry run of the application.
In the design of the variable data fields of a form; that is, the fields analogous to the entry spaces on a preprinted form, you can enter the characters X, Y and 8, 9.
When keying in variable data, X denotes an alphanumeric character and 9 denotes a numeric character. If you need to have two alphanumeric fields contiguous with each other, place Ys in the character positions of the second field. Similarly, for contiguous numeric fields use 8s in the character positions of the second field.
Example
Suppose in an application the operator must key in an invoice number. The fixed text in this example could be "INVOICE NO .....". An example value of an invoice number could be "CA3021". You must define the size and type of this variable data explicitly. Hence, if the invoice number always had two alphanumerics followed by four numerics, you would key in XX9999 at the point on the screen (the dots in this example) where you want the operator to key the actual invoice number when the application itself is running.
Note that Object COBOL provides automatic validation of numeric fields. Additionally, you can input special editing characters to specify numeric edited fields. These fields should be separated by spaces. Numeric edited fields are described in your Language Reference. Valid characters are:
| Z, *, +, -, CR, DB, .(period), ,(comma), B, /, 0(zero), $ |
The $ sign is the currency sign, that may be replaced by another sign as specified in the Special-Names paragraph of the Object COBOL program, either directly or as specified during the initialization phase of the Forms-2 run (see the section Initialization Phase).
Picture characters S, V and P are not allowed.
Forms-2 checks variable data fields for validity, but only when a .DDS file is being created. Consult your Language Reference for details of how screen handling works.
To switch to command mode from edit mode, simply press Enter.
Command mode is the mode in which two underscore (_) characters initially bound the cursor, and the cursor is constrained to stay within these two characters. See the section Commands for information about the commands available.
Before you invoke a command, make sure you are in command mode by checking that two underscore (_) characters are displayed. If they are, enter the relevant command and press Enter.
The commands available to you during the work phase fall into three main groups:
General commands perform such functions as releasing the work screen for processing.
Work screen manipulation commands help you to prepare and edit the work screen. You are advised to become very familiar with these commands.
Programming commands exist mainly for the convenience of the COBOL programmer, and some of them are not meaningful without an understanding of COBOL. They include commands to help in producing efficient code, and to give you more control over the output files.
These groups of commands are explained in detail in the following sections.
The following work screen commands are available:
All commands except Space, ! and Q return you to edit mode. The default command was introduced for convenience in case you enter command mode accidentally.
The following work screen manipulation commands are available:
The following programming commands are available:
To complete the work phase, select command mode, press Space and then Enter. Space is the command to release the work screen for processing.
Forms-2 completes the work phase (depending on the file selections from initialization screen I02) as follows:
WORK SCREEN VALIDATION in progress - DO NOT press RETURN.
If any other character is encountered, an error is signaled by the validation routine by alternately displaying "?" and the offending character to give a flashing effect. This error indication then ceases and Forms-2 returns to edit mode with the cursor positioned under the erroneous character. You must repeat the Space command after making any corrections.
Forms-2 allows editing characters but does not verify that the combinations of these are valid; Object COBOL editing rules must therefore be obeyed to ensure error free code. Note that these fields should be separated by spaces.
Only foreground data is output to the screen image file.
This section describes the Object COBOL data descriptions that Forms-2 generates in the .DDS file. You need some knowledge of Object COBOL to fully understand the topics in this section.
The Object COBOL extensions to the ACCEPT and DISPLAY verbs allow comprehensive screen handling to be included in a user application (see your Language Reference). Programming the necessary data description statements can be tedious and expensive in terms of programmer time, particularly since it is very prone to simple errors.
Forms-2 simplifies the production of error-free data descriptions by enabling you to specify screen layouts (forms) in the most convenient way, namely by setting them up on the screen as described in the sections Initialization Phase and Work Phase. If you invoke the facility by selecting an appropriate option from initialization screen I02 during the initialization phase, Forms-2 automatically converts this input to the necessary Object COBOL statements and outputs these to a data description (.DDS) file. You then simply incorporate these statements in your application source code by means of the Micro Focus COBOL COPY verb and use record-names consistent with those generated by Forms-2.
Initialization screen I01 prompts you for a base-name . This is a six-character field into which you enter any name of your choice consistent with COBOL data naming (see your Language Reference ). This base is then used to generate the COBOL data and record-names as described in the following sections.
The default record-name format generated by Forms-2 for inclusion in your Object COBOL source program for screen formatting is as follows:
bbbbbb-rr (01 level)
where the variables are:
bbbbbb |
The 1-6 character base that you specified at initialization screen I01. |
rr |
The record number, starting at 00, in the first work phase and increasing by one for each subsequent work phase. |
If you use the window commands to define a window starting in a line other than line 1, the record-name generated is:
bbbbbb-rr-ll
where ll is the line number.
This serves as a useful reminder when coding the appropriate ACCEPT/DISPLAY statements.
The elementary data naming structure generated by Forms-2 for inclusion in your Object COBOL source program for screen formatting is as follows:
bbbbbb-rr-nnnn
where nnnn is the sequence of this field in the
screen, starting at 0001.
Sometimes it might be more convenient to have the screen coordinates incorporated in the data-name rather than a field sequence number. You can do this by using the G command during the work phase. See the section Programming Commands for a description of the G command.
Generation of PICTURE clauses by Forms-2 depends on the type of text you select at work phase screen W01 at the start of each work phase. Forms-2 forces field boundaries at the end of each line to be compatible with certain types of terminal.
At the end of a fixed text work phase, Forms-2 generates only FILLER areas or named alphanumeric fields with associated VALUE clauses.
The Object COBOL interactive ACCEPT and DISPLAY verbs operate only on named fields; FILLER areas are left alone. The time taken to display a screen depends both on the size and also the number of constituent fields.
When processing fixed text screens, Forms-2 by default generates FILLER wherever multiple spaces appear. You can alter this default by using the J command described in the section Programming Commands. Alternatively, you can use the underscore character (_) to force inclusion of spaces in a VALUE clause. You can alter the default character used for this purpose by using the M command described in the section Programming Commands.
At the end of a variable data work phase Forms-2 generates alphanumeric, numeric or numeric edited fields depending on the actual characters that you keyed in (see the section Work Phase). These are usually the Object COBOL characters 9 and X, but note the additional use of 8 and Y as alternatives to 9 and X.
Also note the exclusion of S, V and P as described under Variable Data in the section Work Phase.
Normally the .DDS file output from Forms-2 should be all that you require. Where special circumstances dictate the use of particular data-names or the disallowed picture characters, the S9 command (see the section Programming Commands) enable you to edit lines in a .DDS file before output. Alternatively, you can use a conventional text editor to edit the file. However, note that this editing process must be repeated if you ever change the form using Forms-2.
You can also completely suppress output of the .DDS file for a particular work phase by using the S1 command (see the section Programming Commands. If you use this command, the record number incorporated in data-names is still incremented by 1 for the next work phase.
To incorporate the generated data descriptions into your application program, all you need to do is copy the .DDS file using the COPY verb available in Object COBOL. The COPY verb is described in your Language Reference.
For example, the COPY statement to incorporate the demo1 sample forms designed in the section Screen Generation Example would be:
000000 COPY "demo1.DDS".
and should be included in the Data Division of your program.
This statement is included in all checkout or index programs generated. Refer to any such program for an example.
This section describes the checkout program that Forms-2 can generate automatically while generating the created forms. The checkout program enables you to:
The checkout source code, in Object COBOL, includes a COPY statement for the .DDS file exactly as it would be coded in your application. It is therefore a true validation of the .DDS file when it is submitted to your Object COBOL system.
If you include numeric edited fields in the variable data fields of a form, error-free code is not guaranteed with standard Micro Focus COBOL. To fully validate numeric edited fields you must submit your program to the Object COBOL system. If errors occur when you submit your program, you can use the Forms-2 screen image facility to recall the offending screen and alter the variable text numeric edited fields as necessary.
The checkout program logic is a sequence of DISPLAY or ACCEPT statements for the screens that you defined in the Forms-2 run, in the order in which they were created. Therefore, by entering all required forms in a single Forms-2 run, a demonstration program using all the forms can be simply and rapidly created, with no programming necessary.
For a complex application the best method might be to create each form in isolation, using screen image output only. Forms-2 can then be run again to produce the required checkout program, using the facility to re-input screen images (the F command and the D option in the subsequent screen display). Use of this facility would also enable you to set up a complex sequence of screens for demonstration purposes incorporating the same screen more than once.
After passing through the sequence of screens, the checkout program gives you the option of repeating the whole sequence. On the second pass, previously entered data is redisplayed, allowing you to check your forms for both initial data entry and data amendment.
You submit your checkout program to the Object COBOL system in the usual way, by entering the command:
cob -ik base-name.chk
There are three stages to running the checkout program: loading, checkout processing and checkout completion. These processes are described in the following sections.
You can run the executable program produced when you submitted your checkout program to the Object COBOL system, by entering the following command:
cobrun base-name
The basic function of the checkout program is to display the fixed text fields of your form and enable data to be entered into the variable data fields of the form in the sequence in which the screens were created.
However, the detailed logic is slightly more sophisticated. The following notes make references to the options taken for screen type at work phase screen W01, and these are discussed in the section Work Phase Screen W01.
The fixed text of a form is displayed. If there are two consecutive fixed text forms, the checkout program pauses after the first display until you press Enter.
If you selected option A from work phase screen W01 when you created the form, checkout clears the terminal before displaying the screen.
If you selected option B from work phase screen W01 when you created the screen, any text displayed remains on the terminal, except where it is overwritten by the text of the new screen.
An ACCEPT statement is issued for a variable data screen, enabling you to enter data in the unprotected areas; that is, the fields specified by means of Xs and 9s, and so on.
You can check the extents of the fields. For numeric fields you can also check that only numeric characters can be entered, and the effect of entering the left zero fill character ".".
On other than the first pass through the sequence of screens the previously entered data is redisplayed before the ACCEPT statement is issued.
If the variable data screen includes numeric edited fields, the ACCEPT operation for the screen is followed by a corresponding DISPLAY operation to show the effect of the editing or normalization by the Micro Focus run-time system. The normalized fields are not automatically echoed to the terminal.
After the entire sequence of screens has been passed, the checkout program displays the following message:
CHECK-OUT completed
Repeat ? [N] (Y=Yes)
If you want to repeat the sequence of screens, press Y followed by Enter. Alternatively press Enter to take the default to terminate the program.
This section describes the screen image files that Forms-2 can produce in addition to, or instead of, the Object COBOL data description statements described in the section Data Descriptions. These files contain exact text images of the forms that you have designed.
These form images have the following uses:
You invoke this facility by selecting option C, D, E or G from initialization screen I02 during the initialization phase. The default option causes screen image output.
Screen images are output to files named base-name.snn,
where base-name is the name that you entered at
initialization screen I01, and nn is a number 00 through 99.
You can override the default filename by issuing the S3 command during the work phase (see the section Programming Commands). This causes Forms-2 to request input of the required filename during processing of this work screen.
A separate screen image file is created at the end of each work phase, with the numeric part of the name (nn) being incremented by 1 each time a new file is created. A screen image file is structured as a standard line sequential file with a record for each line of the screen. Each screen image contains only text entered during the work phase in which it is generated; that is, foreground data. Consequently, for a variable data work phase, the output screen image contains only Xs, 9s, Ys and 8s.
You can suppress the screen image output from any work phase by issuing the S2 command during that phase (see the section Programming Commands). If you use this command, the numeric part of the filename extension is still updated for the next phase to keep in line with the record numbering in the generated .DDS files.
Object COBOL data description statements that have been generated from a user-designed form by Forms-2 are held in a .DDS file. You might need to make corrections and adjustments to maintain the form. You can maintain a .DDS file using a conventional text editor, but this involves the high risk of simple but expensive errors, that Forms-2 eliminates.
To avoid this, Forms-2 enables you to read a screen image file you have previously saved. You can do this by running Forms-2 and either issuing the FF command (see the section Work Screen Manipulation Commands) or selecting option F from the work phase screen W02 (see the section Work Phase Screen W02). You are then prompted for the identity of the screen image required. Forms-2 reads the screen image file into the foreground area of the work screen and returns you to edit mode. The form is then displayed as if it had just been entered and you can make any required amendments before releasing the screen for processing by using the Space command.
When you use Forms-2 for maintenance in this way it overwrites the existing files, but only after issuing warnings that the files already exist, and asking you for confirmation to proceed. For screen image files Forms-2 offers you the facility of specifying an alternative filename if you want to retain the old version.
The screen image files are created as line sequential files in accordance with the conventions of the operating system. Therefore you can use standard software to print them, and the resulting hard copy is an exact image of your form with no risk of transcription error.
Form images can be used as a step in the applications design process, providing a valuable part of the designer/programmer interface.
For interactive applications, design of the user interface; that is, the screen layouts or forms, could take place well in advance of the actual program being written, and the forms designer need not have any detailed knowledge of COBOL.
Forms-2 enables a non-technical user to generate valid Micro Focus COBOL statements. An experienced COBOL programmer can then make use of commands available to generate the most efficient code, for example, by influencing the number of fields to be displayed.
Thus, it can sometimes be advantageous to use screen image output alone as an intermediate stage in the design process, with the programmer using the image files as input to Forms-2 to produce the final .DDS file. If you use Forms-2 in this way, both fixed text and variable areas can conveniently be indicated on a single fixed text screen. You can then easily use this screen to generate a .DDS file, and the form designer does not need to know any details of COBOL data field specifications.
In this example, you use Forms-2 to build the following data entry form:
NAME      [                     ]
ADDRESS   [                     ]
          [                     ]
          [                     ]
TEL       [    -     ]
where NAME and ADDRESS are alphanumeric fields and TEL is a numeric field. You can then use the checkout program generated by Forms-2 to experiment with data entry. Then you change the ADDRESS field name to ABODE. Afterwards, the screen appears as:
NAME      [                     ]
ABODE     [                     ]
          [                     ]
          [                     ]
TEL       [    -     ]
To do this, perform the following steps:
forms2
NAME      [                     ]
ADDRESS   [                     ]
          [                     ]
          [                     ]
TEL       [    -     ]
Press Enter.
A message is then displayed giving the name of the fixed text screen image file created. Press Enter as requested.
NAME      [XXXXXXXXXXXXXXXXXXXXX]
ADDRESS   [XXXXXXXXXXXXXXXXXXXXX]
          [XXXXXXXXXXXXXXXXXXXXX]
          [XXXXXXXXXXXXXXXXXXXXX]
TEL       [999 - 9999]
WORK SCREEN VALIDATION in progress - DO NOT press RETURN
A message is then displayed giving the name of the variable data screen image file created. Press Enter as requested.
cob -iPk demo1.CHK -C copylist
When you submit your program to the Object COBOL system, the COPYLIST directive ensures that the text of any copyfiles is included in your program listing. See the appendix Directives for Compiler for more information on the COPYLIST directive.
cobrun demo1
Satisfy yourself that the cursor can only be placed in the variable fields, and that the data accepted into the fields depends on whether X or 9 was specified. You may also test the effect of left fill character ".".
When satisfied, press Enter to complete. A message is displayed as follows:
CHECK-OUT completed
Repeat? [N] (Y=Yes)
Press Enter to accept the No default and complete.
END OF Forms-2 CHECK-OUT
The variable form is used in the demonstration for accepting data. In practice, the form can be used for displaying data as well as accepting it. The demonstration shows the extent and type of each field, that is the same in DISPLAY as well as ACCEPT. A useful technique for clearing just the variable data fields on the screen is to move spaces to the ACCEPT record and then DISPLAY it.
demo1.DDS
demo1.chk
demo1.s00
demo1.s01
demo1.int
demo1.lst
to check the output from Forms-2 during this run.
If you continue with steps 20 onward you can learn to update both the fixed and variable data screens already created by moving them from background onto foreground.
forms2
File already exists:    demo1.DDS
overwrite? [N] (Y=Yes)
Press Y then Enter.
If you enter the No default here, the run is abandoned.
File already exists: demo1.CHK
overwrite? [N] (Y=Yes)
Press Y then Enter.
If you enter the No default here, the run is abandoned.
File already exists:    demo1.S00
overwrite? [N] (Y=Yes)
Press Y then Enter.
If you enter the No default here, you are asked for a file identity for a new screen image.
File created = demo1.S00
Press Enter to continue.
NAME      [                     ]
ABODE     [                     ]
          [                     ]
          [                     ]
TEL       [    -     ]
Press Enter to enter command mode, then F, then Enter.
You have now seen facilities to retrieve fixed text and variable text from previously created files. With a small number of variable data fields such as in this example it would, in practice, be easier to re-key them.
File already exists: demo1.S01
overwrite? [N] (Y=Yes)
As before, press Y then Enter.
File created = demo1.S01
Forms-2 provides facilities to automatically generate a COBOL program to create and maintain an indexed sequential file. The input required to generate the index program and use it to maintain files is supplied interactively by you.
You can design a data entry screen using Forms-2 by specifying the fields that comprise the indexed sequential file records in the usual fixed text and variable text work phases described in the section Work Phase.
The user interface to the generated index program is simply the form designed by you that reflects the desired record structure. You need give no thought to setting up specific command areas, but need only consider the data requirements.
You must submit the source file of your index program to the Micro Focus COBOL system, to produce an executable program.
The source file for the index program you generate is written to the
file filename.gen. This file provides you
with the following facilities required for the creation and maintenance of
an indexed sequential file:
The program has been developed so you do not have to explicitly state the facility to be invoked at any time; the program is able to follow the logic from the way you manipulate the actual data and cursor position.
You can see that only the variable text data is written to the file, and the fixed text data is merely a template to enable each field to be entered separately at data entry time. A record in the indexed sequential file is constructed by concatenating the variable fields of the form, in the order in which they appear.
The record must include a key area by which it can be uniquely accessed. The index program logic requires that this key area must be at the beginning of the record, that is, must be the first integral field(s) in the form, and must not exceed 32 characters long. This key area constitutes part of the record data. For convenience, the remaining fields are known as the data fields.
The section Index Program Example shows the sample application used in the section Screen Generation Example adapted to create and maintain a file of names, addresses and telephone numbers.
You can generate an index program using Forms-2 as described in the sections Initialization Phase and Work Phase.
All existing Forms-2 facilities are present, but logic is incorporated to prevent the use of inappropriate features if you select the index program option. The steps involved are:
Specify file and name data base as normal.
Specify option G for index program generation.
Work screen selection: the program forces the default option "A"
for fixed text entry by refusing to accept anything else, except !
to abandon the run or ? to display help screens.
A blank work screen is then displayed for input of the fixed text form.
Forms-2 commands as described in the section Work Phase are available except:
G : The generated program relies on the default data-name structure. This command is rejected.
S : It would be inappropriate to switch off .DDS file generation, and this command is rejected.
W : This feature is not available, and the command is rejected. However, the program reserves the bottom line for use in the generated program for system messages ("RECORD NOT FOUND", for example), and a delimiting line of hyphens marks this fact.
You release the screen for processing by the sequence Enter, Space, Enter, when the fixed text screen has been completely entered.
The work screen selection screen is again displayed.
Specify the variable fields as described in the section Work Phase; that is, X/Y/8/9 and editing characters. At some time before releasing this screen you must define the end-of-key/start-of-data bound in the record. You do this by positioning the cursor on the first data field, entering command mode and keying the * command; that is, the sequence Enter, *, Enter.
A key field cannot exceed 32 characters.
Release the screen by the usual Enter, Space, Enter sequence. If the program is not satisfied with the specification of the key/data boundary, it returns to edit mode.
Upon completion of the variable text screen Forms-2 completes its processing and terminates automatically without any need for the termination (!) command.
The following files are written to the disk by Forms-2 during index program generation:
| File |
Description |
|---|---|
base-name.s00
|
Screen image file |
base-name.s01
|
Variable data |
base-name.DDS
|
COBOL data description statement file |
base-name.gen
|
Source file for the generated index program |
Submit your index program to the Object COBOL system by entering the command:
cob -ik base-name.gen
After submitting your index program to the Object COBOL system, you can run the executable program produced (see the section Running Your Executable Index Program).
You can run your executable program by entering the following:
cobrun base-name
As soon as the index program is invoked, your form is displayed.
The form remains on the screen throughout the run, processing being controlled by manipulation of the data in the variable fields.
A screen display reflects the structure of a single record. You initiate the required processing function by entering data and positioning the cursor as described below, and then pressing Enter. Index program messages are displayed in an unused area of the screen as necessary.
The basic operator functions and index program messages are described below, and are sufficient for general use. Details of the index program interpretation of data manipulation and cursor position follow this description.
Amend the key fields only, and press Enter. The required record is displayed. If the record is not found; that is, the key cannot be found, the following message is displayed:
RECORD NOT FOUND
Press Enter to show the next record. If the end of the file is reached, the following message is displayed:
END OF FILE REACHED - RETURN WILL TERMINATE
Amend the data field only, and press Enter. The following message is displayed:
RECORD AMENDED
Press the Home key and press Enter. The following message is displayed:
RECORD DELETED
Amend the key and data fields as required and press Enter. If the data fields currently displayed do not need changing; that is, it is required to enter the existing data fields under a new key, press Home before pressing Enter.
The following message is displayed if insertion takes place:
RECORD WRITTEN
If a record already exists with the specified key, the current display is retained and the following warning is displayed:
RECORD ALREADY EXISTS WITH THIS KEY
The facilities available on the subsequent input are as follows:
Press Home then press Enter.
The record is replaced and the following message is displayed:
RECORD REPLACED
Amend key fields and press Enter (cursor position is unimportant).
Press Enter only.
Inquire up to the end-of-file by means of continual sequential inquiry or a combination of inquiry by key to a specific record, then sequential inquiry.
When end-of-file is reached the following message is displayed:
END OF FILE REACHED - RETURN WILL TERMINATE
Press Enter to terminate the run.
The index program interprets your requirements according to the status of key and data fields and the cursor position as follows:
The function performed depends on cursor position as follows:
The function performed depends on cursor position as follows:
This is a request to update the file, and either a new record is written or the existing record amended as appropriate.
This is a request to insert a new record. However, it is assumed that you should not overwrite a record without at least being informed of its presence. Therefore, if a record exists with the specified key, a warning message is displayed, and one of the following three functions can be performed depending on the status of key and data fields and the cursor position:
The function required depends on cursor position as follows:
An attempt is made to insert the data under the new key regardless of cursor position. If necessary, the warning message is repeated.
A normal insert request as described above is assumed.
In this example you generate an indexed sequential file that contains records of names, addresses and telephone numbers with name as key field, and process these records using the form as used in the section Screen Generation Example shown on the following page.
    NAME      [                     ]
    ADDRESS   [                     ]
              [                     ]
              [                     ]
    TEL       [    -     ]
where NAME and ADDRESS are alphanumeric fields and TEL is a numeric field.
If you then use the form for data entry and key in John Smith, 500 Chestnut St., Santa Cruz CA 95060, 425-7222, the form appears as:
    NAME      [John Smith           ]
    ADDRESS   [500 Chestnut St.     ]
              [Santa Cruz           ]
              [CA 95060             ]
    TEL       [425 - 7222]
To do this, carry out the following steps:
forms2
NAME      [                     ]
ADDRESS   [                     ]
          [                     ]
          [                     ]
TEL       [    -     ]
Press Enter
A message is then displayed giving the name of the fixed text screen image file created. Press Enter as requested.
NAME      [XXXXXXXXXXXXXXXXXXXXX]
ADDRESS   [XXXXXXXXXXXXXXXXXXXXX]
          [XXXXXXXXXXXXXXXXXXXXX]
          [XXXXXXXXXXXXXXXXXXXXX]
TEL       [999 - 9999]
Press Enter.
You have now specified the NAME variable data field as the key field. Press Enter.
File created = demo2.DDS
File created = demo2.GEN
END OF FORMS2 RUN
cob -C copylist -P -ik demo2.GEN
When you submit your program to the Object COBOL system, the COPYLIST directive ensures that the text of any copyfiles is included in your program listing. See the appendix Directives for Compiler for information on the COPYLIST directive.
cobrun demo2
Enter the name field as for the second record added, followed by Enter. The whole record is displayed because the name is the key that finds that record. You have now seen the inquiry facility in operation. You can recall any record as easily as that.
RECORD AMENDED
RECORD DELETED
END OF FILE REACHED - RETURN WILL TERMINATE.
You have now seen the record handling method demonstrated.
| demo2.DDS | Data Description Statements for form (COBOL source) |
| demo2.gen | Source code of index program demo2. |
| demo2.int | Intermediate code of index program |
| demo2.lst | Listing of index program processed by the Object COBOL system |
| demo2.idx | Index file |
| demo2.dat | Data file |
The two files demo2.dat.idx and demo2.dat constitute the indexed sequential file created by the generated index program, and in any further runs of this program these two files are used.
Copyright © 1998 Micro Focus Limited. All rights reserved.
This document and the proprietary marks and names
used herein are protected by international law.
| Editor� 1 | Library: Command Line Interface | |