

| On-line Help System | UNIX Session Recorder | |
Structure Animator is an additional function of Advanced Animator that lets you see your program as a structure while you are testing it.
Structure Animator displays the organizational hierarchy of your program. You can execute your program using this display format instead of the source code. This is especially useful for understanding and maintaining a program.
Structure Animator displays the structure of your program as a tree diagram. This diagram consists of nodes, with each node representing one of:
The COBOL sections in your program are displayed as nodes in the diagram by default, but you can choose to display any or all of the other nodes. As you animate the program, you see which node is controlling execution.
Because the structure diagram is derived from the source code of the program, you can print the structure diagram: you have automatic documentation of the program structure. Changes to the source code mean automatic changes to the structure and therefore the program documentation.
This section describes how to prepare your programs for Structure Animator, how to access it, and how to read the structure display. Following this is a list of the functions you can use in Animator to manipulate your diagram. The last section gives you some examples of source code and the structures it creates to give you a better understanding of the diagram.
Before you use Animator, syntax check your source code, including all called programs, with the STRUCT and ANIM directives set. The ANIM directive is set by default in the menus supplied with Workbench. For information on these directives see the appendix Directives for Compiler in your Object COBOL User Guide.
DOS, Windows and OS/2:
If you choose not to use the menus, use the following command line for
DOS and OS/2:
[xm] wb check program-name struct
DOS:
You need specify xm only if you are on DOS.
Windows:
On Windows, use the command wbw (instead of wb)
entered after selecting Run from the File menu in Program
Manager.
UNIX:
If you choose not to use the menus, use the following command line for
UNIX:
cob program-name -C struct
You can select the Structure feature to be active as soon as you enter Animator by setting the STRUCT directive toggle on the menu which invokes Animator. When it is on, it is displayed on the menu information line.
DOS, Windows and OS/2:
Alternatively, you can enter the following command line for DOS and OS/2:
[xm] wb advanim program-name struct [directives]
DOS:
You need specify xm only if you are on DOS.
Windows:
On Windows, use the command wbw (instead of wb)
entered after selecting Run from the File menu in Program
Manager.
UNIX:
Alternatively, you can enter the following command line for UNIX:
anim program-name struct [directives]
If you have not set Structure Animator to be active on entry to Animator, you can switch it on in Animator by pressing Alt+F3=structure/code, so that structure is highlighted like this: Alt+F3=structure/code.
Note: You cannot use the USER-SESSION directive with Structure Animator.
The structure diagram is displayed in a window. All the functions that you can use in the source code display are available in the structure display, although some behave slightly differently (see the descriptions in the section Functions later in this chapter).
You can manipulate the window using the F2=alter-window function (accessed from the Query menu by selecting Cursor, with the cursor positioned over the diagram), switching between the structure window and the source code window using Alt+F3=structure/code, changing the structure using the Alt+F6=display function and printing it using the Alt+F7=print function. All of these functions are described in the section Functions later in this chapter.
A structure diagram is displayed as program nodes joined by connectors. A node is either a COBOL section or paragraph, a range of sections or paragraphs (such as PERFORM THRU), a GO TO or a CALL to another program. The connectors show the relationship of nodes.
The diagram shown in Figure 11-1 can be considered as an inverted tree. The root of the tree is the node to which all other nodes are directly or indirectly attached and is the start of your program. Each leaf is a node that has no subordinate nodes. The tree can be divided into subtrees. This is a useful procedure when subtrees can be entered from different places in the program. In this case they are called common subtrees. An alternative use for the definition of a subtree is for a procedure that is not entered from the program at all. In this case it is called a widow subtree.
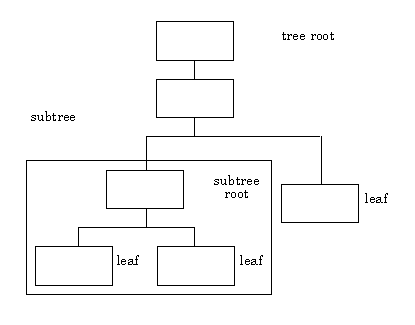
Figure 11-1: Structure Diagram
Each node in the program is displayed as a box.
The connectors indicate the flow of execution between nodes which can either be explicit, as with CALL statements, PERFORM statements, or GO TO statements; or it can be implicit, with control falling through to the next node in sequence. The individual boxes contain a symbol to identify explicit transfer of control as follows:
The highlighted bars on each side of a box indicate which node is controlling execution. If you change the nodes to be displayed, you might find that the highlighting moves to a different node. This is because the diagram always shows which node is controlling execution.
For example, if your diagram shows only sections, the cursor can show only which section has control. The section can be divided into five paragraphs. However, while each of these is executed, the cursor remains in the section node. If you stop execution while control is in this section and select to display paragraphs, the diagram then shows which paragraph in that section currently has control.
Your structure diagram might be too large to fit onto one screen. This is especially true if your program is long or has a complex structure, or if you have chosen a large box size. The Structure Animator automatically displays that part of the diagram currently controlling execution. However, if you wish to look at other parts of the diagram without executing them, you can use the cursor movement keys.
Some functions of Animator behave slightly differently if you are animating a structure. This is because you are working with program nodes rather than statements. Here are two examples: the Step function executes the current node which might include several COBOL statements; the Exit Perform function zooms through the execution of a section or paragraph node, including subordinates, and returns to the parent node (the next higher node in the hierarchy). When you refer to the chapter Animator in the UNIX version of this book or in your Object COBOL Character Tools for details of the Animator functions and you are in structure mode, you should bear this in mind.
The functions that are specific to Structure Animator, or that have particularly different actions when you are in structure mode are listed below. The keys you need to press to activate the function from the main Advanced Animator menu are shown after each function heading.
Q,C,F2=alter window
Make sure the cursor is positioned on the structure diagram. Select Cursor-name from the Query menu, then press F2=alter-window to display the Alter Window menu, which lets you change the shape, size and position of the structure diagram window. The F4=Monitor option on this menu has no effect.
Alt+F6,F9
This lets you change the size of the boxes used in the structure diagram and the distance between them. When you select this function, a three-node diagram showing the current size of the boxes is displayed.
Box-size is defined by using the cursor movement keys as follows:
| Key |
Function |
|---|---|
| <down-arrow> | lengthens the box |
| <up-arrow> | shortens the box |
| <right-arrow> | widens the box |
| <left-arrow> | makes the box narrower |
Box-separation is a toggle that causes the arrow keys to be redefined:
| Key |
Function |
|---|---|
| <down-arrow> | increases the number of lines between boxes |
| <up-arrow> | decreases the number of lines between boxes |
| <right-arrow> | increases space between boxes |
| <left-arrow> | decreases space between boxes |
Alt+F6,F5
This toggle selects whether CALLs are shown in the structure diagram or not. CALLs are identified by a down arrow (<down-arrow>) in the box.
Q,C (for DOS and OS/2 you can double-click instead)
If the cursor is in a structure diagram window, but not on a data monitor window,this function displays the Query Structure menu (see Figure 11-2).

Figure 11-2: Query Structure Menu
The functions available on this menu enable you to modify the structure window size and shape or to switch it off.
Alt+F6
The options shown on this menu let you change the shape of the diagram boxes (F9=box-dimensions), and let you change what items are shown as nodes. See the functions Calls, Go-tos, Paragraphs, and Perform-thrus.
Alt+F6,F4
This toggle selects whether GO TOs are shown in the structure diagram or not. GO TOs are identified by a left arrow (<left-arrow>) in the box.
Q,M
This function removes the structure diagram from the screen and returns you to the Animate main menu. Before using this function the cursor must be positioned on the structure diagram.
F9
This function moves the cursor to the next node to the left. When the cursor is at the leftmost node on a level, this function moves the cursor to the rightmost node on the next level down.
F10
This function moves the cursor to the next node to the right. When the cursor is at the rightmost node on a level, this function moves the cursor to the leftmost node on the next level down.
Alt+F6,F2
This toggle selects whether paragraphs are shown in the structure diagram or not. Any implicit (unnamed) paragraphs in your program are shown as nodes called FILLER in the structure diagram.
Alt+F6,F3
This toggle selects whether PERFORM THRU sections and paragraphs are shown in the structure diagram. Sections and paragraphs in a PERFORM THRU group are identified by a greater than sign (>) in the box.
Alt+F7
You can print your diagram to a file called filename.prt
using this function. You must be in the structure diagram when you select
the Print function for the correct Print menu to be shown. You can select
a printer (see the section Printer Configurations later in this
chapter) and toggle on the cross reference listing (see the description of
the Xref function below).
Alt+F3
This toggle enables you to choose whether you execute in COBOL text mode or in structure diagram mode as the program is animated. You might have to execute this function to display the structure diagram, if it is not visible.
Alt+F7,F2
This print option for a structure diagram produces a cross-referenced listing of common and widow subtrees.
This section shows how COBOL source code is represented in the structure diagram. It includes an example program and the various diagrams that you can obtain from the source code.
Example:
 working-storage section.
 01 k      pic(9) value 0.

 procedure division.
 a section.
 b.
     perform c.
     perform d.
     stop run.

 c section.
     call "xyz".

 d section.
 e.
     perform f 3 times
     if k = 3 go to c.
 f.
The default structure diagram for this program (one that shows sections only) is shown in Figure 11-3. This is the basic structure of the program.
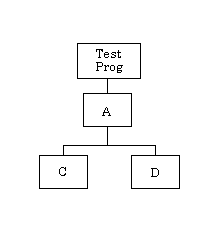
Figure 11-3: Basic Program Structure
If you then choose to include CALL nodes in the diagram, the diagram that is produced from the same program is as shown in Figure 11-4.
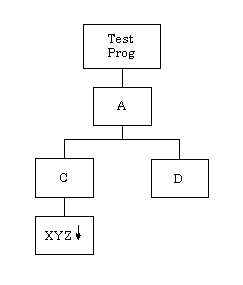
Figure 11-4: Program Structure with CALLS Included
The diagram that is produced when you add GO TO nodes to the basic structure is shown in Figure 11-5.

Figure 11-5: Program Structure with GO TOs Included
In this instance the GO TO statement refers to a section. In a program where a GO TO statement refers to a paragraph, the GO TO is shown on the diagram only if you have also selected to display paragraphs.
Figure 11-6 shows the diagram that is produced when you add paragraphs to the basic structure.
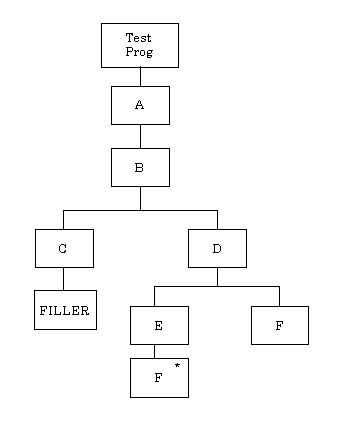
Figure 11-6: Program Structure with Paragraphs
Here is another short program that includes a PERFORM...THRU statement.
 procedure division.
 a  section.
 b.
     perform c thru e.
     stop run.

 c  section.
     exit.

 d  section.
     exit.
 e section.
     exit.
Figure 11-7 shows the diagram that is produced from this program when you include PERFORM THRUs in the diagram.
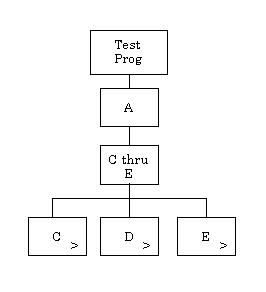
Figure 11-7: Program Structure with PERFORM THRU Nodes
The following program includes a GO TO...DEPENDING construct.
 working-storage section.
 01 k     pic 9 value 0.

 procedure division.
 a section.
     perform b.
     go to c d e depending on k.
     stop run.

 b section.

 c section.

 d section.

 e section.
Figure 11-8 shows the diagram that is produced from this program when you include GO TO...DEPENDINGs in the diagram.
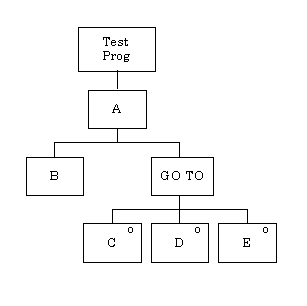
Figure 11-8: Program Structure GO TO .. DEPENDING Node
If you compare the COBOL code with the diagrams that are produced, you can see how constructs in your own COBOL programs are reflected in the structure diagrams.
Some nodes in a structure diagram represent a common subtree. Such nodes are referred to from two or more nodes, or form part of a PERFORM THRU construct. Examples are given later in this section. Although these nodes are referred to as common subtrees, they do not necessarily have to form a subtree structure; they can, in fact, be leaves.
Common subtrees are not shown in full on the main diagram. Only the subtree root node is displayed. However, the subtree structure is displayed whenever:
In the first case, the subtree remains on the screen until execution passes out of the subtree.
In the second case, only the common subtree is shown on the screen.
The only way you can return to the main structure diagram is by either continuing execution or performing a Locate function on a node in the main diagram. You cannot use the key functions (for example, PageUp, PageDown) to change the display back to the main structure diagram.
In the third case, the subtree is displayed for as long as the subtree can remain on the diagram. For example, the subtree might have to disappear to leave room for an adjacent structure.
When you print a structure diagram (see the section Printing a Structure Diagram later in this chapter), the common subtrees are printed one to a page at the end.
The rest of this section shows examples of code that produce common subtrees.
Example 1
This example shows common subtrees created by two references to the same section.
 working-storage section.
 01 a      pic 99 value 0.

 procedure divsion.

 number-one section.
      perform number-two.
      perform number-three.
      stop run.

 number-two section.
     add-one.
     add 1 to a.
     exit.

 number-three section.
     perform number-two.
     exit.
This program produces the structure diagram shown in Figure 11-9.
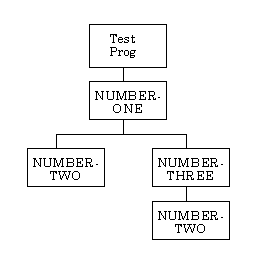
Figure 11-9: Common Subtrees
The two nodes called NUMBER-TWO represent the subtree root node of the common subtree. You can prove it to be a common subtree by selecting to display paragraphs in the diagram. The FILLER paragraph in the NUMBER-TWO section is not shown until execution moves into the NUMBER-TWO section, or you perform a Locate function on this section.
Example 2
This example shows common subtrees created from sections in a PERFORM THRU construct.
 procedure division.

 number-one section.
     perform number-two thru number-five.
     stop run.

 number-two section.
     exit.

 number-three section.
     exit.

 number-four section.
     exit.

 number-five section.
     exit.
This program produces the structure diagram shown in Figure 11-10.
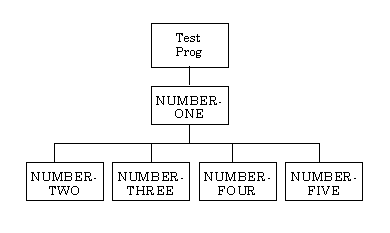
Figure 11-10: Common Subtrees using PERFORM THRU
Each of the nodes NUMBER-TWO through NUMBER-FIVE represents the subtree root nodes of the common subtrees. You can see these are common subtrees more clearly if you select to display paragraphs. The FILLER nodes are displayed only when execution passes into the common subtree.
You might find widow subtrees in your diagram. A widow subtree occurs when control passes into a section or paragraph that has not already been drawn as part of the structure. Later, this section describes those code structures that cause widow subtrees. In general, the occurrence of a widow subtree indicates that your program could be better structured. This section gives advice on how you can structure your programs to avoid widow subtrees.
Like common subtrees, widow subtrees do not necessarily form a subtree structure but can be thought of as leaves. However, widow subtrees do not appear at all on the main structure diagram. The subtree root node is not shown. When Structure Animator draws the structure diagram, there is no reference to the widow subtree, and there is no way of telling where the widow subtree fits into the overall structure. It is only when execution passes into the widow subtree, or you perform a Locate function on a node in the widow subtree that the widow subtree structure is shown.
When the widow subtree is displayed, the only way you can return to the main structure diagram is either by passing control of execution to a node in the main structure diagram (for example, by executing all the nodes in the widow subtree) or by performing a Locate function on a node in the main diagram.
When you print a structure diagram (see Printing a Structure Diagram later in this chapter), the widow subtrees are printed one on a page at the end.
The rest of this section shows examples of code that produce widow subtrees, and explains how you could restructure your code to avoid them.
Example 1
This example shows a widow subtree caused by an unreferenced section after a performed section.
 procedure division.

 number-one section.
     perform  number-two  thru  number-four.

 number-two section.
     exit.

 number-three section.
     exit.

 number-four section.
     exit.

 number-five section.
     stop run.
Selecting Perform-thrus produces the structure diagram illustrated in Figure 11-11.
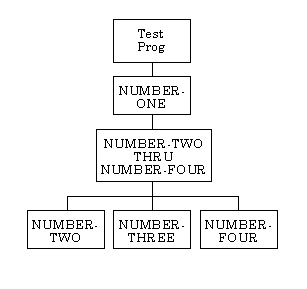
Figure 11-11: Main Structure Diagram
It also gives the widow subtree structure shown in Figure 11-12.
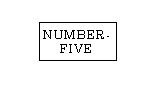
Figure 11-12: Widow Subtree
You can avoid NUMBER-FIVE section becoming widowed by including a reference to it in the main controlling section, NUMBER-ONE. For example, you could have:
perform number-two thru number-five
or you could add a separate PERFORM NUMBER-FIVE statement.
Example 2
This example shows a widow subtree (see Figure 11-13) caused by a PERFORM THRU statement referring to a mixture of paragraphs and sections.
 working-storage section.
 01 score     pic 99 value 0.
 procedure division.
 number-one  section.
     perform  number-two  thru  b.
     perform  c.
     perform  number-five.

 number-two  section.
     exit.
 number-three  section.
     exit.

 number-four  section.
 a.
     add 1 to score.
 b.
     add 10 to score.
 c.
     exit.

 number-five  section.
     stop run.
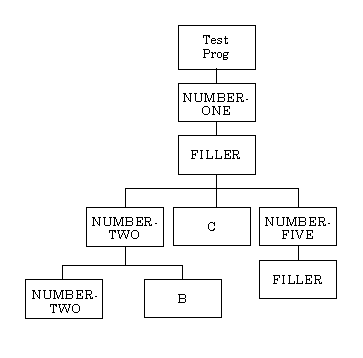
Figure 11-13: Widow Subtree
The sections NUMBER-THREE and NUMBER-FOUR are widowed, because only the first and last procedures in the PERFORM THRU construct are shown on the main diagram. This is because one is a section and the other is a paragraph. The widowed sections are displayed when control passes to a node in the widow subtree, or if you perform a Locate function on a node in the widow subtree. When control passes into NUMBER-FOUR section, the displayed widow subtree is as follows.
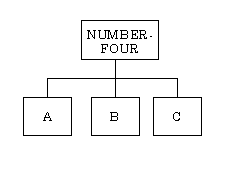
Figure 11-14: Widow Subtree in NUMBER-FOUR
As soon as control passes into node B, the main diagram is displayed again because B appears on the main diagram.
To avoid this kind of widow subtree, ensure that the procedures named in a PERFORM THRU statement are of the same type (that is, both sections, or both paragraphs). You can do this by using separate PERFORM statements, or by regrouping the performed procedures. For example:
    perform  number-two
    perform  a  thru c
    perform  number-five
Example 3
This example shows a widow subtree caused by a PERFORM THRU of non-contiguous procedures.
 procedure division.
 number-one section.
    perform z.
    perform number-five thru number-two.
    perform y.

 z section.
     exit.

 number-two section.
     exit.

 number-three section.
     exit.

 number-four section.
     exit.

 number-five section.
     exit.

 y section.
     stop run.
This program produces the main structure diagram shown in Figure 11-15. It is assumed that PERFORM THRU constructs are being displayed.
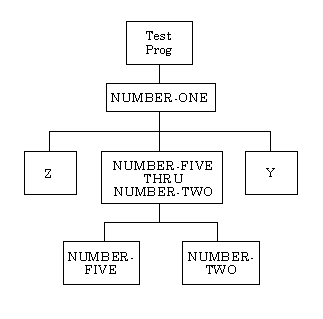
Figure 11-15: Widow Subtree (Non-contiguous Procedures)
Both sections NUMBER-FOUR and NUMBER-THREE form widow subtrees. The only way you can display them is to use the locate option and enter the procedure-name. In this particular program, control never passes into these sections during execution, so they are never displayed unless you "locate" them. It is bad programming practice to use PERFORM THRU statements for procedures that are not sequentially contiguous. You should either PERFORM each procedure separately,
Example
    perform  number-five.
    perform  number-four.
    perform  number-three.
    perform  number-two.
or you should re-order the procedures in your program so that they are contiguous.
You can use the same keys to move around structure diagrams as you use to move through your source code. However, the effect of some of the keys is slightly different.
| Key |
Function |
|---|---|
| <left-arrow> | Moves the cursor left one character position (with Scroll Lock on, moves the diagram right one character position). |
| <right-arrow> | Moves the cursor right one character position (with Scroll Lock on, moves the diagram left one character position). |
| <up-arrow> | Moves the cursor up one line (with Scroll Lock on, moves the diagram down one line). |
| <down-arrow> | Moves the cursor down one line (with Scroll Lock on, moves the diagram up one line). |
| Home | Moves the cursor to the leftmost position on the current line. Pressing Home a second time moves the cursor to the top left of the window; pressing Home a third time moves the cursor to the topmost node in the diagram (that is, the root node). |
| End | Moves the cursor to the rightmost position on the current line. Pressing End a second time moves the cursor to the bottom right of the window; pressing End a third time moves the cursor to the rightmost leaf in the diagram (logically the last node in the structure). |
| PageUp | Displays the screenful of diagram immediately above the current screen. |
| PageDown | Displays the screenful of diagram immediately below the current screen. |
| Tab | Moves the cursor to the next tab stop position to the right (tabs are set every four positions). |
| Back-tab | Moves the cursor to the next tab stop position to the left. |
| Enter | Moves the cursor to the leftmost character position on the next line (with Scroll Lock on moves the diagram up one line). |
| Ctrl | Holding this down gives you additional cursor movement functions: |
| Ctrl+<right-arrow> | Displays the screen to the right of the current screen. |
| Ctrl+<left-arrow> | Displays the screen to the left of the current screen. |
DOS and OS/2:
The following cursor movement function keys are available for DOS and
OS/2:
| Key |
Function |
|---|---|
| Ctrl+Home | Moves the cursor immediately to the topmost node in the diagram (the root node). |
| Ctrl+End | Moves the cursor immediately to the rightmost leaf in the diagram (logically the last node in the structure). |
Note: Whenever the cursor lands on a common subtree root node,
or on a node with a dependent structure that is not already shown on the
diagram, the dependent nodes are shown.
The functions available to you while using Structure Animator are similar to those you use to move around the source code. However, the functions are slightly different since you use them to move through the structured diagram. These differences are noted in the function description.
The Alternate menu contains functions that you use to change the way the diagram looks and to obtain a printed version of the structure diagram. You access the Alternate menu by pressing the Alt key. You must continue to hold down the Alt key when you select each option on this menu.
You can change the way your diagram looks by altering the colors. The colors you choose for the rest of the Object COBOL system affect the Structure Animator.
The color you choose for the background in the Object COBOL system is used also for the background for your diagram. The foreground color you choose is used for the lines between the boxes on the diagram. The color of the current line is the color used to indicate which node contains the statement to be executed next, and the color of the margins is the color used for the boxes themselves.
This means that you can change the colors used in your diagrams by changing the background and foreground colors, and the colors of the margins and the current line in the Micro Focus Workbench system. See the chapter Color in your Object COBOL Character Tools for information on how to do this.
When you have animated the structure of your program, you might want to obtain a hard copy (printout) of the diagram. To print the diagram, you use the print option from the Alternate menu.
See the section Printer Configurations later in this chapter for details of the configurations of various printers.
The print of the diagram is sent to the file filename.prt
where filename is the name of the program. This file
is suitable for printing. It is a good idea to have fairly large boxes in
your diagram so that there is enough space for the paragraph- and/or
section-name in the box. The name is truncated if there is not enough
space.
When the diagram is printed, each page indicates the page that
illustrates the adjacent part of the diagram. In the diagram itself there
can be references to other pages. For example, a subtree could be included
on another page. That page is identified by "Page n"
appearing next to the box, or if there is not enough room, a reference to
a key at the bottom of the page. Figures -16 to -18 show different
printouts of the sample program, Tictac.
Figure 11-16 shows the main structure diagram on the first page. Each node that is a subtree has a page number below, which indicates the page that illustrates that subtree.
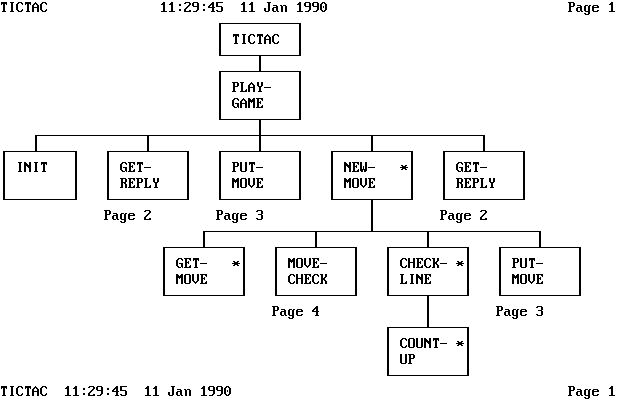
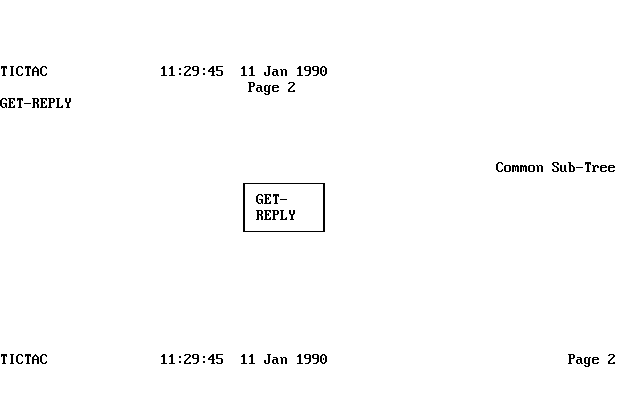
Figure 11-16: Printout of Tictac Showing Page References
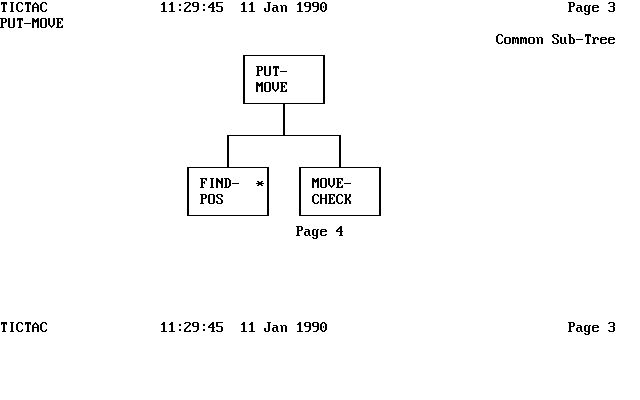
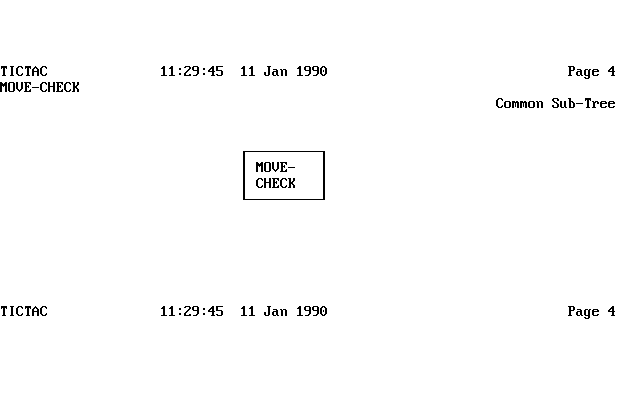
Figure 11-17: Printout of Tictac Showing Page References
Figure 11-17 is a similar diagram, but the pages are referenced by a key at the bottom of the page.
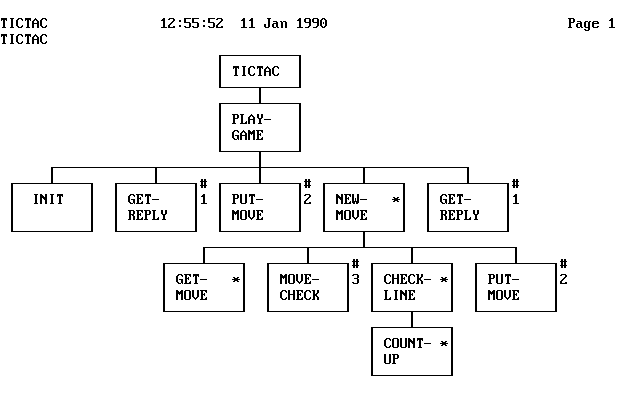
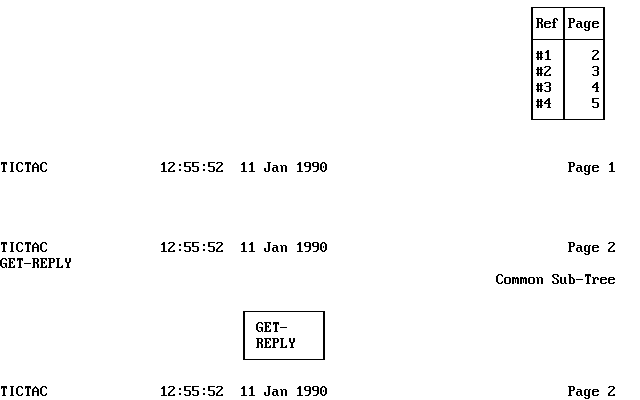
Figure 11-18: Printout of Tictac Referenced by a Key

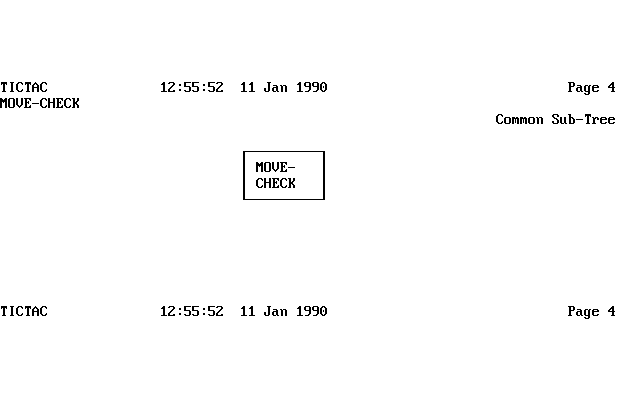
Figure 11-19: Printout of Tictac Referenced by a Key
Figure 11-18 shows the same diagram, but this time the boxes are so large that the whole diagram does not fit across the page. Where the diagram is split across two pages, the pointer to the page shows the adjacent part of the diagram.
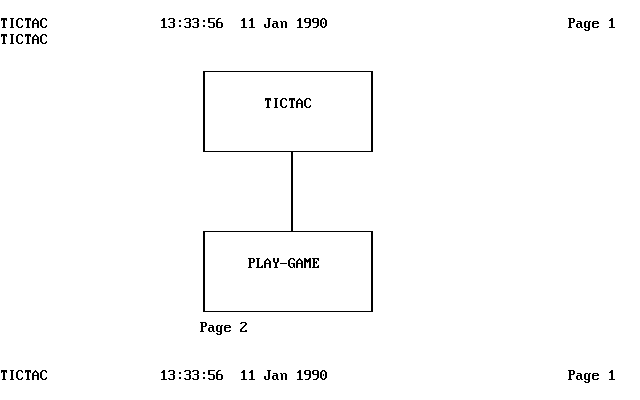
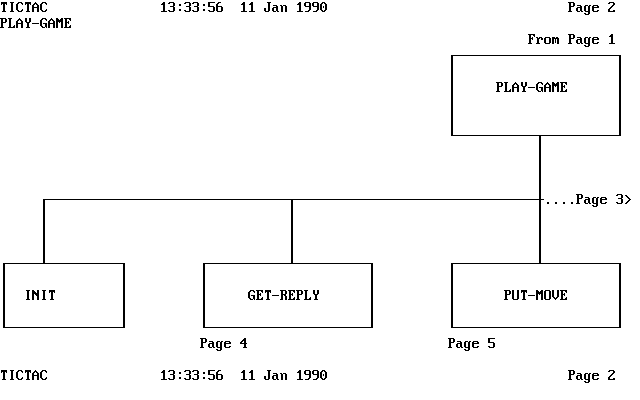
Figure 11-20: Printout of Tictac Split Across Two Pages
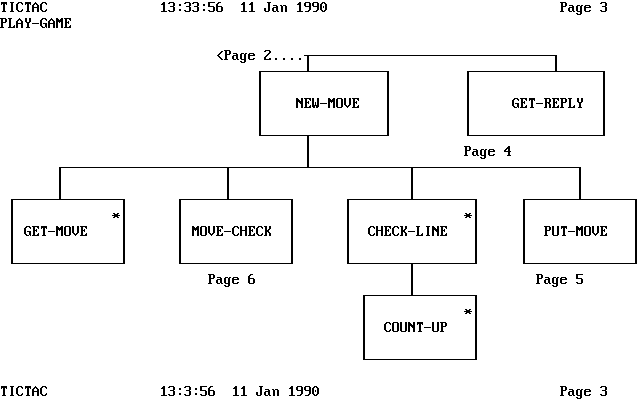
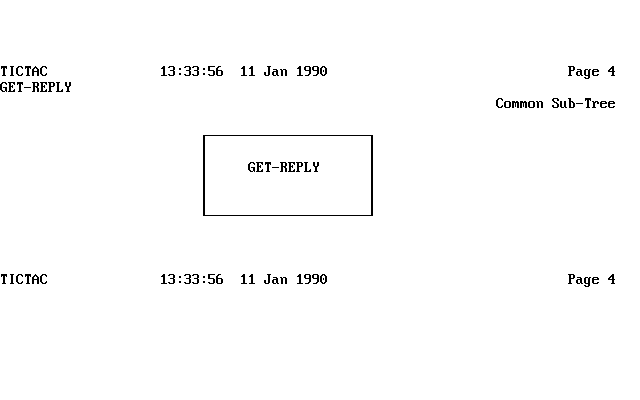
Figure 11-21: Printout of Tictac Split Across Two Pages
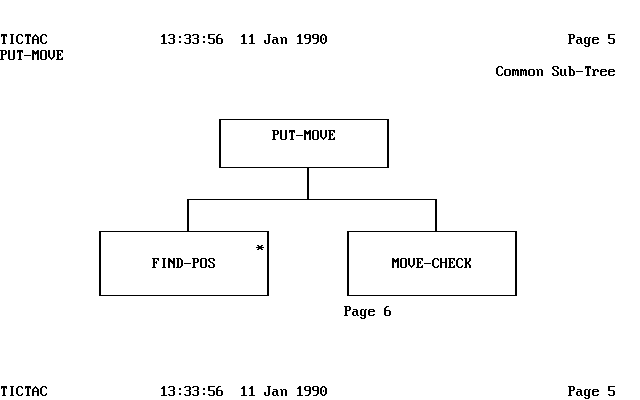
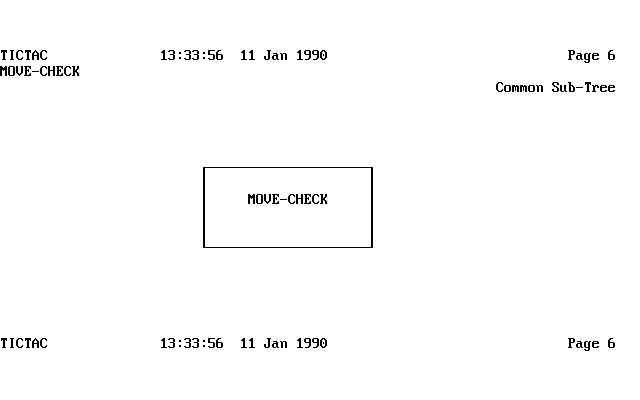
Figure 11-22: Printout of Tictac Split Across Two Pages
You can also produce a printout of the structure that includes a cross reference of all the common and widow subtrees. The cross reference occurs after the structure diagrams. The cross reference lists the subtrees and the pages that refer to them as follows:
node-name

       # n n1  n2      n3 ...
where the parameters are:
node-name |
The name of the node at the top of the subtree |
#n |
The page of the printout that shows this subtree |
n1 n2 n3 |
The page numbers of the printout that reference this subtree. |
This section lists those printers that are configured for Structure Animator and gives details of the print file that each creates. Seven printers are configured for DOS and OS/2, and one printer configured for UNIX.
UNIX:
A single printer is configured for the Micro Focus Object COBOL system.
It is the ASCII printer (using ASCII carriage control characters) and is
described below.
132 columns, 60 lines per page. The page-throw character is x"0C". This print option creates a file with no special characters.
DOS, Windows and OS/2:
Seven printers are configured for the Micro Focus Workbench system. These
printers are listed below.
132 columns, 66 lines per page. The page-throw character is x"0C". If you are using this kind of printer you need to use the DOS command:
mode lpt#:132,66
to set the mode of operation for the printer. Refer to your operating system documentation for more information on this command.
120 columns, 60 lines per page. The character sequence .pa at the beginning of a line causes a page-throw. The file this printer produces is suitable for use with SCRIPT VS. SCRIPT VM is a document composition utility available for MVS and VM environments.
132 columns, 60 lines per page. The page-throw character is x"2F" in column 7. This print option creates a file with no special characters.
132 columns, 60 lines per page. A one (1) in column 1 causes a page-throw. This print option creates a file with no special characters.
132 columns, 60 lines per page. The page-throw character is x"0C". This print option creates a file with no special characters.
Format suitable for the HP Laserjet printer with the diagram printed down the page.
Format suitable for the HP Laserjet printer with the diagram printed across the page.
If the printer configurations provided do not meet your requirements, you can modify them, or you can add your own configuration for your printer.
The configuration details are held in the configuration file mf.ini, see the chapter Configuring Development Tools in your Getting Started .
The printer configuration details must follow the tag:
[MF-STRUCTURE-PRINTERS]
Several printers can be specified. The configuration is terminated by the next PRINTER-NAME line or any other tag, or by the end of the configuration file.
Each option must be on a separate line. Any of the options apart from PRINTER-NAME can be omitted; a default value is used instead.
In those options where you specify the hexadecimal code to send to the printer to print a particular character, you enclose the code in quotes, preceded by an "x"; for example: x"C4". Most of the characters you can specify are the characters used to create line drawings.
The defaults given below assume the IBM PC character set encoding.
| Default: | none |
This must be the first line of the configuration. It specifies the text to be displayed in the list of available printers in Animator's Print option.
| Default: | 132 |
This specifies the number of columns that the printer can print on the page.
| Default: | 66 |
This specifies the number of lines that the printer can print on the page.
| Default: | x"C4" |
This gives the code for the horizontal line character "-".
| Default: | x"B3" |
This gives the code for the vertical line character "|".
| Default: | x"DA" |
This gives the code for the top left corner character "+".
| Default: | x"BF" |
This gives the code for the top right corner character "™".
| Default: | x"C0" |
This gives the code for the bottom left corner character ".".
| Default: | x"D9" |
This gives the code for the bottom right corner character "Ù".
| Default: | x"C1" |
This gives the code for the top join character "Á".
| Default: | x"C2" |
This gives the code for the bottom join character ".".
| Default: | x"B4" |
This gives the code for the left join character "©".
| Default: | x"C3" |
This gives the code for the right join character ".".
| Default: | x"C5" |
This gives the code for the line cross character "+".
| Default: | x"23" |
This gives the code for the number or reference character "#".
| Default: | x"0C" |
This specifies the string to use to make the printer execute a form feed.
| Default: | ESCAPE |
This specifies what type of sequence the form feed string is. The possible values are:
| ESCAPE | Escape sequence. |
| TEXT | Text sequence. |
| TEXT-CC | Text carriage control sequence. |
This specifies an escape sequence to be sent at the beginning of the print file to control font, pitch, line spacing, and so on. This string is sent to the printer as it is, except for the special token ESC which is interpreted as the Escape character.
An example of the entries you might put in the file follows:
[MF-STRUCTURE-PRINTERS]
PRINTER-NAME:  HP Laserjet
PAGE-WIDTH:  132
PAGE-HEIGHT:  66
HORIZ-LINE:  x"C4"
VERTICAL-LINE:   x"B3"
TOP-LEFT:  x"DA"
TOP-RIGHT:  x"BF"
BOTTOM-LEFT:  x"C0"
BOTTOM-RIGHT:  x"D9"
TOP-T:  x"C1"
BOTTOM-T:  x"C2"
LEFT-T:  x"B4"
RIGHT-T:  x"C3"
CROSS:  x"C5"
HASH:  x"23"
NEW-PAGE:  x"0C"
SEQUENCE-TYPE:  ESCAPE
INIT-FONT:  <ESC>&l0o<ESC>(10U<ESC>(s0p16.67h12.0v0s0b3T<ESC>&l8D
Copyright © 1998 Micro Focus Limited. All rights reserved.
This document and the proprietary marks and names
used herein are protected by international law.
| On-line Help System | UNIX Session Recorder | |