9.4 DST Migration From the Shadow Volume To Cloud Storage Causes High CPU Utilization
Performing DST migration from the Shadow volume to the cloud storage might also cause the OES server to hang or the client connections to drop.
To ensure the CPU is not loaded, the DST migration process is divided in two phases. In phase 1, data is migrated and in phase 2 the attributes of the files and folders are copied from shadow volume to cloud. To perform the migration, do the following:
-
Patch the OES servers with the latest patches.
-
On the OES server where DST migration is planned, do the following:
-
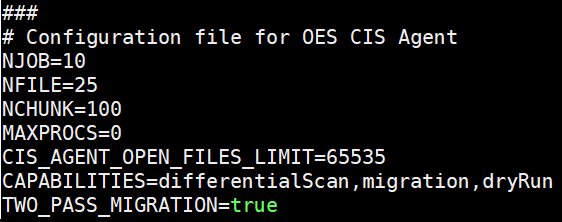
In the /etc/opt/novell/cisagent/config file change the value of the parameter "TWO_PASS_MIGRATION" to “true”.
-
Restart the agent services: systemctl restart oes-cis-agent.service
-
-
Using CIS management console, migrate the DST shadow volume data to cloud. For more information, see Section 7.0, Migrating DST Volumes to Cloud.
-
In the CIS management console, click the > to view the DST migrated tier. Click
 to view the status of DST migration. If the status displays Completed, then migrate the attributes of files and folders.
-
To migrate the attributes, go to /opt/novell/cis/bin on the OES server and run the following:
copyattr -shadow DSTS -cbv VOL1_CBV
where DSTS is the DST shadow volume and VOL1_CBV is the Cloud Backed up volume.
The copyattr.log file is located at /var/opt/novell/log/cisagent.
-
-
Remove the DST pair. For more information, see Section 7.0, Migrating DST Volumes to Cloud.
-
Ensure that the primary volume, shadow volume, and CBV are mounted.
-
Using CIS management console, perform switch operation to move the DST tier to cloud tier. For more information, see Managing DST Migrate Tiers.