Walkthrough to Set up a Session to Reference Macros in a Session Document File
This walkthrough shows how to set up a local session document file to reference macros in a session document file on a network share and how to add the share as a trusted location. It also shows how to create an MSI file that can be used to deploy the local sessions and their related settings to users.
note
You can set up session document files to reference session document files that contain shared macros on any location that is a trusted location. These locations are not limited to network shares. For example, you could choose to reference macros in a session document file that resides on a folder on user workstations that is available to all users.
Set up and Test References to Macros
To set up and test your references to macros, first you'll need to develop the macros you want to reference and save them in a session document on the network share. Then you'll need to specify the network share as a trusted location. And then set up a local session document to reference this session document and configure the local session with buttons or menu items that run the macros.
Make sure the VBA projects in the session document files you are referencing have unique project names. Each project name in the VBA Project editor must be unique to avoid errors caused by naming conflicts. You can change project names by modifying the project properties in the VBA editor or by creating and saving these session document files in Reflection Desktop 16.2 or greater.
To develop and test a reference
-
Set up a network share to save the macros on.
-
Create a session document and develop the macros you want to reference. Make sure the macro projects in this document have unique names to prevent naming conflicts with VBA projects in any sessions that reference this session. Then save that session document file on the network share.
note
You'll need to create at least one session document file for each type of terminal you are using. Session document files can only reference macros in the same type of session document. For example, IBM3270 sessions can only reference session documents with an
.rd3xextension. -
Open the Reflection Workspace Settings window as follows:
-
If you're using the Ribbon interface, choose Reflection Workspace Settings from the File menu or the Reflection button
 (if using the Office 2007 Look and Feel).
 -
For an IBM session in the Classic interface, choose Settings from the Options menu to open the Settings window and then choose Reflection Workspace Settings.
-
For a VT Session in the Classic interface, choose View Settings on the Setup menu to open the Settings window and then choose Reflection Workspace Settings.
-
-
In the Specify Trusted Locations dialog box, make sure the location you are saving the shared session documents on is on the list of trusted locations and add it if necessary. You must use a UNC path to specify this location. If you are using a network share, you'll also need to select Allow trusted location on my network.
-
Open each session you want to use these macros in and configure them as follows:
-
In the Settings window, select Set Up VBA References.
-
Under Referenced Session Documents, enter the fully qualified paths to the session documents that have the macros you want to reference.
note
If you are saving the referenced session documents on a network share, you'll need to specify the location with a UNC path. Mapped letter drives are not supported.
- If you want to set up a toolbar button or menu item to run a referenced macro, open the UI Designer on the Appearance tab and set the action for the button (or menu item) to run the macro.
note
For more about setting up a button or menu item, see Customize the Ribbon or Customize Classic Menus and Toolbars.
-
-
Run and test the macros in your local session documents and modify them as needed. When you save your local sessions, any changes you made to the macros are automatically uploaded and saved in the document on the share.
-
To prevent users from modifying the macro source in the session document on the share, consider locking and password protecting the macros or using some other method to control access.
-
To "lock down" the settings for trusted locations or VBA references, see Control Access to Lock Down Settings and Controls.
Deploy Sessions that Reference Macros and Related Settings
After you have developed and tested your macros, you'll need to deploy your local session files and the related settings files to users. This typically includes creating a companion MSI file or using another method to deploy the following files:
-
The session files (the
.rd5x,.rdox, or .rd3xfiles) that are configured with references to the files that contain the macros. (For this walkthrough, we'll deploy themySession.rd3xfile.) -
A custom ribbon (
.xuml) file that includes any buttons or menu items you added to run the macros. -
The
Application.Settingsfile that includes the trusted locations you added.
To create an MSI file for session documents that reference shared macros
-
Make sure you know where the session files and their related settings you want to add are located. For this example, we are packaging the files in the following locations:
Add this file In this directory mySession.rd3x %USERPROFILE%\Documents\Micro Focus\ReflectionmyRibbon.xuml %USERPROFILE%\Documents\Micro Focus\Reflection\CustomUI -
On your administrative workstation, open the Installation Customization Tool from a desktop shortcut or from a command line as follows:
path_to_setup\setup.exe /admin -
In the Select Customization dialog box, choose Create a new Companion installer.
The Installation Customization Tool opens in the mode used to create companion installer packages.
-
From the Navigation pane, click Specify package information.
-
In the Add/Remove name box, enter the name for the package that you want to appear in the Windows Uninstall or change a program list.
-
In the Organization name box, enter the name of your department.
-
-
From the Navigation pane, click Specify install locations. Then, under Installation type, select Installs only for the user who installs it.
-
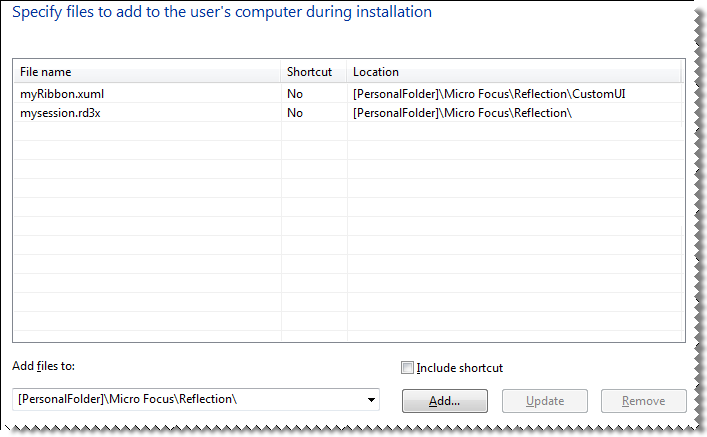
In the Navigation pane, select Add Files. Then, in the Add files to list, select
[PersonalFolder]and type in:\Micro Focus\Reflection\CustomUIWhen you are done, the list entry is:
[PersonalFolder]\Micro Focus\Reflection\CustomUInote
[PersonalFolder]is the full path to the Documents folder for the current user. The default isC:\Users\username\Documents. -
Click Add. Then browse to the configuration file (
myRibbon.xuml) and click Open. -
Repeat steps 6 and 7 to add the
mySession.rd3xfile to the[PersonalFolder]\Micro Focus\Reflectionlocation.note
Be sure to specify the correct location for each file you add. Reflection looks for configuration files in specific locations. To find the correct file locations for any type of file see Customized Files that Must be Deployed to Specific Locations.
When you are finished adding files, the panel should look similar to the following:
-
On the Navigation pane, click Modify user settings. Then, in the Make changes to user settings panel, under Application –Settings, select Reflection Desktop–Workspace Settings and then click Define.
-
In the Reflection Workspace Settings dialog box, under Workspace Settings, select Specify Trusted Locations.
-
Add the path to the shared macros to the list of trusted locations and select Allow trusted locations on my network.
note
Be sure to specify the path in the same way (either drive letter or UNC path) that you used in your session files.
-
Click OK to add the settings to the package and return to the main Installation Customization Tool window. The
Application.Settingsfile is automatically added to the package in the appropriate location. -
To "lock down" these settings, see Control Access to Lock Down Settings and Controls.
-
From the File menu, save the package as an
.msifile on the administrative installation point.