Apply an Update to all Session Document Files
You can use the SettingsUpdate feature to change specific settings in all session document files of a specific type. For example, you could deploy a .rd3xu update file to modify specific settings for all existing and new IBM 3270 sessions. The update file includes only those settings that are changed from the default value.
You might use these special local update files when:
-
You need to apply a setting to all user sessions for a terminal type, both for existing sessions and for new sessions.
-
Your environment is set up to allow users to create and customize their own session documents. (You don't know the names of session documents or how users have customized them.)
-
You don't want to change customizations (such as screen colors) in sessions that users have created.
For example, let's say you need to enforce a security mandate that specifies all user sessions must use TLS 1.2 to connect to your mainframe. You need to ensure this type of secure connection is used, not only for existing sessions but also for any new sessions users may create.
You could create a 3270 update file that has only the security settings required for the TLS 1.2 connection and then deploy it to each user's data directory as shown below.
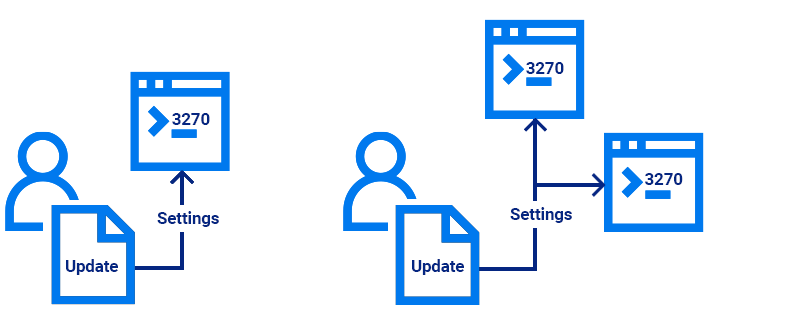
When users open a 3270 session or create a new 3270 session, the settings in the local update file are applied. None of the other settings in the users' session files are changed. Other types of session documents (for example 5250 sessions) are not changed.
Setting up Local Update Files
To set up a local update file, you'll need to create the update file and then deploy it to users.
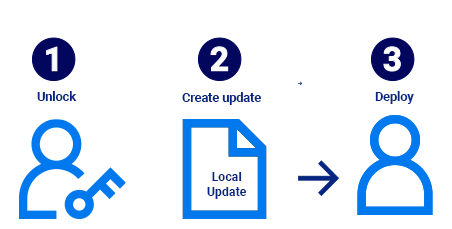
Step One: Unlock access for saving update files
Step Two: Create a local update file
Step Three: Deploy the local update file
Step One: Unlock access for saving update files
Before you create an update file, you'll need to unlock the access settings that allow you to save it. You can unlock these settings with Permissions Manager as follows. You can also unlock them with Group Policy as shown in To unlock access for saving Session Update files with Group Policy.
To unlock access for saving update files with Permissions Manager
-
On a workstation on which you have installed Reflection, log on as administrator and in the Reflection Desktop install folder, run
AccessConfig.exe. -
When prompted to create a new permission file, or edit an existing one, choose Create new permission file.
-
When prompted with a list of access file templates, select the .access option for the terminal for which you want to create the update file.
-
In the Groups panel, click Next.
-
In the Additional Security options panel, select User can create session update files and click Next.
-
Click Finish to save the file in the default folder.
-
Repeat these steps for each type of terminal that you want to create an update for.
Step Two: Create a local update file
Create the local update file that includes only the settings you want to modify as follows.
To create a local update file
-
On the File menu, choose New.
note
All the settings you configure that are different from the default settings or are not part of the default settings are included in the update. This includes connection settings such as the host address.
-
In the Create New Document window, select the terminal for which you want to apply the update and click Create.
-
In the Create New Terminal Document dialog box, select Configure additional settings and click OK. (Do not enter the host name unless you want to include it as part of the update.)
-
In the Settings window, click OK.
-
If prompted for a host name or IP Address, click Cancel.
-
Configure the settings you want to change on user desktops.
-
On the File menu, choose Save As, name the file
updateand then, in the Save as Type list, select an Encrypted Session Update file extension and save the file. (For example, a 3270 update file should be namedupdate.rd3xu.)note
SettingsUpdate files that apply automatically to all sessions must be named with the special
updatename. Unlike regular session files, update files contain only the settings you changed (the deltas).You can create update files that apply to sessions only by saving the file from the Reflection Desktop interface. You cannot create an update file by renaming a session file.
To prevent file tampering, update files that apply to sessions can be saved only as encrypted files.
Step Three: Deploy the local update file
After you create the file, you'll need to deploy it to the users data directory.
To deploy the local update file to users
-
Create an MSI companion installer package that includes the update file as shown in Walkthrough to Create a Package with the Installation Customization Tool.
note
Session update files are deployed to the same directory as regular session files.
-
Deploy the MSI package as shown in Deploy Companion MSI File from MSI Command Line.