Connect to Hosts using the Security Proxy Add-On
The Security Proxy Add-On acts as a proxy for terminal sessions and provides token-based access control, routing encrypted network traffic to and from user workstations.
note
The Security Proxy Add-On requires the base installation of Host Access Management and Security Server. It is not included with the Management and Security Server license. To activate this product, you must purchase a separate license.
Using the Security Proxy Add-On, you can set up the following types of centrally managed secure connections.
| Connect using... | Description |
|---|---|
| Client Authorization | When using the default configuration for the Security Proxy, users are authorized using security tokens. Transmitted data between the client and the Security Proxy is encrypted; transmitted data between the Security Proxy and the host is not. The Security Proxy server should be installed behind a corporate firewall when used in this mode. Before you create a connection, review the Requirements for connections through the Security Proxy and Getting to the Reflection Desktop Security Settings. Then see the instructions for creating and assigning secure sessions in the Management and Security Server Administrator Guide, in the Host Access Management and Security Server Documentation. 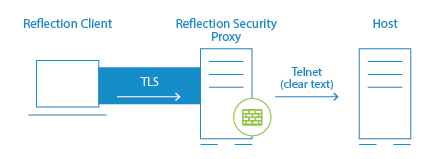 ** ** |
| Pass Through | When configured as a Pass Through Proxy, the Security Proxy passes data to the destination host without regard to content (that is, it ignores any TLS handshaking data) and does not provide client/server authentication or encryption. If TLS is used in this mode, the TLS session is created between the client and destination host and encrypted data simply passes through the Security Proxy. You can secure data traffic using TLS between the client and the destination host by enabling TLS user authentication on the destination host. When using a Pass Through proxy, client authorization is not an option. Before you create a connection, review the Requirements for connections through the Security Proxy and Getting to the Reflection Desktop Security Settings. For instructions that show how to configure the Security Proxy, see the Management and Security Server Administrator Guide, in the Host Access Management and Security Server Documentation. Note: If you want to establish an TLS-secured connection between Reflection and the destination host using the Security Proxy in Pass Through mode, you may need to unselect Host name must match certificate or, preferably, add the Security Proxy as the Subject Alternate name in the host server certificate. To create a Reflection Desktop session that connects to the Security Proxy, see the instructions for creating secure sessions in the Management and Security Server Administrator Guide. |
| End-to-End TLS Security | This option, available for 3270 sessions only, combines user authorization with TLS security for the entire connection. Single sign-on capability using the IBM Express Logon Feature is also supported, provided the host supports TLS. See Connect using End-to-End Encryption in 3270 Sessions. 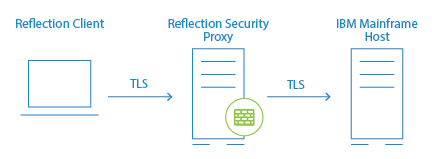 |
| End-to-End SSH Security | In a standard configuration for a secure Reflection session, the connection between the client and security proxy server is encrypted using TLS, but the connection between the security proxy and the host uses unencrypted Telnet. By sending an SSH-encrypted connection through the security proxy tunnel, you can configure a secure Reflection session so that the entire communication path is encrypted from the client, through the proxy server, and on to the host. See Connect using End-to-End Encryption in VT SSH Sessions 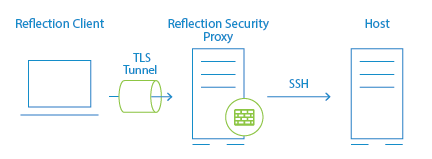 |
Requirements and Other Information for Using the Security Proxy
Requirements for connections through the Security Proxy
Requirements for connections through the Security Proxy include:
-
TLS must be enabled on the hosts to which you want to establish TLS connections. See the documentation included with the hosts for instructions.
-
A centralized management server with the Security Proxy Add-On installed must be available. The Security Proxy must be configured to require client authorization. (It can optionally be configured to require client authentication. For client authentication, you can use a single certificate or two separate client certificates on each server (Security Proxy and destination host).
-
You may need multiple digital certificates to successfully establish the TLS sessions between the client and the Security Proxy, and the client and the destination host.
Getting to the Reflection Desktop Security Settings
When you create a session in Reflection Desktop, use the following steps to go to the security settings:
-
Enter the Host name and Port.
-
Select Configure additional settings to open the Settings window and then choose Set Up Connection Security.
-
In the Configure Advanced Connection Settings dialog box, click Security Settings.
About Certificates
| Server Certificates | Destination TLS hosts and Security Proxy servers typically have server certificates already installed. Each of these server certificates must be trusted by the client. The client will trust a server certificate if: It is signed by the certificate authority that is trusted by the clientorIt is self-signed and imported into the trusted root certificate store where Reflection can find it.To use a single server certificate for both the destination host and the Security Proxy, do one of the following:In the Reflection session, unselect the Verify Server Identity check box on the Connection Editor dialog box.(Recommended) Create a certificate that uses the destination host address for the Subject Common Name and the Security Proxy address for the Subject Alternative Name. |
| Client certificates | Certificates used for client authentication must be signed by a certificate authority that is trusted by both the Security Proxy and the destination host's TLS server.Express Logon also requires that the client certificate used to authenticate on the TN3270 server be registered with RACF. (For details, see the documentation that came with the 3270 server.) For more details on configuring TLS and creating certificates on the host, see Technical Note 1760 |
Connect using End-to-End Encryption in 3270 TLS Sessions
End-to-end encryption tunnels a direct TLS connection to the host, while still connecting through the Security Proxy Server. These connections require two certificates and TLS handshakes — one for the client/proxy server connection and another for the client/host connection. Without end-to-end encryption, only data between the client and proxy server is encrypted.
Before you create a connection, review the Requirements for connections through the Security Proxy and Getting to the Reflection Desktop Security Settings.
To configure a session with end-to-end encryption, see the instructions for creating secure sessions in the Management and Security Server Administrator Guide in the Host Access Management and Security Server Documentation.
note
You can modify the level of security by adjusting the TLS protocol version and encryption key-strength setting. Click PKI Manager to add the Certificate Revocation List (CRL) and Online Certificate Status protocols (OCSP) to certificate validation.
Connect using End-to-End Encryption in VT SSH Sessions
You can configure a Reflection Desktop session to send an SSH-encrypted connection through the Security Proxy Server.
In a standard Administrative Console configuration for a secure Reflection session, the connection between the client and security proxy server is encrypted using TLS, but the connection between the security proxy and the host uses unencrypted Telnet. By sending an SSH-encrypted connection through the security proxy tunnel, you can configure a secure Reflection session so that the entire communication path is encrypted from the client, through the proxy server, and on to the host.This feature has the following advantages:
-
Encryption is used for the entire connection.
-
The IP addresses and names of your secure hosts are not exposed outside of the internal network.
-
Only clients with a valid authorization token can launch a secure session.
-
The authorization token contains connection information. This enables the security proxy to send all secure host connections through a single port, eliminating the need to open multiple firewall ports.
-
All settings required for a connection (such as the trusted certificate, the personal certificate, user keys, and host keys) reside on the Administrative Console and are downloaded to users' workstations when they start sessions.
You can set up this configuration using the Reflection VT Terminal type (used for UNIX and OpenVMS sessions).
Prerequisites
To make these SSH connections through the Security Proxy, you must have the following:
-
The host must have an SSH server installed.
-
Reflection Desktop v16 or Reflection 2014 R1 SP1 must be installed locally on your workstation. Note: Earlier versions and other products (such as Reflection 2014 R1, Reflection 2011, Reflection 14.x, or Extra!) are not supported.
-
You must have access to the centralized management server Security Proxy and Administrative Console.
-
Host Sessions must be opened from the Administrative Console or the Links List page.
-
Sessions must be configured from the Administrative Console in the centralized management server.
-
The Security Proxy must be running with Client authorization enabled.
note
Management and Security Server is not licensed for connections from Reflection Desktop clients. You must have a Management and Security Server activation file installed to configure Reflection Desktop sessions.
To connect your VT session SSH connection through the Security Proxy Add-On
-
Follow the instructions for creating a new session in the Management and Security Server Administrator Guide in the Host Access Management and Security Server Documentation to create a new VT session.
-
When you configure the session, select Secure Shell for the connection type.
-
Enter the host name and user name (optional; users are otherwise prompted when they connect). Then select Configure additional settings and click OK to open the Settings dialog box.
-
Under Host Connection, click Set up Connection Security.
-
In the Reflection Secure Shell Settings dialog box, on the Reflection Security Proxy tab, select Use Security Proxy, and then choose a Security proxy and a Proxy port.
note
The Destination host values you entered in step 6 should be entered automatically here. If you don't see them, select the Security proxy name from the drop-down list to populate these fields.
-
Configure SSH connection settings such as the trusted certificate, the personal certificate, user keys, and host keys as required for your connection. For more information about configuring your SSH-specific settings, refer to the Reflection Help topic Reflection Secure Shell Settings Dialog Box.
-
Click OK to close the open dialog boxes and initiate the connection. Select Always to import the host key for these sessions.
note
If you do not want to include the user name in the configuration, cancel the connection. If you cancel, you will be unable to import the host key for the session.
-
Save the session. When prompted, choose to send the settings for this session to the Administrative Console, and then exit the Reflection workspace.
All the files required for your configuration are uploaded to the Administrative Console. When a user launches the session, these files are downloaded to their workstation so that Reflection has access to all configuration data required to establish a connection.
note
All non-default SSH settings required to establish a connection are saved in three files:
-
The
sessionname.rsshfile contains the public key (if public key authorization is used), the host key (if a host key is accepted while in administrative mode), and the settings normally stored in both thepki_configfile and theconfigfile. It also includes all TLS settings such as the TLS version, cipher suites, and applicable proxy data. -
The
sessionname.psfile stores any personal certificates included for the connection. -
The
sessionname.tsfile includes any trust certificates.
When you send settings for the session to the Administrative Console, these files are uploaded along with the session document file.
-