Moving from Extra to Reflection
If you're moving from Extra! to Reflection, you'll find that some things are very similar, while others are different or new to you. This article shows Extra! users how to customize terminal sessions in Reflection. It shows how to find the settings you want to configure, points out differences between how some of the settings work, and shows what's new for Extra! users.
 Setting up Reflection with an Extra! UI
  Running Extra! Macros in Reflection
Opening Extra! Sessions in Reflection Desktop
You can open Extra! (.edp) session files in Reflection Desktop to automatically convert them to Reflection Desktop sessions. When you save these files, they are automatically converted to the new Reflection Desktop session file format. Many of the supporting files referenced by the sessions you open (keyboard and mouse maps, QuickPads, toolbars, and Hotspots) are also converted when you save the sessions. For a list of supported files, see Supported Extra! Files in the Reflection Deployment Guide.
note
-
In addition to
.edpfiles and their associated support files, you can also open Ind$File file transfer session files. -
You cannot open
.eppfiles and most file transfer sessions. -
Only Hotspot text mappings are imported. Region mappings are not imported.
To open Extra! session files along with supporting files
-
If you use a user data directory or Extra! directory other than the default (under
...Users\user\Documents\Micro Focus\), make sure the session files are in trusted locations.note
When the Trusted Locations security feature is enabled, Reflection does not allow you to open files unless they are in trusted locations. For information about trusted locations and how to configure them, see Specify Trusted Locations Dialog Box.
-
From the Reflection Desktop File menu, open the
.edpsession file. -
Verify that all of your custom settings, such as toolbars, QuickPads, keyboard maps, and other custom settings work as expected.
-
If Reflection is not using all of your customized settings, make sure these files are in the same location as the session (
.edp) file.note
If Reflection cannot find custom settings files, it uses default settings.
-
Save the session file in the Default user data directory specified in Configure workspace attributes.
-
If you want to use the supporting files you imported for other sessions, choose Save from the File menu. All of the settings and supporting files referenced by the session are saved under the user data folder. These files are automatically converted to the new Reflection file formats.
-
If you are deploying the file to a centralized environment (such as Citrix), consider saving the file as a compound session document. This saves all of the supporting settings in a single file.

-
Creating a Session
Creating sessions in Reflection is somewhat different from the process you used for Extra! Instead of using a wizard that walks you through configuration settings, you'll select from a set of templates to create the type of session you want and then configure settings for that session in a settings dialog box.
To create a Reflection Desktop session
-
On the toolbar (or the Quick Access toolbar), click
 to open the Create New Document dialog box.
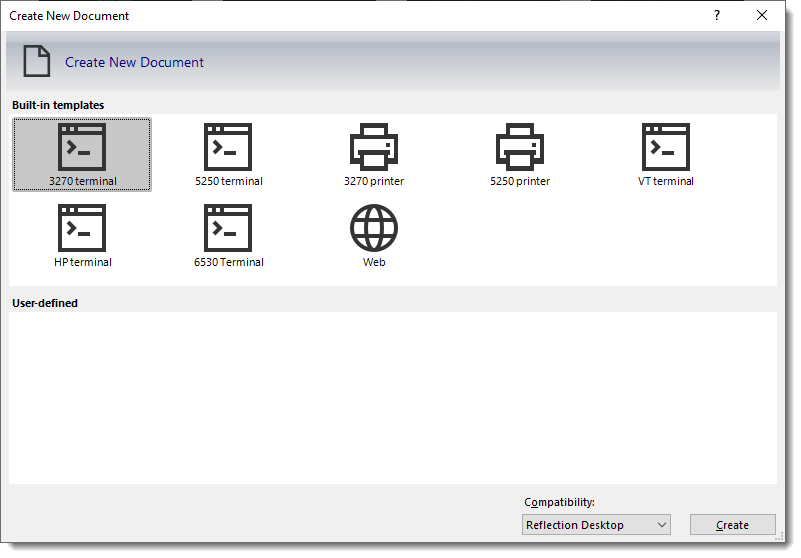
-
If you are creating an Extra! VT terminal session, choose the Extra! option in the Compatibility list.
note
This setting specifies which built-in keyboard maps, themes, Hotspots, and other settings to use for the session. You don't need to change this for IBM terminal sessions, because the default Reflection Desktop option uses Extra! settings for those sessions.
-
Choose the type of session to create and then click Create.
-
In the Terminal Document Settings window, enter the Host name, Port and other connection settings for the session.
-
To set up additional settings, select Configure additional settings.
The Reflection Settings Window that you will use to configure and manage your session settings is displayed.
Using the Reflection Settings Window
Most of the utilities and configuration options in the Extra! Settings window can be accessed and configured from the Reflection Settings window.
If you are using the Reflection Classic user interface mode (which is very similar to the Extra! user interface), you can open this window in the same way you do in Extra!, by selecting Settings from the Options menu.
While the Reflection Settings window includes most of the items in the Extra! Settings window, there are a few important differences.
Organization
The items in the Reflection Settings window are organized a little differently than in Extra!'. It's appearance is flatter and some of the items are found in different groups. Some of the items also have different names.
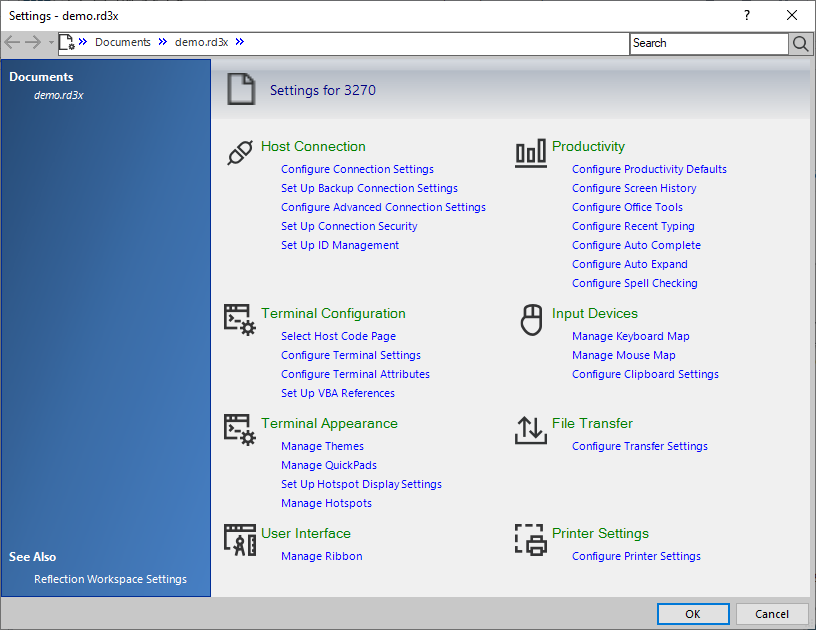
Navigation
After you select an item to configure, you'll navigate the Settings window differently than you did in Extra!:
-
Instead of using high level links to all the items on the left pane, you'll use Jump To links to jump to other areas of the dialog box you have opened and See Also links to go to other dialog boxes in this group.
-
You can use the breadcrumbs at the top of the window to go to different groups.
-
You can use the Back button just as you would a Back button in a Web browser.
-
If you are having a hard time finding a setting, use the Search.
Connection Settings
The Extra! Connection category settings are found in several Reflection dialog boxes that can be accessed under the Host Connection group in the Settings window.
| To find these Extra! Settings | In the Host Connection group, select... |
|---|---|
| Basic non-security related connection settings (IP address, port, etc.) available in the Extra! Configure Connection dialog box | Configure Connection Settings |
| The security settings in the Extra! Configure Connection dialog box | Set up Connection Security to open the Reflection Security Properties dialog box. If you set up a SSL/TLS connection, select Configure PKI for settings related to certificates. |
| Extra! Connection categories Advanced tab settings | Configure Advanced Connection Settings |
| ID Management options. | Set up ID Management |
For more, see:
Display, Colors, and Fonts Categories
Display options for cursor appearance are configured along with fonts and colors in Reflection files called themes. Each session file is associated with a theme.
note
Additional settings similar to Extra! Text display options and Graphics display options are configured in the Configure Connection Settings dialog box, accessed from the Reflection Settings window.
When you open and save an Extra! session, the session and an associated theme are saved in Reflection file formats. The new theme file has the same name as the session file and is associated with the new session file.
You can modify any of the theme settings by modifying an existing theme or by creating a new theme from an existing theme. If you want to associate a new theme with a session after your theme is configured, you'll need to apply the theme to the session.
To configure a theme
-
In the Settings window, under the Terminal Appearance group, select Manage Themes.
-
In the Manage Themes dialog box, select Modify the currently selected theme or Create a new theme from an existing file.
-
If you are creating a new theme, choose a theme to base your theme on.
note
If you want to automatically associate the new theme with your session, make sure Use the new file in the current session document is selected. Alternatively, you can select to associate the theme with the current session after you configure it.
-
In the Modify Theme dialog box, set the colors, fonts, and cursor display options for your theme and save the theme.
Theme files are saved as
.themexfiles in theThemesfolder in your user data directory.
For more, see:
Edit Category Settings
Extra!'s Edit category settings are found in the Reflection Desktop Configure Clipboard Settings dialog box.
To access Edit category settings in Reflection Desktop
- In the Settings window, under the Input Devices group, select Configure Clipboard Settings.
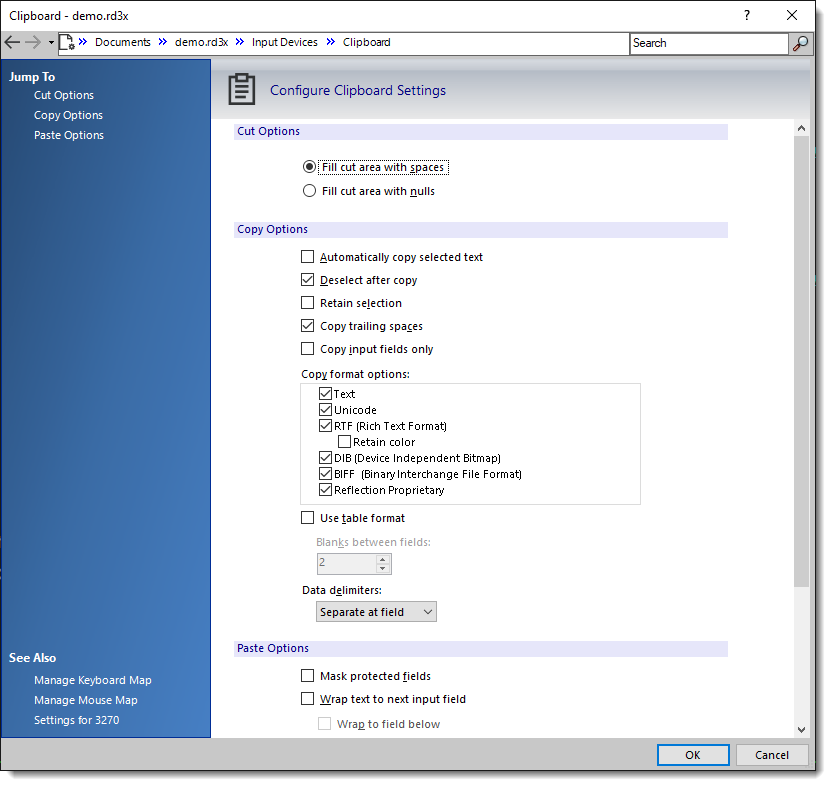
The settings you configure are saved in your session file.
For more, see:
Hotspots
When you open and save an Extra! session that is associated with a Hotspot file, the session and the Hotspot are saved in Reflection file formats. The new Hotspot file has the same name as the session file and is associated with the new session file.
note
Only Text Hotspots mappings are imported. Region Hotspots mappings are not imported. Modifications to .ehs Hotspots files are saved using the Reflection Hotspots file format and extension (*.xhs).
You can modify Hotspots by selecting Manage HotSpots in the Settings window and then choosing whether to create a new Hotspot or modify your existing Hotspot. The Hotspot editor is very similar to the Extra! editor.
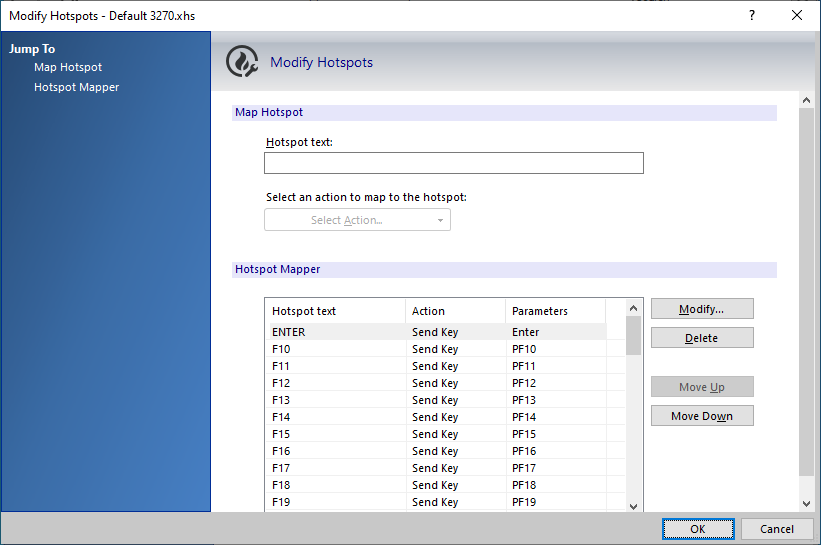
You can also import Hotspots that are not associated with a session file and convert them to the new format.
To convert a Hotspot file
-
Place the Hotspot file in the
My Documents\Reflection\HotspotsMaps folder. -
In the Settings window, select Manage Hotspots.
-
Choose Select another Hotspots file.
-
Select Custom, and browse to the file.
-
Select to Modify the currently selected Hotspots file and then save it in the new file format (
.xhs).
For more, see:
Keyboard Maps
When you open and save an Extra! session that is associated with a keyboard map file, the session and keyboard map are saved in Reflection file formats. The new keyboard map file has the same name as the session file and is associated with the new session file.
You can open the keyboard mapper from the Settings window by choosing Manage Keyboard Maps under Input Devices and selecting whether to create a new map or modify an existing one.
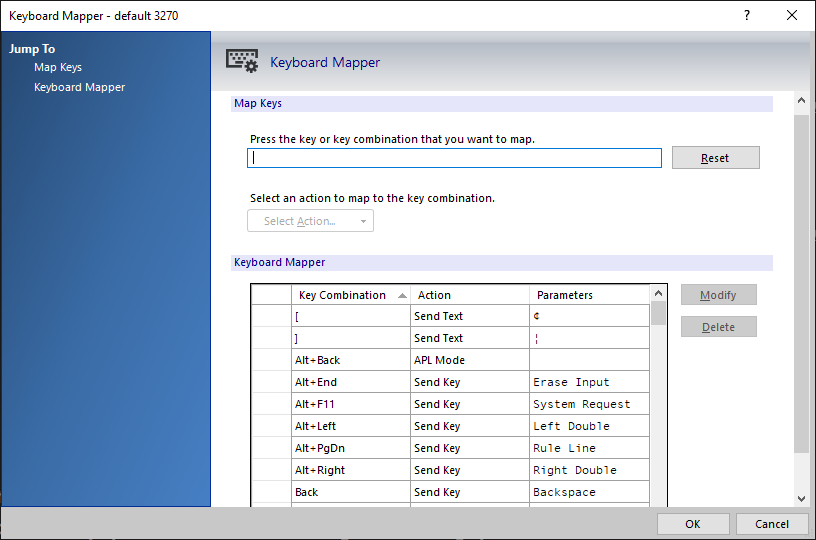
The Reflection keyboard mapper works a little differently than the Extra! mapper. Instead of displaying a graphical map that you interact with, the Reflection mapper provides a table that includes all the keys and their values.
To map a new key action
-
In the Settings window, under Input Devices, select Manage Keyboard Map.
-
Enter the key or key combination and then click the Select Action button.
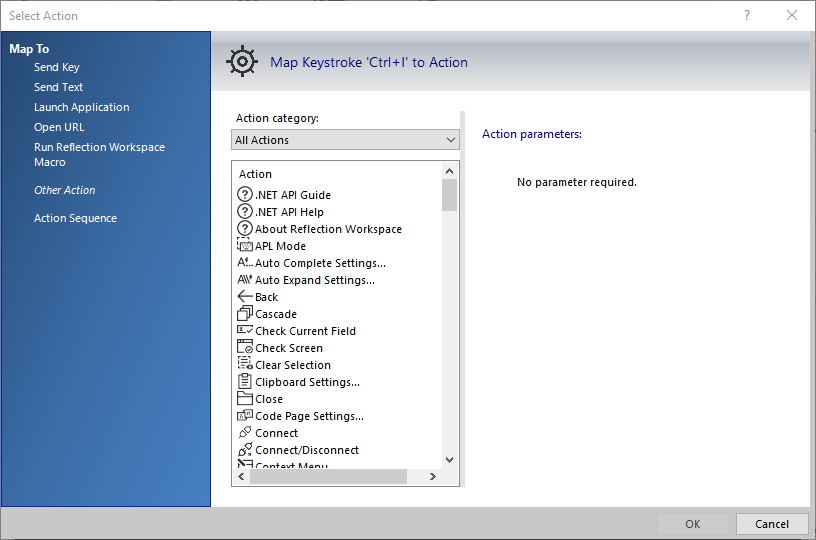
-
In the Select Action box, choose the action to associate with the key.
To modify a key action
-
Select the key in the table and then click Modify.
-
In the Select Action dialog box, choose the action to map the key to.
note
You can also create new keyboard maps or new mouse maps. If you want to automatically associate a new map with your session, make sure Use the new file in the current session document is selected. Alternatively, you can select to associate the map from the Manage Keyboard Map or the Manage Mouse Map dialog box after you configure it.
For more, see:
Menus and Toolbars
You'll use the same process to create menus and toolbars as you used in Extra! but you'll find that the UI Designer is a little different from Extra!.
To create or edit menus or toolbars
-
In the Settings window, under User Interface, select Manage Ribbon.
note
Although the Reflection interface references the Ribbon throughout this process, it applies to toolbars and menus if Reflection is in Classic mode.
-
Select whether to Modify the currently selected Ribbon file or Create a new Ribbon from an existing Ribbon file.
-
If you are creating a new file, browse to a file to use as a template.
-
If you want to associate a new menu or toolbar with the current session, select Use the new file in the current session document.
note
Alternatively, you can select to associate the menu or toolbar from the Manage Ribbon dialog box after you configure it.
When Reflection is in Classic mode, the UI Designer displays an interface you can use to modify toolbars and menus, as shown below.
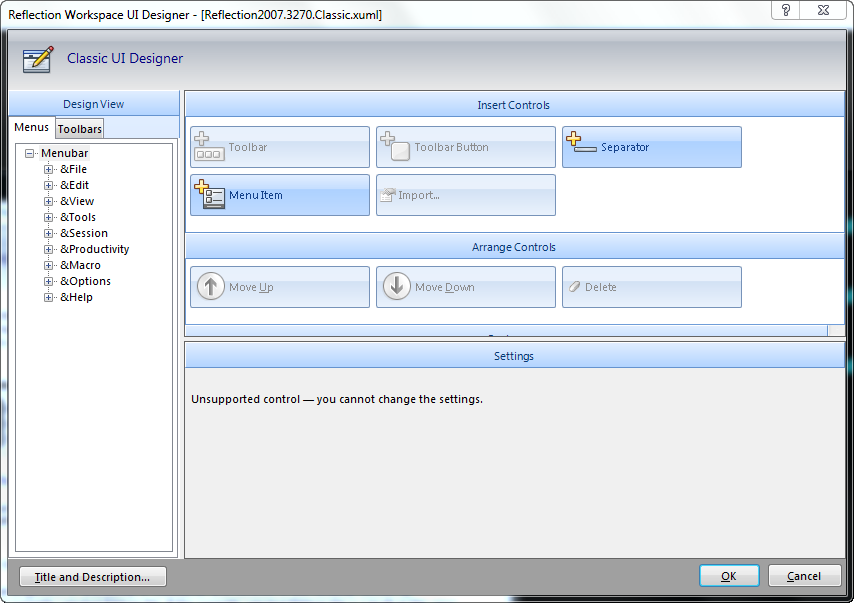
When Reflection is in Ribbon interface mode, the UI Designer displays an interface that can be used to modify the ribbon.
Productivity
Configuring productivity settings such as Spelling, Auto Complete, Auto Expand and Recent Typing is very similar to Extra!.
Instead of tabs, these options are displayed in dialog boxes that are accessed under the Productivity group in the Settings window.
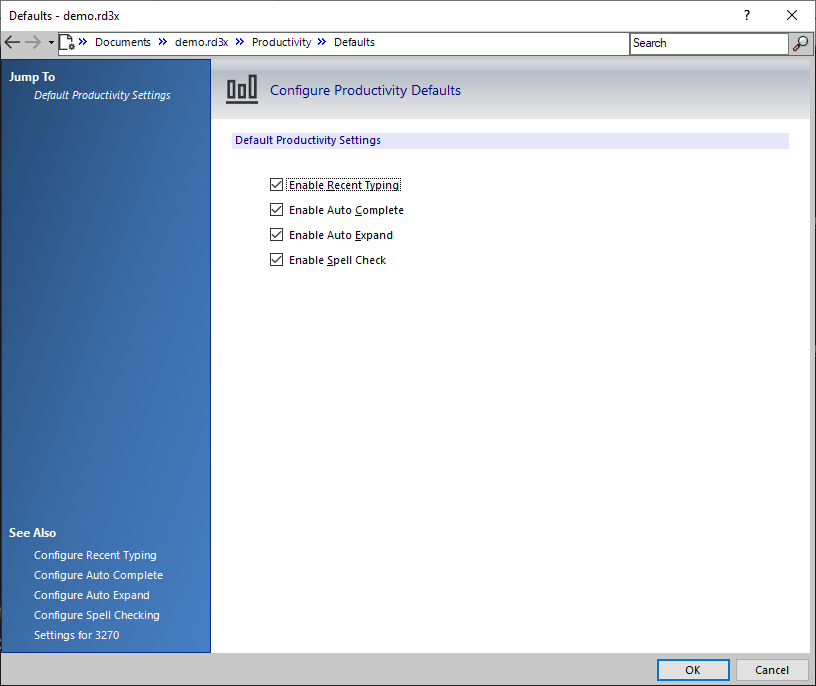
Most of the settings on the Productivity General tab are found by selecting Configure Productivity Defaults.
note
-
Screen History is disabled by selecting Manual capture only on the Configure Screen History dialog box.
-
Office Tools and enable Scratch pad are always on.
More information
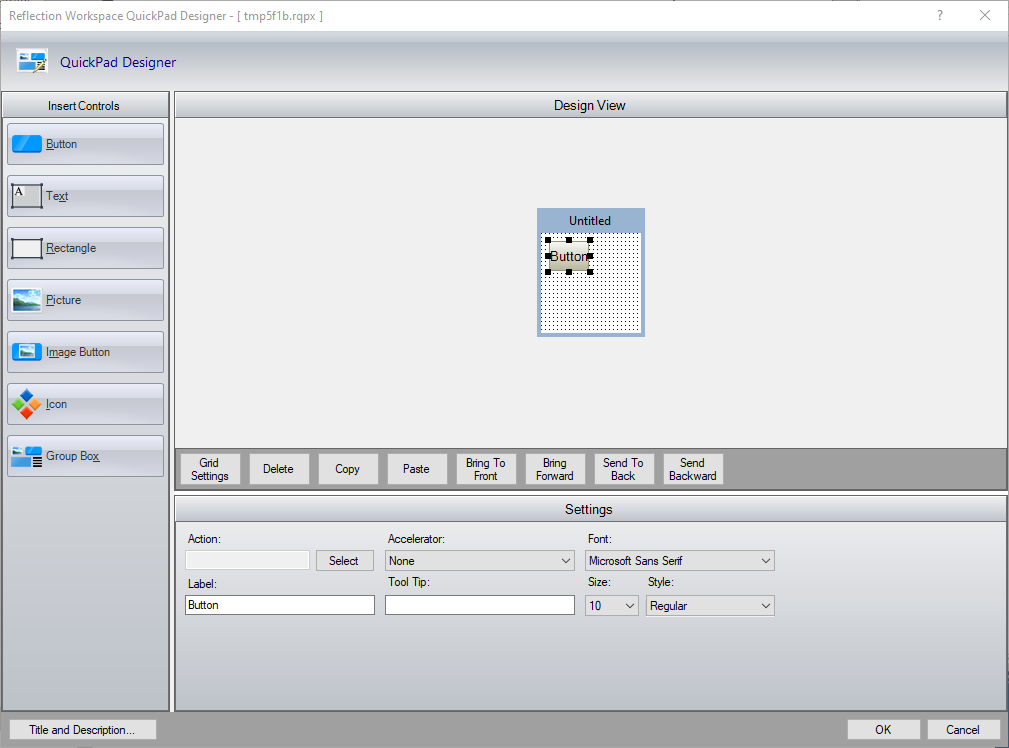
QuickPads
You can use Extra! QuickPads in Reflection. If you are deploying QuickPads, it's a good practice to save them in the new Reflection QuickPad file format (.rqpx). You can do this by selecting to modify the QuickPads.
Editing QuickPads in Reflection is similar to how you edit them in Extra!.
To create or modify a QuickPad
-
On the Settings window, under Terminal Appearance, select Manage QuickPads.
-
Select whether to modify a QuickPad or create a new one.
The new QuickPad editor has been redesigned to provide a more modern graphical layout for designing QuickPads.