Customize Classic Menus and Toolbars
You can customize the menus and toolbars used by your Reflection Desktop sessions. You can set up sessions to share the same customized menus and toolbars or you can set up unique menus and toolbars for each session.
After you customize menus and toolbars for a session and save these settings, you can apply them to other sessions.
You can also import toolbars from Reflection 14 or Extra! sessions and then save them in Reflection .xumlfiles that can be applied to other sessions.
note
For IBM sessions, only Extra! and Reflection Desktop toolbar files can be imported. For VT sessions, Extra!, Reflection Desktop, and Reflection 14 toolbar files can be imported.
 How To Customize Menus and Toolbars in Reflection Desktop Classic Mode
Create or Modify Menus or Toolbars
To create or modify the Classic menu or toolbar
-
From the Classic user interface mode, open a session document.
-
Open the Settings window as follows:
For VT sessions, choose View Settings on the Setup menu.
For other types of sessions, choose Settings on the Options menu.
-
In the Settings window, under User Interface, choose Manage Ribbon.
In Classic sessions, the currently selected ribbon includes "Classic..." in the filename.
-
Choose Modify the currently selected Ribbon file or Create a new Ribbon from an existing Ribbon file. (When you are using the Classic user interface mode, these Ribbon settings are actually toolbar and menu settings.)
-
If you choose to create a new Ribbon, select an alternate file with "Classic..." to use as your starting point.
note
If you select one of the built-in files that is included in the installation folder, Reflection automatically creates an editable copy of the built-in file and saves the copy with your modifications to the
CustomUIfolder in your Reflection user data folder. -
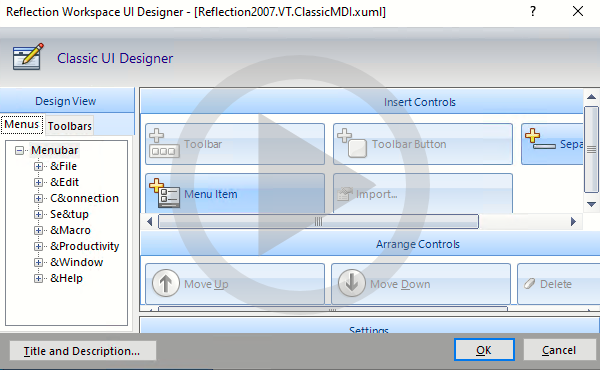
Use the Classic UI Designer to modify the menu or toolbar items. Changes are saved to the currently selected Ribbon when you click OK.
Apply Menu and Toolbar Settings to a Session
You can duplicate toolbars and menus used in other sessions by applying these settings to a session.
To apply menu and toolbar settings to a session
-
From the Classic user interface, open a session document.
-
Open the Settings window as follows:
For VT sessions, choose View Settings on the Setup menu.
For other types of sessions, choose Settings on the Options menu.
-
Under User Interface, select Manage Ribbon.
-
In the Manage Ribbon dialog box, click Select another Ribbon file and then select the file you want to apply to the session.
note
After you apply toolbars to a session, you can show or hide the toolbars from a context menu that you open by right clicking on a toolbar area.
Import Toolbars and Menus into a Session
Menus and toolbars associated with Extra! and Reflection 14 sessions are automatically imported when you open and save these sessions. You can also import toolbars from these types of sessions into Reflection Desktop sessions. And you can import other Reflection Desktop toolbars.
note
For IBM sessions, only Extra! and Reflection Desktop toolbar files can be imported. For VT sessions, Extra!, Reflection Desktop, and Reflection 14 toolbar files can be imported.
To import toolbars
-
In the Classic UI Designer Design View panel, select the Toolbars tab.
-
Select Import.
-
To import toolbars from another Reflection Desktop session, select the toolbar file for that session in the CustomUI folder, under the Reflection user data folder.
-
To import toolbars from Extra! sessions, browse to the folder that contains your toolbars and select the toolbar to import.
-
To import Reflection 14 toolbars, select the session file that includes the toolbars to import or select a Reflection 14 toolbar file.
note
All toolbar and menu settings are saved in Reflection Desktop
.xumlfiles.