Perform Other Common Tasks
You can perform these common tasks to make it easier to use Reflection or configure it to meet your requirements.
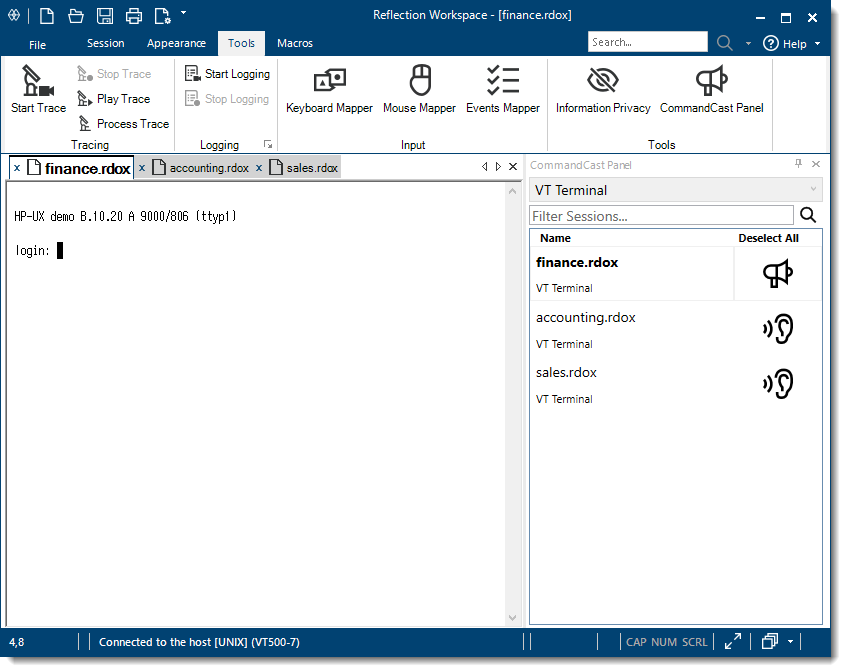
Broadcast Commands to Multiple VT Sessions
If you manage multiple host machines, you may often need to send the same command to more than one host and reentering the command on each host can be tedious. You can save time by using the CommandCast feature to broadcast the commands you enter in one host to any number of other hosts that you have selected to receive the commands.
note
CommandCast is supported only for VT sessions. You can use this feature for sessions you open in all user interface modes except the Classic user interface mode.
To broadcast commands from a VT session to other VT sessions
-
In Reflection Desktop, open the VT session in which you want to enter the commands and the sessions you want to send commands to.
-
Open the CommandCast Panel as follows:
The steps depend on your user interface mode.
User Interface Mode Steps Ribbon On the Tools tab, in the Tools group, click the CommandCast Panel button. Classic MDI On the toolbar, click the CommandCast button  .
. -
In the CommandCast Panel, click the sessions you want to include in the broadcast.
The CommandCast Panel displays a list of open VT sessions. It shows which session is set to broadcast commands, and which sessions are set to receive them. The last session you click is the session you broadcast from.
-
To broadcast from another session, select the session in the workspace window or click that session in the CommandCast panel.
-
If you want to be able to see the commands you enter and their output on each of the servers, click
 on the status bar and select Tile Vertical.
-
Enter the command you want to broadcast.
The command you enter and the resulting output are displayed on all the host machines you are broadcasting to.
-
If you routinely broadcast to this group of hosts, select Save Layout on the File menu to save this group as a layout.
The CommandCast Panel settings are saved with the layout. The next time you want to broadcast to these hosts, you can open the layout to open all the sessions, along with your previous CommandCast Panel settings.
Capture Incoming Screen Data (VT)
You can use the Capture Incoming Data action to capture data received from the host and save it to a file. This allows you to save a report (or other data) on the host screen and distribute it as a text file. It is also useful for logging data received from the host.
Using the Capture Incoming Screen Data action has advantages over printing or tracing data. Unlike when you print data to a file or create a trace file, captured lines are not wrapped, and you can choose whether to capture all of the data (including control sequences) or text data only.
Capture incoming data in Classic mode
If you are using a Classic interface mode, you'll need to make sure your session compatibility is set for Extra! as follows.
To capture incoming data in Classic mode
-
From the File menu, select New Session to create a new session document.
-
In the Create New Document dialog box, select VT Terminal and then in the Compatibility list (at the bottom of this dialog box), select Extra!.
-
To capture data from the host, on the Tools menu, select Capture Incoming Data.
-
In the Capture Incoming Data dialog box, browse to the file you want to save the data in and select whether to append the data you capture to an existing file or overwrite the file each time you start capturing data.
-
If you want to omit control sequences from the captured data, select Save As Text.
All of the data sent by the host is saved to the file you specified.
-
When you want to stop capturing data, on the Tools menu, select End Capture.
Capture incoming data in Ribbon mode
If you are using the Ribbon mode interface, you'll need to map the Capture Incoming Data action to a button on the Ribbon interface as follows.
To capture incoming data in Ribbon mode
-
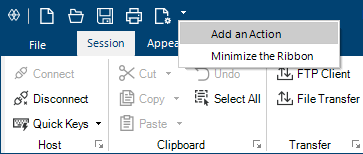
Click the Quick Access Toolbar menu, and then select Add an Action.
-
In the Select Action dialog box, in the Action list, select Capture Incoming Data.
-
In the Capture Incoming Data dialog box, browse to the file you want to save the data in and select whether to append the data you capture to an existing file or overwrite the file each time you start capturing data.
-
If you want to omit control sequences from the captured data, select Save As Text.
-
To capture data from the host, select
 on the Quick Access Toolbar.
All of the data sent by the host is saved to the file you specified.
-
When you want to stop capturing data, select
 on the Quick Access Toolbar.
Add a Keyboard Shortcut That Sends Special Character Data (VT)
You can add an action that sends special characters to the host and then map it to a keyboard shortcut, a button, or another control.
To add a keyboard shortcut that sends special character data to the host
-
Open the Settings window. The steps depend on your user interface mode.
User Interface Mode Steps Ribbon or Reflection Browser With a session open in Reflection, from the Quick Access Toolbar, click  .
.TouchUx Tap the Gear icon and then select Document Settings. -
Select Manage Keyboard Map.
-
In the Keyboard map dialog box, select Modify the currently selected keyboard map file.
-
Press the key combination you want to map (for example,
CTRL+Q). -
Click Select Action and then select the Send Text action.
-
In the Select a special character list, choose the character data to send.
note
If the Select a special character list doesn't have the character data you want to send, you can type in the string for the character data in the Text to send to host field. For example, type in
<ESC>. Alternatively, you can hold down the ALT key and use the numeric keypad to enter the numeric code for the data. For example, to send<ESC>, enter027.
Edit the Translation Table
Using the Translation Tables dialog box, you can:
-
Edit the tables Reflection uses to translate the PC's character set into the character set used by the host and vice versa.
-
Use currently unsupported character sets.
-
Customize Reflection for unique host environments.
Use the translation tables when:
-
You need to edit how characters are translated from the host to the PC, and vice versa. Typically, you'll use the tables to support a host character set that's currently unavailable in Reflection. The characters in the table are hexadecimal.
- or -
-
You need to edit how EBCDIC characters are translated from the host to the PC, and vice versa for a Unisys T27 host. These translations are done in addition to the normal PC-to-host and host-to-PC translations performed by Reflection. The characters in the table are hexadecimal.
note
To use the translation tables, the
DataStreamTranslationVBA property must be set totrue(the default isfalse). When Reflection is emulating a Unisys T27 host, theDataStreamTranslationproperty is automatically set to true.
To open the Translation Tables dialog box
-
Launch a Reflection VT session.
-
From the Tools ribbon, select Visual Basic.
-
In the VBA editor, right-click on Project Legacy and choose Insert and then Module.
-
Copy and paste the following VBA code into the code window:
Sub Translation() With Session .DataStreamTranslation = True .ExecuteBuiltInFunction "TranslationTables" End With End Sub -
Close the VBA editor.
-
On the Tools ribbon, click Run Macro.
-
In the Run Macro dialog box, select Legacy Reflection Macro in This File.
-
Run the
TranslationMacro.The Translation Tables editor is displayed.
Use Customized Host Files
Reflection supports legacy Reflection custom host files. These files are used to specify the host names displayed in the Host name/IP address list in the Settings dialog box.
The path to the customized host file is specified in the value for the HKCU\Sofware\WRQReflection\Rwin\Global registry setting. This registry setting is only installed in legacy versions of Reflection. It is not part of the Reflection installation.
If the value of this setting is "" (the default) or if the setting is not in the registry, all of the names in the system local host file are displayed in the Host name/IP address list.
note
Windows can resolve the host names in the custom host files only if these names are valid domain names or names that are in the local hosts file. Custom host files are not used by Windows to resolve IP addresses.
Host file format
The custom host file must have the following format:
<IPv4 or IPv6 address> <host name>
For Example:
127.0.0.1 localhost
:: localhost
The host name information is used to populate the Host name/IP address list in the Settings dialog box.
The IP address information is not relevant unless the specified host file also happens to be the Windows system hosts file.
Generate a HLLAPI Trace
HLLAPI is a standard API for automating terminal tasks. A HLLAPI trace displays the HLLAPI calls the application is making, including return codes. You can use the trace for troubleshooting problems with a HLLAPI application and send the generated file to customer support.
To create a HLLAPI trace
-
In the Reflection Workspace Settings dialog box, select Configure Workspace Attributes. Then select Enable HLLAPI logging and specify a HLLAPI log file name in a location where you have the appropriate permissions to create and save a file.
-
In the Reflection Workspace, open or create a session document to connect to your IBM host, and start the HLLAPI application. Perform the actions you want to record in the trace.
-
Close the HLLAPI application.
The trace file is automatically saved as
hllapi.login the folder selected in the HLLAPI log file box.