Select and Map the Keyboard and Mouse
A keyboard map lists host terminal keys and their definitions, as well as all defined keystrokes (shortcuts).
Keyboard map files control the action of keys on your PC keyboard, so that they correspond to specific host keys or provide keyboard shortcuts. When you create a terminal session document, it includes a pointer to a default, built-in keyboard map file. You can choose a different keyboard map file for each session, and you can create custom keyboard map files with the settings you prefer.
You can also set up and select custom mouse maps. When you configure keyboard and mouse maps for sessions, you can:
 Map a Keyboard in Reflection Desktop
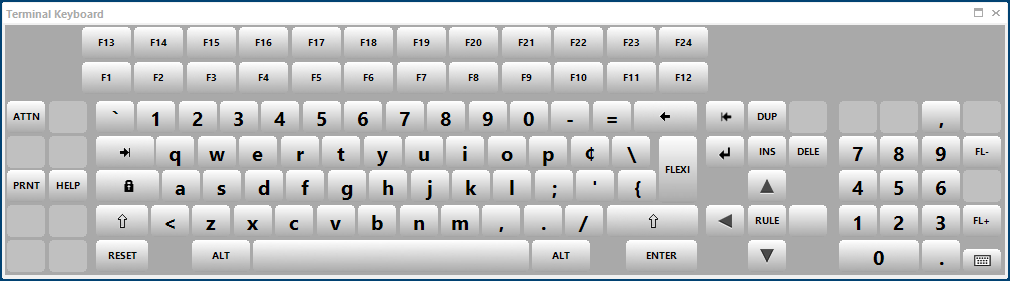
Use the Graphical Terminal Keyboard
You can display a graphical terminal keyboard that allows you to use your mouse or touch screen to enter data or use special keys in your IBM or Open Systems sessions. You can choose from several prebuilt keyboards.
note
you can select different prebuilt keyboards but you cannot change the mappings for each keyboard. If you are using the five supported languages (English, French, German, Spanish, and Japanese), the keyboard displays in the language for your operating system. If you are using an unsupported language, the keyboard displays in English.
To use the graphical terminal keyboard
-
Open a session in Reflection.
-
Display a graphical terminal keyboard as follows. The steps depend on your user interface mode.
User Interface Mode Steps Ribbon On the Appearance tab, click Terminal Keyboard. TouchUx Tap the Wrench icon and then select Terminal Keyboard. Reflection Browser On the Reflection menu, choose Tools and then Terminal Keyboard. Classic On the session default toolbar, click  .
. -
To switch keyboards, click
 in the lower right hand corner of the keyboard.
 -
To close the keyboard, select the same terminal keyboard menu item or icon you used to open it.
-
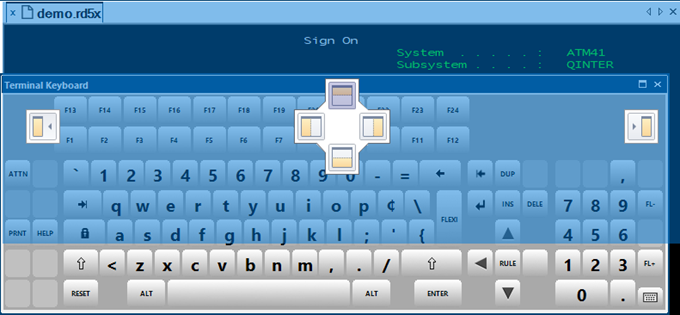
To dock the keyboard to the workspace, select the keyboard title bar and move the cross-hairs to one of the upper, lower, left or right arrows displayed above the keyboard.
The following example docks the keyboard to the top of the workspace.
-
Save the session. When you reopen the session, the keyboard is displayed just as it was when you saved the session.
Select the Keyboard Map for a Session
Reflection pre-configures all session documents to use a built-in keyboard map file. You can choose to use a different built-in map, or a custom map that you've created.
To select a keyboard map
-
Open the Settings window. The steps depend on your user interface mode.
User Interface Mode Steps Ribbon or Reflection Browser With a session open in Reflection, from the Quick Access Toolbar, click  .
.TouchUx Tap the Gear icon and then select Document Settings. -
Under Input Devices, click Manage Keyboard Map.
-
Click Select another keyboard map file.
-
Do one of the following:
To Do this Select a built-in keyboard map Click Built-in, and then select a map from the list; for example, Default 5250 en.xkb.Select a custom keyboard map Click Custom, and then browse to a custom keyboard map file. Note: The file must be in a trusted location.
Create a Custom Keyboard Map
Host terminal and PC keyboards have different sets of keys; for example, many terminal keyboards have a Transmit key, but PC keyboards do not. Reflection pre-configures each session document with a built-in "keyboard map" substituting a PC key (or combination of keys) for the terminal function, so that a PC can communicate with a host in the same way as a terminal. You can create a custom keyboard map by adding, removing, or redefining keystroke combinations from an existing keyboard map.
To create a custom keyboard map
-
Open the Settings window. The steps depend on your user interface mode.
User Interface Mode Steps Ribbon or Reflection Browser With a session open in Reflection, from the Quick Access Toolbar, click .TouchUx Tap the Gear icon and then select Document Settings. -
In the Settings dialog box, under Input Devices, click Manage Keyboard Map.
-
In the Manage Keyboard Map dialog box, click Create a new keyboard map from an existing keyboard map file.
-
In the Create a New Keyboard Map file dialog box, select a keyboard map file to use as a template for your new file (for example,
Default 3270.xkb). -
If you want to use the new keyboard map file in your current session, choose Use the new file in the current session document.
-
Click OK.
-
Do one of the following:
To Do this Add a keystroke definition Under Map Keys, enter a key combination (keystroke) in the box, click the Select Action menu, and then choose Send Key. From the Key drop-down box, choose the host terminal key to which you want to map, and then click OK. Change the definition of a keystroke Select the key combination you want to change and click Modify. Specify an action for the keystroke, and then click OK. Remove a keystroke definition Select the key combination you want to remove, and then click Delete. -
When you are done making changes, click OK.
-
When prompted, save the new keyboard map in the
Keyboard Mapsfolder. -
If you are prompted that this is not a secure location, click Yes.
The file is saved in your
Documents\Micro Focus\Reflection\Keyboard Mapsfolder.
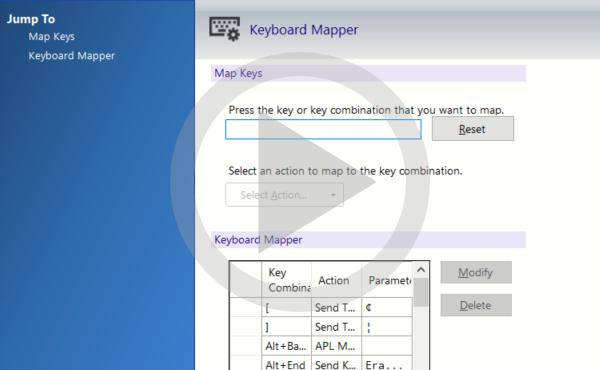
Add a Keyboard Shortcut
You can create keyboard shortcuts that perform any assignable action during a Reflection session. For example, using the Keyboard Mapper, you can select a standard action, such as Send Text or Launch Application, or you can create a macro or complex sequence of actions that you assign to a keystroke.
To add a keyboard shortcut
-
Open a session in Reflection.
-
Open the Reflection Keyboard Mapper dialog box as follows:
The steps depend on your user interface mode.
User Interface Mode Steps Ribbon On the Tools tab, click Keyboard Mapper. Reflection Browser On the Reflection menu, choose Tools, and then Keyboard Mapper. TouchUx Tap the Wrench icon and then under Tools, select Keyboard Mapper. -
Under Map Keys, enter a keystroke (for example, CTRL+K).
note
Avoid using keystrokes already defined in the keyboard map.
-
Assign an action by doing one of the following:
-
From the Select Action menu, choose a task (for example, Launch Application).
-or-
-
Click the Select Action button, and from the Select Action dialog box, specify an action or action sequence.
-
-
Enter parameters for the action, if required, and then click OK.
-
Save your changes to a custom keyboard map file.
The new keyboard shortcut appears in the table under Keyboard Mapper.
Delete a Keyboard Shortcut
-
Open a session in Reflection.
-
Open the Reflection Keyboard Mapper dialog box as follows:
The steps depend on your user interface mode.
User Interface Mode Steps Ribbon On the Tools tab, click Keyboard Mapper. Reflection Browser On the Reflection menu, choose Tools, and then Keyboard Mapper. TouchUx Tap the Wrench icon and then under Tools, select Keyboard Mapper. -
From the Keyboard Mapper table, select the key combination you want to remove.
-
Click Delete, and then click OK.
-
Save your changes, as needed.
Restore the Default Keyboard Map
If you have problems using a customized keyboard map in a session document, you can restore the default keyboard map.
To restore a default keyboard map
-
Open the Settings window. The steps depend on your user interface mode.
User Interface Mode Steps Ribbon or Reflection Browser With a session open in Reflection, from the Quick Access Toolbar, click .TouchUx Tap the Gear icon and then select Document Settings. -
Under Input Devices, click Manage Keyboard Map.
-
Click Select another keyboard map file.
-
Click Built-in, and select a map from the list that matches your host session; for example, for a 5250 host session, choose Default 5250 en.xkb.
-
Click OK.
Select the Mouse Map for a Session
A mouse map is a configuration file that shows all of the defined mouse actions and mouse/key combinations for your mouse. Reflection pre-configures all session documents to use a built-in mouse map file. You can choose to use a different built-in map, or a custom map that you've created.
To select a mouse map
-
Open the Settings window. The steps depend on your user interface mode.
User Interface Mode Steps Ribbon or Reflection Browser With a session open in Reflection, from the Quick Access Toolbar, click .TouchUx Tap the Gear icon and then select Document Settings. -
Under Input Devices, click Manage Mouse Map.
-
Click Select another mouse map file.
-
From the Select a Mouse Map File dialog box, do one of the following:
To Do this Select a built-in mouse map Click Built-in, and then select a map from the list; for example, mouse.xmm.Select a custom mouse map Click Custom, and then browse to a custom mouse map file. Note: The file must be in a trusted location.
Add a Mouse Action
Using the Mouse Mapper, you can assign an action to a mouse click, a wheel up/down, or, to a mouse click and keystroke combination. Each time you perform that mouse action in Reflection, the specified action occurs.
To add a mouse action
-
Open a session in Reflection.
-
Open the Mouse Mapper Dialog box. The steps depend on your user interface mode.
User Interface Mode Steps Ribbon On the Tools tab, click Mouse Mapper. Reflection Browser On the Reflection menu, choose Tools, and then Mouse Mapper. TouchUx Tap the Gear icon and then select Document Settings. Under Input Devices, click Manage Mouse Map. Then choose whether to modify the current mouse map or create a new map. -
Under Mouse Mapper, place your pointer over the image, and then do either of the following:
-
Click a mouse button or wheel up/down.
-or-
-
Click a mouse button while pressing a modifier key (for example, CTRL).
-
-
Assign an action by doing one of the following:
-
From the Select Action menu, choose a task (for example, Launch Application ).
-or-
-
Click the Select Action button, and from the Select Action dialog box, specify an action or action sequence.
-
-
Enter parameters for the action, if required, and then click OK.
-
Save your changes to a custom mouse map file, if necessary.
The new mouse action appears in the Mouse Action table.
Delete a Mouse Action
-
Open a session in Reflection.
-
Open the Mouse Mapper Dialog box. The steps depend on your user interface mode.
User Interface Mode Steps Ribbon On the Tools tab, click Mouse Mapper. Reflection Browser On the Reflection menu, choose Tools, and then Mouse Mapper. TouchUx Tap the Gear icon and then select Document Settings. Under Input Devices, click Manage Mouse Map. Then choose to modify the current mouse map. -
From the Mouse Mapper dialog box, select the key combination you want to remove.
-
Click Delete, and then click OK.
-
Save your changes, as needed.
Restore the Default Mouse Map
If you have problems using a customized mouse map in a session document, you can restore the default mouse map.
To restore a default mouse map
-
Open the Settings window. The steps depend on your user interface mode.
User Interface Mode Steps Ribbon or Reflection Browser With a session open in Reflection, from the Quick Access Toolbar, click .TouchUx Tap the Gear icon and then select Document Settings. -
Under Input Devices, click Manage Mouse Map.
-
Click Select another mouse map file.
-
Click Built-in, and select
Mouse.xmmfrom the list. -
Click OK.
More information