Improving Performance over a Slow Network
You can use the Reflection X Remote Session Services feature when your network configuration causes delays that make running a remote X client application difficult or when using an X client application that transmits large amounts of data, such as the GNOME 3 Desktop.
To support this feature from the standalone X Manager, you can install the Remote Session Services feature on your X client host, as described below.
note
The following steps show how to configure the standalone X Manager. You can also configure X Manager for Domains to address problems with high latency or bandwidth. Once you've set up a Reflection X domain, this support is available without the extra step of installing Reflection X on the X client host. For domain setup information, search on "Domain Setup: Improve Performance Over a Slow Network" in the Reflection X Help.
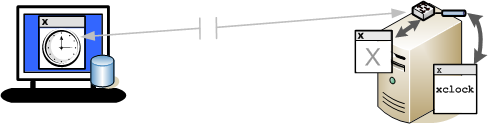
With Remote Session Services enabled, when you start a session, Reflection X creates two X servers. An X server display runs on your Windows workstation (shown on the left below) and a second "headless X server" runs on the X client host (shown on the right). In high latency networks, this configuration improves performance by short-circuiting some of the data exchange over the network. With the headless X server running on the client host (or on a nearby host), client/server exchanges that don't change the display pass between the client and the headless X server, but aren't sent over the network to the X server display on the workstation. This eliminates round trip network messages and dramatically improves the response time you see on your workstation. In addition, the protocol is compressed between the remote session and the X server display.
The first procedure installs the Remote Session Services feature on your X client host to support this kind of connection.
Before you begin
- Use any of the procedures described under Starting an X Client to test an X client connection to your UNIX host. In the procedures that follow, you'll modify the client definition to use the Remote Session Services feature.
Configure your X client host to support Remote Session Services
-
Return to the Download library page, download the package for the Linux system on which you run your X clients, and copy this file to the X client host.
-
Unzip the download file. For example:
unzip reflection-x-18.n.nnnn-prod-linux.zip -
Log on as root and navigate to the directory that contains the installation file.
-
Start the installation program. For example:
./reflection-x-18.n.n.nnnn-prod-x86_64.sh -
When you reach the Choose Product Features section, select Remote Session Services for Standalone manager.
-
Complete the installation.
The next procedure creates a new session definition that you can use to test the Remote session services feature.
Create a new session definition that uses Remote Session Services
-
Return to the Windows computer on which you created and tested an X client definition and start X Manager.
-
Under Session Definitions, click
 to create a new session. For Session Name, enter "RSS Session."
 -
Select the display option appropriate for your X client:
-
If you want your client application to run on your desktop, select Show clients on my desktop.
-
If your client command launches a desktop environment such as KDE, CDE or GNOME, select Show clients on X terminal desktop.
-
-
(Optional) If you want the session to stop when you exit your client, change On last client to Stop session.
-
Under Remote session services:
-
Select High-latency network performance.
-
For Host name, specify the name of the X client host on which you installed the Remote session services feature.
-
For User name and Password, specify your credentials on the X client host.
-
The next procedure configures your client to connect using this new session.
Start a client using your new session and view the session statistics
-
In X Manager, under X Clients, select your X client definition.
-
For Default session, use the drop-down list to select the "RSS Session" you just configured.
-
Double-click the X client definition and log onto your host. You should see your X client display.
-
In X Manager, under Session Definitions, select your running session, which is identified with this icon:

-
In the Session Status pane, view the X Servers section. Depending on the latency in your network, either one or two X servers are listed:
-
If latency is not a problem, a single X display server (running on your X Manager workstation) is listed. In this case, all protocol is forwarded directly to this X server display.
-
If latency is a problem (greater than 10 ms), two servers are listed —the display server running on the X Manager workstation and a second "headless server" running on the Linux host. This configuration improves performance by short-circuiting many protocol queries. This reduces the number of round trips and the amount of data that needs to pass over the network to the X server display on your workstation.
-