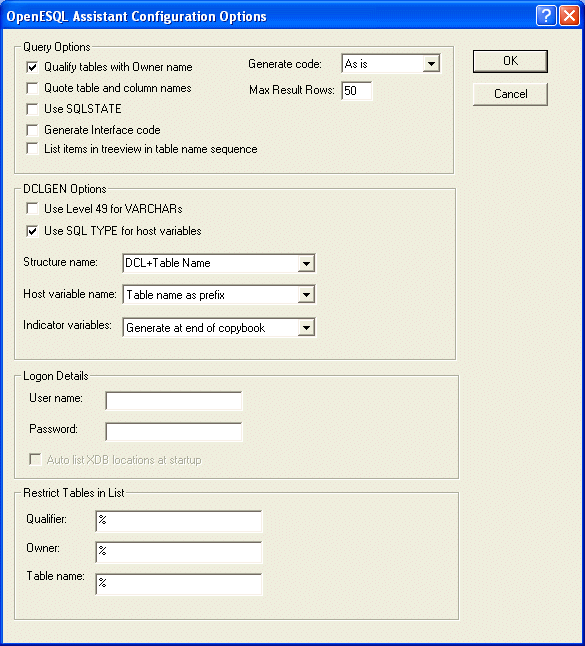
Figure 4-1: OpenESQL Assistant Configuration Options
Use the OpenESQL Assistant to generate SQL code you can embed into a COBOL program.
You need to have worked through the Using Net Express chapter of your Getting Started book before you do this session.
OpenESQL Assistant is a tool that makes it fast and easy to generate SQL queries that you can embed right into your COBOL programs. You can also test your queries to be sure they return the information you need before embedding them into a program. OpenESQL Assistant can also generate auxiliary code necessary to properly execute an embedded SQL query.
This session takes you through the process of creating a new SQL project, connecting to a data source, building and testing an SQL query, generating a generic SQL program, embedding the SQL query into the program, generating and embedding auxiliary code to support the query, and compiling and running the program.
If you have closed , open it as before. Close any project windows and any other windows that are open.
In this session, you:
The program we create in this tutorial uses the TCP/IP communications protocol. We need to enable it for both the XDB Server and the Client. Perform these steps from the Net Express IDE.
To configure the XDB Server:
To configure the Client:
For this tutorial, we need to add a System ODBC data source using the Micro Focus XDB driver. Consult the Microsoft documentation that came with your operating system for details. When you add the system data source:
If your XDB Server was not automatically started when you started Net Express, start it now. However, if your XDB Server is already started, stop it and then restart it before proceeding. Perform these steps from the Net Express IDE.
To stop the XDB Server:
To start the XDB Server:
For this tutorial, we'll create a new Net Express project for SQL.
You can configure several features within OpenESQL Assistant. For the purposes of this tutorial, we will change one of the default configuration settings. This setting works to qualify table names using the table owner name.
Figure 4-1: OpenESQL Assistant Configuration Options
Now we can start the OpenESQL Assistant from the IDE.
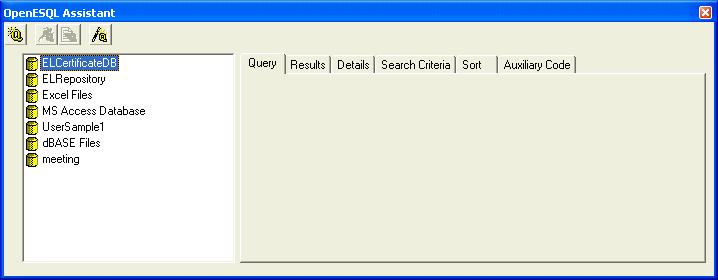
Figure 4-2: OpenESQL Assistant Showing Data Sources
The tree view on the OpenESQL Assistant lists of all the data sources cataloged on your work station, including the UserSample1 ODBC source we set up earlier in this tutorial. We can now connect to it:
Note: The INSTALL user ID does not require a password.
OpenESQL Assistant expands the UserSample1 data source and shows all available tables.
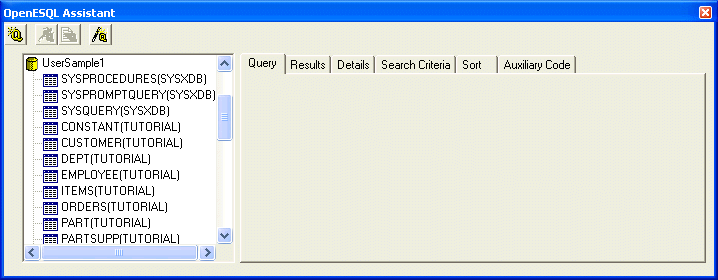
Figure 4-3: OpenESQL Assistant Showing Table Names
Notice that all of the tables are qualified using the owner name for the table. This is because we set our OpenESQL Assistant configuration options to qualify table names with the owner name.
We're now ready to build a query that we can embed into a COBOL program and run. In this scenario, we are interested in retrieving the first and last names of our employees and the payrate for each. So we'll build the query to access the EMPLOYEE table and return the data from three columns: LNAME, FNAME, and PAYRATE.
The Select Type of Query to Create dialog box enables you to choose the type of query you want to generate. In this case, we want to create a simple SELECT CURSOR statement. OpenESQL Assistant generates a default cursor name that we have the option to override. Here, we'll accept the default.
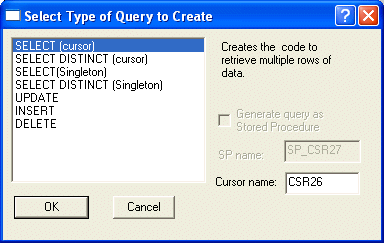
Figure 4-4: Select Type of Query to Create Dialog Box
The OpenESQL Assistant marks the table with check mark, generates the query, and places the generated code on the Query tab.

Figure 4-5: OpenESQL Assistant Showing Query and Columns
The columns in your selected table appear on the tree view with an alias of "A" prepended to the column name. For SELECT queries only, OpenESQL Assistant assigns the alias of A to the first table you select for a query, B to the second table if you join another table to the query, C for the next, etc. By prepending the table alias to each column name, you can easily identify the table to which a column belongs even if the same column name appears in more than one table.
We want our SQL query to return the first and last names of our employees along with the pay rate for each employee.
OpenESQL Assistant marks the selected column names with check marks and updates the Query tab with the appropriate code.
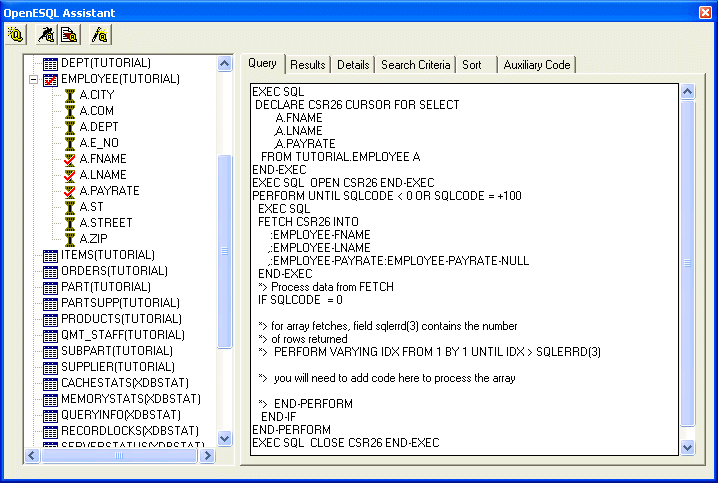
Figure 4-6: OpenESQL Assistant Showing Selected Columns
Our SQL query is complete at this point so we can test it.
 .
.
OpenESQL Assistant shows the results of the query on the Results tab.
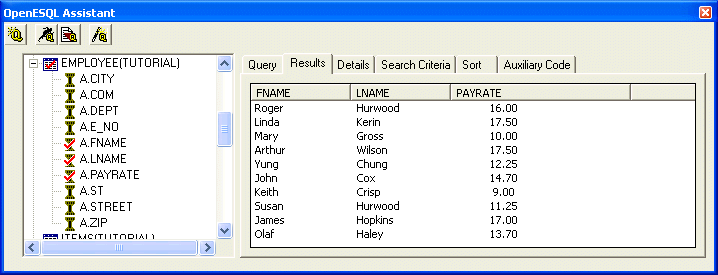
Figure 4-7: OpenESQL Assistant Showing Results
We're now ready to embed this query into a program. We can use OpenESQL Assistant to generate a generic program we can use to run this query.
OpenESQL Assistant generates a generic SQL program in the right-hand pane of the Auxiliary Code tab.
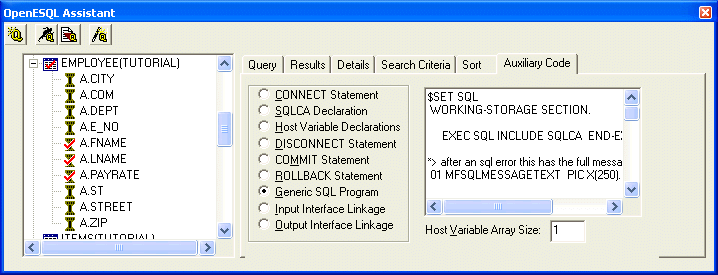
Figure 4-8: OpenESQL Assistant Showing a Generic SQL Program
Now we need to create an empty file into which we can embed our program and eventually the query we have built.
This opens the source code editor with the cursor placed at the very beginning of the file.
With the new program file open in Net Express and the cursor at the beginning of the file, we're ready to embed our generic SQL program.
 .
.
The generated code appears in the new source file.
Our program will not compile and run unless we provide code that declares our table, provides a COBOL record to receive the data, and provides a COBOL record for indicator variables. We can generate a copybook that contains all of this code using the Host Variable Declarations feature on the Auxiliary Code tab.
OpenESQL Assistant generates an INCLUDE statement for our program and a copybook. The name of the copybook is tablename.cpy. In this case, the name of the generated copybook is employee.cpy. All generated copybooks are stored in the current Net Express project folder.
The following shows the code generated for the copybook:
           EXEC SQL DECLARE
           TUTORIAL.EMPLOYEE TABLE
           ( CITY                  CHAR(15)
            ,COM                   DECIMAL(2, 2)
            ,DEPT                  CHAR(4)
            ,E_NO                  SMALLINT(5)          NOT NULL
            ,FNAME                 CHAR(10)             NOT NULL
            ,LNAME                 CHAR(10)             NOT NULL
            ,PAYRATE               DECIMAL(15, 2)
            ,ST                    CHAR(2)
            ,STREET                CHAR(20)
            ,ZIP                   CHAR(5)
           ) END-EXEC.
      *>  --------------------------------------------------------------
      *> COBOL DECLARATION FOR TABLE EMPLOYEE
      *>  --------------------------------------------------------------
       01  DCLEMPLOYEE.
           03 EMPLOYEE-CITY                    SQL TYPE IS
                                               CHAR(15).
           03 EMPLOYEE-COM                     PIC SV9(02) COMP-3.
           03 EMPLOYEE-DEPT                    SQL TYPE IS
                                               CHAR(4).
           03 EMPLOYEE-E-NO                    PIC S9(04)  COMP-5.
           03 EMPLOYEE-FNAME                   SQL TYPE IS
                                               CHAR(10).
           03 EMPLOYEE-LNAME                   SQL TYPE IS
                                               CHAR(10).
           03 EMPLOYEE-PAYRATE                 PIC S9(13)V9(02) COMP-3.
           03 EMPLOYEE-ST                      SQL TYPE IS
                                               CHAR(2).
           03 EMPLOYEE-STREET                  SQL TYPE IS
                                               CHAR(20).
           03 EMPLOYEE-ZIP                     SQL TYPE IS
                                               CHAR(5).
      *>  --------------------------------------------------------------
      *> COBOL INDICATOR VARIABLES FOR TABLE
      *>  --------------------------------------------------------------
       01  DCLEMPLOYEE-NULL.
           03 EMPLOYEE-CITY-NULL               PIC S9(04)  COMP-5.
           03 EMPLOYEE-COM-NULL                PIC S9(04)  COMP-5.
           03 EMPLOYEE-DEPT-NULL               PIC S9(04)  COMP-5.
           03 EMPLOYEE-PAYRATE-NULL            PIC S9(04)  COMP-5.
           03 EMPLOYEE-ST-NULL                 PIC S9(04)  COMP-5.
           03 EMPLOYEE-STREET-NULL             PIC S9(04)  COMP-5.
           03 EMPLOYEE-ZIP-NULL                PIC S9(04)  COMP-5.
We need to embed the generated INCLUDE statement into our program.
.
OpenESQL Assistant inserts the generated INCLUDE statement into the program.
We are now ready to embed our SQL query into the program.
*> Put your program logic/SQL statements here
.
OpenESQL Assistant inserts the query into the program.
When we run our program, we want to be able to see the results of the query as easily as we see them when we run the query in the OpenESQL Assistant. To achieve this, we need to add some code to the program that formats the PAYRATE information and sends all data to the console.
01 EDIT-PAY PIC Z,ZZ99.99.
IF SQLCODE = 0
MOVE EMPLOYEE-PAYRATE TO EDIT-PAY
Display 'Process data = ' EMPLOYEE-LNAME ' '
EMPLOYEE-FNAME ' ' EDIT-PAY UPON CONSOLE
The following shows the completed code for your COBOL program:
      $SET SQL
       WORKING-STORAGE SECTION.

           EXEC SQL INCLUDE SQLCA  END-EXEC
           EXEC SQL INCLUDE EMPLOYEE END-EXEC

       01  EDIT-PAY     PIC Z,ZZ99.99.

      *> after an sql error this has the full message text
       01 MFSQLMESSAGETEXT  PIC X(250).

       01 IDX               PIC X(04)  COMP-5.

       EXEC SQL BEGIN DECLARE SECTION  END-EXEC
       *> Put your host variables here if you need to port
       *> to other COBOL compilers

       EXEC SQL END DECLARE SECTION END-EXEC

       PROCEDURE DIVISION.

           EXEC SQL
               WHENEVER SQLERROR perform OpenESQL-Error
            END-EXEC

       EXEC SQL
         CONNECT TO 'UserSample1' USER 'install'
       END-EXEC

      *> Put your program logic/SQL statements here
            EXEC SQL
             DECLARE CSR26 CURSOR FOR SELECT
                    A.FNAME
                   ,A.LNAME
                   ,A.PAYRATE
               FROM TUTORIAL.EMPLOYEE A
            END-EXEC
            EXEC SQL  OPEN CSR26 END-EXEC
            PERFORM UNTIL SQLCODE < 0 OR SQLCODE = +100
              EXEC SQL
              FETCH CSR26 INTO
                  :EMPLOYEE-FNAME
                 ,:EMPLOYEE-LNAME
                 ,:EMPLOYEE-PAYRATE:EMPLOYEE-PAYRATE-NULL
              END-EXEC
              *> Process data from FETCH
              IF SQLCODE  = 0
              MOVE EMPLOYEE-PAYRATE TO EDIT-PAY
              Display 'Process data = ' EMPLOYEE-LNAME ' '
              EMPLOYEE-FNAME ' ' EDIT-PAY UPON CONSOLE
              *> for array fetches, field sqlerrd(3) contains the number
              *> of rows returned
              *>  PERFORM VARYING IDX FROM 1 BY 1 UNTIL IDX > SQLERRD(3)

              *>  you will need to add code here to process the array

              *>  END-PERFORM
               END-IF
            END-PERFORM
            EXEC SQL  CLOSE CSR26 END-EXEC

       EXEC SQL DISCONNECT CURRENT END-EXEC
           EXIT PROGRAM.
           STOP RUN.
      *> Default sql error routine / modify to stop program if needed
       OpenESQL-Error Section.

           display 'SQL Error = ' sqlstate ' ' sqlcode
           display MFSQLMESSAGETEXT
      *>   stop run
           exit.
Next we need to save the program and add the program and copybook to our OpenESQLAssistant project.
On the Project window tree view, click the + icon next to getpay.cbl to expand the entry. You can see that the employee.cpy file was automatically added as a dependent to getpay.cbl.
We're now ready to build and run our new SQL application.
 .
. .
.Net Express outputs the data to the console:
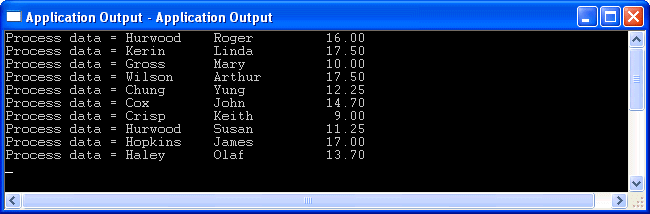
Figure 4-9: Application Output Window
Close the Application Output window.
Close the project. If you want to take a break before going on to the next session, you can close Net Express.
Comments on the books? Click Send Us Comments.
Copyright © 2006 Micro Focus (IP) Ltd. All rights reserved.