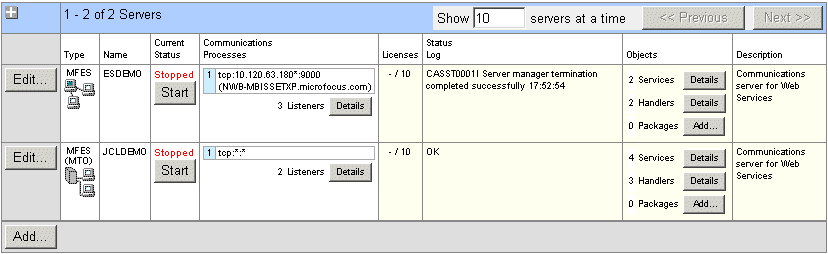
Figure 10-1: Servers Page showing JCLDEMO
This chapter takes you step by step through the process of configuring an enterprise server to run JCL applications, and then deploying and running a JCL application. This is intended both as an introduction to using JCL in reUZE Server, and as an Installation Verification Procedure (IVP) to confirm the JCL support is correctly installed.
If you are not familiar with reUZE Serverr, Mainframe Subsystem support, or CICS, see the chapters:
JCL applications written to run on a z/OS or VSE mainframe can be run under Enterprise Server. You maintain the applications in Net Express.
You can maintain your JCL files on the PC using any text editor.
This chapter uses the demonstration application ESJCL supplied with Net Express. The ESJCL application has four steps:
For your convenience we have supplied the required Net Express project.
To work through this chapter, you need Net Express including reUZE Server.
In this chapter you perform the steps typically required in managing, maintaining and running JCL applications in Enterprise Server. In summary:
To enable JCL support in an enterprise server, you need to do the following tasks. The sections below walk you through these.
To create an MSS-enabled enterprise server:
Figure 10-1: Servers Page showing JCLDEMO
To enable the JES (that is, JCL) support within MSS:
Don't click Apply yet - there is more to do on this page.
You need to specify the directories and other details needed for the enterprise server to find deployed programs:
| Field | Value to enter: | Details |
|---|---|---|
| JES Program Path | c:\Documents and Settings\user-ID\My Documents\Micro Focus\Net Express ver\WORKAREA\jcldemo\esjcl | Path for the directory
containing executable files to be run by your JCL jobs.
You will put your .gnt and .dll files here. For debugging, you put your .int, .idy and .cbl files here. |
| System Catalog | c:\Documents and Settings\user-ID\My Documents\Micro Focus\Net Express ver\WORKAREA\jcldemo\catalog\catalog.dat | Path and name of the system catalog. This is a file that holds the details of data files, their attributes and locations. For more information see the section Catalog Files in the chapter Files and Data Sets. |
| Default Allocated Dataset Location | c:\Documents and Settings\user-ID\My Documents\Micro Focus\Net Express ver\WORKAREA\jcldemo\catalog\datasets | The default path for the directory where new data sets are to be created, if you do not specify a directory. |
| System Procedure Library | SYS1.PROCLIB | Set of cataloged PDS data set names that will be searched to resolve JCL procedure names. |
It is possible to view ES Admin in a window in the IDE instead of in a Web browser. If you do this, some extra functions appear on the IDE menus, for controlling an enterprise server. To use these you must have a project open that you have associated with an enterprise server - these functions then operate on that enterprise server.
We will associate the supplied Net Express project with the JCL server that we just created, JCLDEMO:
A window displaying the Home page of ES Admin opens within the IDE.
It will be useful to have the character-mode console daemon window showing. It is enabled by default, and should appear when you start JCLDEMO in a moment, but if you want to make sure:
You can now start JCLDEMO:
Because you associated this project with JCLDEMO in the Project Properties above, this starts JCLDEMO.
(If Start server is disabled, click Stop server instead, and when JCLDEMO has stopped then restart it.)
There are two types of Service Execution Process (SEP):
You can define initiators and printers to start up automatically whenever the enterprise server is started, and you can also create ones that last only for the current session. We will define one initiator and one printer to start automatically. (If you do not have a printer available, you can omit the steps concerning the printer):
| Field | Value | Comment |
|---|---|---|
| Name | INITAB | Not case sensitive - gets folded to upper case |
| Class | AB | Not case sensitive - gets folded to upper case |
| Description | Initiator for class A and B jobs |
| Field | Value | Comment |
|---|---|---|
| Name | printer-name | Use the Browse button to select a printer. |
| Class | AB | Not case sensitive - gets folded to upper case |
| Exit module | Leave this field blank | |
| Description | Printer for class A and B jobs |
Note: For the list displayed by the Browse button to include printers accessed across a network, you need to have started the enterprise server either by using Tools > Start Server in the Net Express IDE, as we did here, or from the command line. If you start it from ES Admin (even if ES Admin is running as a window within the Net Express IDE), it runs as a system service and the network printers defined on your machine are not visible.
Now that we have an enterprise server configured to run JCL applications, we'll build, deploy and run the demonstration application.
To build the supplied project:
The project contains the two COBOL programs and the JCL file.
The Project Properties in this project include the DIALECT(ENTCOBOL) directive, because you need to set a mainframe dialect to indicate to the File Handler that it should use mainframe-style rules for resolving the filename when the job is run in Enterprise Server.
If you get a message that the project directives have changed (because you earlier checked the Project uses an enterprise server check box), click Yes.
When you started your new enterprise server JCLDEMO, a working directory was created for it. This directory is called c:\Documents and Settings\user-ID\My Documents\Micro Focus\Net Express ver\WORKAREA\jcldemo, where user-ID is the Windows ID you are logged in under.
Within this directory, you now need to create the directories that you configured JCLDEMO to use:
| Name | Used for |
|---|---|
| esjcl | executables to be run from JCL |
| catalog | system catalog location |
| catalog\datasets | cataloged data set location |
To deploy to Enterprise Server on Windows, you simply copy the application files to the directory where the enterprise server that will run your application expects them. Because we will be debugging later in this chapter, you need the .cbl, .idy and .int files.
These are the .int and .idy files of the two COBOL programs.
The JCL file does not in fact have to be in the same directory as the executable files - you will specify its path when you run it - but it's convenient to put it there.
To run the application:
If JES is not present, return to the Home page of ES Admin, click Edit by JCLDEMO, and check that you entered the configuration details correctly. In particular check that the paths exist, and that the spelling and case are correct. If you change anything, you must stop and restart JCLDEMO for the change to take effect.
The JCL Control page that appears is for submitting jobs, and for starting additional printers and initiators.
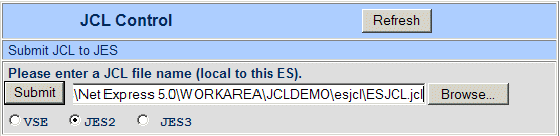
Figure 10-2: Submitting a JCL Batch Job
The Job Control page displays messages showing the job starting, as shown in Figure 10-3. The Console Daemon window displays messages showing the job running. If you defined a batch printer SEP, the output from the job is printed out.
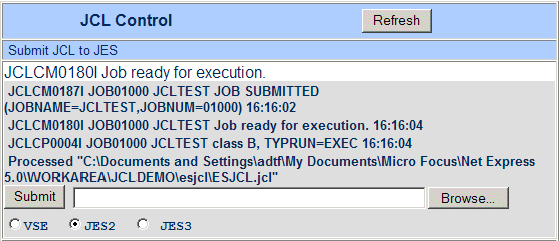
Figure 10-3: Running a JCL Batch Job
The spooler is another name for the job entry subsystem, JES. It maintains a number of spool queues, showing the status of jobs in the system. To see the spool queues:
The page that appears shows one of the spooler queues. There is a set of radio buttons to select which queue is displayed.

Figure 10-4: The Output Queue
This shows details of the job, as shown in Figure 10-5.
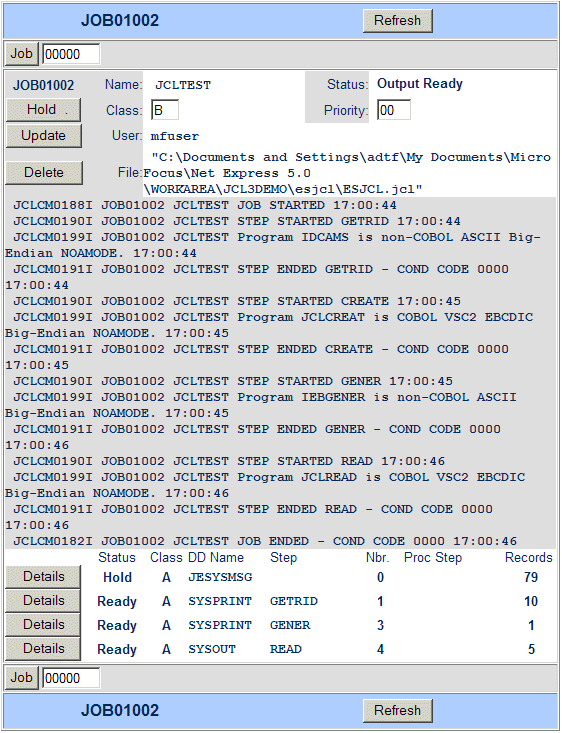
Figure 10-5: Job Output
The page shown in Figure 10-6 appears.
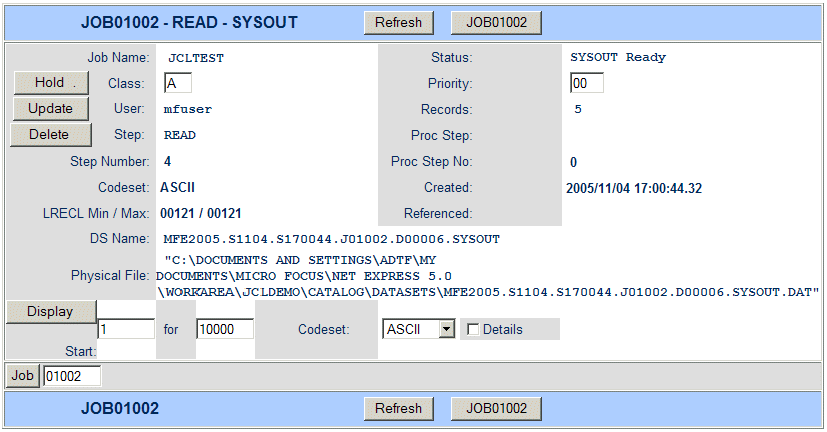
Figure 10-6: Details of the READ Step
The output from this step consists of a small number of simple records.
You can get back to the ESMAC pages by right-clicking in the window and clicking Back.
To see the catalog:
The page that appears shows the catalog, as shown in Figure 10-7. The file MFIJCL.OUTFILE.DATA that was created by the example job is there.
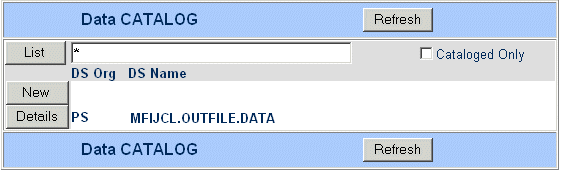
Figure 10-7: The Catalog
The page shown in Figure 10-8 appears.
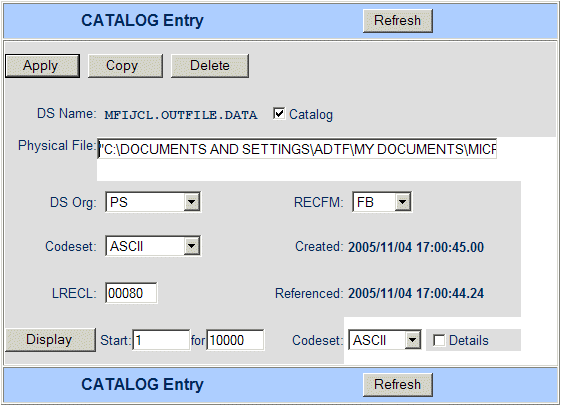
Figure 10-8: Catalog Entry
Because you are within the IDE, the IDE recognizes from the .dat extension of the physical filename that this is a data file, and opens the Data File Editor to display it. If you were using a separate Web browser, the file contents would simply be displayed as a page in the browser.
Initially the data appears invalid. As we said earlier, the project contains a DIALECT(ENTCOBOL) directive. One effect of this mainframe-dialect directive is to cause the application that we ran to output its data file in EBCDIC.
You can now see the data correctly.
If you were using a separate Web browser, you would use the Codeset field at the bottom right in Figure 10-8 to select EBCDIC before you clicked Display.
You can write a printer exit module to integrate MSS’s batch printing capability with existing print subsystems. For more information about what printer exit modules do, see the section Printer Exit Modules in the chapter JCL Support.
A sample printer exit is provided in install-dir\Examples\Net Express IDE\sampprnx\sampprnx.cbl. This printer exit simply takes each line of the data file created and calls the COBOL run-time system's print routines to print it. You can try it out by following these instructions, which assume that you have already worked through the preceding sections in this chapter:
A separate project has been supplied for the printer exit, because a printer exit module cannot be built with a mainframe dialect, and so this program could not be compiled with the DIALECT(ENTCOBOL) directive included in esjcl.app.
Do not include the extension.
Copyright © 2008 Micro Focus (IP) Ltd. All rights reserved.