This tutorial takes you through using the GUI application template to
create a simple Phonebook application.
This tutorial consists of a number of sessions, which you should work
through in order. You don't have to do all the sessions at one sitting. When
you want to stop, complete the session you are working on and close the
phonebook tutorial project to ensure all your changes are saved, ready for you
to resume from the next session. The sessions are as follows:
The Phonebook application displays a phonebook in a window on your
desktop. The phonebook is held in a COBOL line sequential file. Each record
consists of the following fields:
Second name
First name
ID
Department
Telephone number
The finished application will enable the end user to:
Open the master phonebook (filename detemined by an environment
variable, set before the application is run).
Open a user phonebook by specifying the filename.
Display all the records in the currently open phonebook.
Restrict the display of records by searching on any field.
Add, edit and delete records
Save changes to a phonebook. The end user is not allowed to save
changes to the master phonebook, so if this is open the end user must save the
changes to a different file.
You can run the completed application before you do the rest of the
tutorial. To do this:
Start the Net Express development environment.
Click File > Open, and open
Examples\Net Express IDE\Phone\phone.app.
Click Debug > Run.
The Phonebook application window appears.
Click File > Open > User phonebook
You can't use the Master phonebook option because that gets its
filename from an environment variable that won't be set. To see how this option
works, look at the readme.txt file included in the
project.
Select tel.lst from the Open file dialog, and
click OK.
The phonebook records are displayed in the Phonebook window. Try the
Edit, Add and Delete record functions (available from the Record menu or the
toolbar), and the Search function (on the File menu and the toolbar).
The phonebook application consists of eight COBOL classes. Rather than
taking you through every single class in detail, we will focus our attention on
three of them:
MainWindow class (tpltwin.cbl)
MainApplication class(tpltapp.cbl)
RecordDetailsDialog class (recrdbox.cbl)
As you work through the tutorial, you build up the MainWindow class by
adding to the default version supplied in the GUI application template. The
other classes are supplied fully coded, so although you will be looking at some
of the code, you will not be writing it. All the code you need to add to the
MainWindow class is included as part of this tutorial, so that you can copy and
paste it straight into your application.
The other classes used by the Phonebook are:
AboutBox class (tpltabt.cbl)
PBSearchDlg class (pbsrch.cbl)
TelRecord class (telrec.cbl)
TelBook class (telbook.cbl)
Query class (query.cbl)
The Phonebook also has one procedural COBOL program:
Trigger (tplttrig.cbl)
The trigger is part of the template, and is the program you run to
start the phone application. The phonebook trigger is exactly the same as the
GUI template trigger, and would not require any changes even if you were
building the application from scratch.
We've supplied a separate version of the Phonebook project for you to
edit. The files that are different between the tutorial version and the
fully-working version are:
tpltwin.cbl
tpltres.dlg
tpltmenu.mnu
mfres.h
mfres.cpy
Take a copy of these files from the tutorial project directory
(Examples\Net Express IDE\phonetut) before starting if you or someone
else wants to repeat this tutorial.
Then start the Net Express development environment and load the
phonebook tutorial project,
Examples\Net Express IDE\Phonetut\phonetut.app.
The GUI application template uses components and signals to separate the business logic of an
application from its user interface. Applications written using the template
are built around two main components, each of which is represented by a COBOL
class:
The MainWindow class is the interface component.
The MainApplication class is the business logic component
In this section of the tutorial you are going to define all the signals
that the MainWindow component can send. A signal can be any
null-terminated literal up to
thirty characters long. To make coding with signals easier, they are all
assigned to level-78 data items in copyfiles, and any code that uses the signal
refers to it by the level-78 dataname. If you mistype a dataname, you'll find
out when you compile the program, whereas if you type the literal for a signal
name in wrong, you won't find out till you run the program.
All the signals sent by the MainWindow component are assigned in
tpltwin.cpy, and all the signals sent by the
MainApplication component are assigned in tpltapp.cpy. The
copyfiles in the tutorial directory already have all the level-78s assigned for
you, otherwise you wouldn't be able to compile the fully-coded MainApplication
(tpltapp.cbl) without errors.
Signals are one-way; no data can be returned with a signal. Most of the
communication between the interface and business logic is in the form interface
request signal, followed by application fulfilment signal. For example, if the
interface sends a search signal, the results are returned by the business logic
sending a display-records signal.
To add the output signals definition code:
Locate the "definesignals" method of the Phone application MainWindow
class (tpltwin.cbl).
Copy the code below and paste it into the "defineSignals" method,
between the USER-CODE and END-USER comments.
define signal openmaster-signal
define signal saveas-signal
define signal search-signal
define signal sort-signal
define signal import-signal
define signal edit-signal
define signal add-signal
define signal delete-signal
Each signal is defined by the verb phrase DEFINE SIGNAL. This is a new
verb phrase, created using the vocabulary feature of Net Express. The GUI
template has an extensive vocabulary of new verb phrases to simplify code and
make it more readable. The statement:
define signal openmaster-signal
is equivalent to:
invoke self "defineOutSignal" using openmaster-signal
Each of the signals defined in the new piece of code you added above, is
assigned to a level-78 data item in tpltwin.cpy. This
copyfile is used by any program that wants to define responses to these
signals.
Each DEFINE SIGNAL makes the signal named available to this component.
If you don't define a signal you are going to use, attempting to send the
signal causes a run-time error. For more information see the Help topic
Defining
Signals
The menu is defined in the resource file,
tpltmenu.mnu. All the resources for applications based on
the GUI application template are included in tpltres.rc.
Click the button below for instructions and the new resource definition code,
and paste it into tpltmenu.rc as directed:
To define the new menu:
Double-click on tpltres.rc in the Project window
to start the Resource Manager.
Double-click on the Menu entry in the Resource Manager window.
Double-click on the filename tpltmenu.mnu.
This opens the menu file in a text editing window. This file is not
COBOL code, but Windows resource definition code. The start of the menu code is
indicated by the line:
ID_MENUBAR MENU
ID_MENUBAR is a symbol that enables you to identify the menu
resource from your program. MENU is a keyword that indicates that the following
set of lines define a menu resource. The menu definition is bracketed by BEGIN
and END keywords. Each submenu is also bracketed by BEGIN and END keywords
nested inside the menu BEGIN and END. Menu items are lines in the form:
MENUITEM "text" symbol
The text between the quotes is displayed as the menu item on the
window, and the symbol identifies the menu item so that you can access it from
your program.
Delete all the lines starting from the BEGIN immediately below the
line ID_MENUBAR MENU, to the matching END statement.
Copy the code below and paste it immediately below the line
ID_MENUBAR MENU.
BEGIN
   POPUP "&File"
   BEGIN
       POPUP "&Open"
       BEGIN
       MENUITEM "&Master phonebook",           ID_FILE_MASTER
       MENUITEM "&User phonebook...",          ID_FILE_OPEN
   END
       MENUITEM "&Import"                      ID_FILE_IMPORT
       MENUITEM "S&earch...",                  ID_FILE_SEARCH
       MENUITEM "&Save",                       ID_FILE_SAVE
       MENUITEM "S&ave as...",                 ID_FILE_SAVEAS
       MENUITEM SEPARATOR
       MENUITEM "S&ort"                        ID_FILE_SORT
       MENUITEM SEPARATOR
       MENUITEM "E&xit",                       ID_APP_EXIT
   END
   POPUP "&Record"
   BEGIN
       MENUITEM "Add record...",               ID_RECORD_ADD
       MENUITEM "Edit record...",              ID_RECORD_EDIT
       MENUITEM "Delete record...",            ID_RECORD_DELETE
   END
   POPUP "&Help"
   BEGIN
       MENUITEM "&Help",                       ID_HELP_HELP
       MENUITEM "&About",                      ID_HELP_ABOUT
   END
END
Save tpltmenu.mnu,and close the text window for
this file.
Click on the Resource Manager window (it has the titlebar
tpltres.rc) or click tpltres.rc on the Window
menu.
Each symbol used in a Windows resource must be given a numeric
value. It is actually the numeric values that refer to each resource. Each menu
item you added included a new identifying symbol that must be given a value.
The symbol values are defined in mfres.h, which is also converted to a COBOL
copyfile, mfres.cpy.
Click Symbol on the Resource menu (when the
Resource Manager window is active, this menu appears on the IDE menu bar).
This opens the Symbol Editor dialog box. You can see that it
contains a list of symbols and numeric values.
Click New.
Type ID_FILE_MASTER, the symbol for Open Master on
the File menu, into the Symbol field, and give it a value of 504. There is no
significance to symbol values, except that each symbol must have a unique
value. You must type ID_FILE_MASTER in upper case, because the Windows resource
compiler is case sensitive.
Click Accept.
If you were building this application from scratch, you would now
add all the new symbols used by the menu definition. To save you time, we've
added the other new symbols already, so click OK to dismiss
the dialog box.
Close the Resource Manager window, and click Yes
when asked whether or not you want to save changes to
tpltres.rc.
You've updated the Windows resource that determines the appearance of
the menubar. To make the menu items work, you have map each one to a method.
Later on in the tutorial, you'll add the new methods to the MainWindow class,
but for now you are simply saying which method gets invoked when a particular
menu item is clicked.
Menu items are mapped by the "defineMenuMap" method of the MainWindow
class. To ad menu mapping code:
Use the Browse window to go to the MainWindow class "defineMenuMap"
method.
The default code in the "defineMenuMap" method defines a menu item
that you have now removed from the menu: New on the File
menu. You must remove this from the mapping code, or you will get a run-time
error when trying to map it to a method.
Find and delete the statement::
map menuid ID-FILE-NEW at osResource to z"onEventNew"
Copy the code below and paste it into the "defineMenuMap" method of
the Phone application MainWindow class (tpltwin.cbl),
between the USER-CODE and END-USER comments.
map menuId ID-FILE-MASTER at osResource to z"onEventImport"
map menuId ID-FILE-SEARCH at osResource to z"onEventSearch"
map menuId ID-FILE-SAVEAS at osResource to z"onEventSaveAs"
map menuId ID-FILE-SORT at osResource to z"onEventSort"
map menuId ID-RECORD-ADD at osResource to z"onEventAdd"
map menuId ID-RECORD-EDIT at osResource to z"onEventEdit"
map menuId ID-RECORD-DELETE at osResource to z"onEventDelete"
The code in the "defineMenuMap method" uses a vocabulary defined verb
phrase, MAP MENUID. Each MAP MENUID statement connects a menu item to a method.
It also sets up menu hints and
tool tips if these have been defined.
These are also defined as Windows resources, in a stringtable.
To add the stringtable definitions:
Open the Phone application menu resource
(tpltmenu.mnu), as you did before.
Locate the line STRINGTABLE DISCARDABLE.
Delete the code between the BEGIN and END statements, then copy the
code below and paste it in between the BEGIN and END statements.
 ID_FILE_MASTER          "Open master phonebook\nOpen Master"
 ID_FILE_OPEN            "Open user phonebook\nOpen User"
 ID_FILE_SEARCH          "Find phonebook entries\nSearch"
 ID_FILE_SAVE            "Save the current phonebook\nSave"
 ID_FILE_SAVEAS          "Save using a different name or location\nSave As"
 ID_APP_EXIT             "Quit the phonebook application\nExit"
 ID_RECORD_ADD           "Add a new record\nAdd record"
 ID_RECORD_EDIT          "Edit a record\nEdit record"
 ID_RECORD_DELETE        "Delete a record\nDelete record"
 ID_HELP_HELP            "Display help topics\nHelp"
 ID_HELP_ABOUT           "Display product information\nAbout"
The symbol for each string has to match the symbol of the menu item
for which it is a hint. For example, the menu item Add Record on the Record
menu has symbol ID_RECORD_ADD. The matching string table entry is:
ID_RECORD_ADD "Add a new record\nAdd record"
Whenever the Add Record menu item is highlit on the Record menu, the
prompt "Add a new record " appears in the status bar. When we setup the toolbar
(later in this tutorial), you will see that if the mouse cursor is left over
the Add Record button for more than a moment, a small label prompts "Add
record" next to the button, in addition to the menu hint appearing in the
status bar.
Most Windows applications have a toolbar that provides the end user with shortcuts
to the most commonly used menu items. Once you have set up a menu, setting up a
toolbar is very easy with the GUI application template. You draw the push
buttons for the toolbar using a bitmap editor (by default Net Express uses the
Micro Focus Image Editor), compile the toolbar into the resources for your
application, and then map the buttons on the toolbar to menu items.
To define the phonebook toolbar.
Open the Resource Manager window.
Double-click on the Bitmap entry.
Double-click on ID_TPLTTOOL
This opens the default toolbar for the application template. Rather
than ask you to laboriously copy the toolbar bitmaps for the phonebook
application, we have supplied a suitable bitmap for you.
Close the Image Editor.
Right click on ID_TPLTTOOL, and click on
Properties from the context menu.
Change the contents of the Resource Filename to
pbtool.bmp.
Click OK on the Bitmap Properties dialog box.
Double-click on ID_TPLTTOOL to reopen the Image Editor.
As you move the mouse cursor over the bitmap at the top of the
window, you can see the position indicator change. The first position in the
bitmap is the top left-hand corner, and is numbered 0, 0. When you create the
buttons on the toolbar, the bitmap is divided into smaller bitmaps 16 pixels
wide. Each of these smaller bitmaps represents one button. The first bitmap
runs from 0, 0 to 15, 14. The second bitmap starts at x-position 16, the third
at 32, and so on.
Close the Resource Manager window.
You've now made the toolbar bitmaps available to your application,
but each push button has to be added explicitly to the toolbar, and mapped to a
menu item.
Use the Browse window to go to the "defineToolbarMap" method of the
MainWindow.
This contains default code that adds the first three sub-bitmaps in
the toolbar bitmap to the toolbar. You are going to replace it with new code
that creates six buttons on the toolbar, and maps them to the appropriate menu
items.
Delete the code between the USER-CODE and END-USER comments in the
"defineToolbarMap" method.
Copy the code below and paste it into the "defineToolbarMap" of the
Phone application MainWindow class (tpltwin.cbl), between
the USER-CODE and END-USER comments.
    map button 3 at osToolbar to menuId ID-FILE-SAVE
                                                at osResource
*----Add separator
     invoke osToolbar "addSeparator" returning lsTemp
*----Add Search File button to toolbar
     map button 1 at osToolbar to menuId ID-FILE-SEARCH
                                                at osResource
*----Add separator
     invoke osToolbar "addSeparator" returning lsTemp
*----Add button to toolbar
     map button 4 at osToolbar to menuId ID-RECORD-ADD
                                                at osResource
*----Add button to toolbar
     map button 5 at osToolbar to menuId ID-RECORD-EDIT
                                                at osResource
*----Add button to toolbar
     map button 6 at osToolbar to menuId ID-RECORD-DELETE
                                                at osResource
*----Add separator
     invoke osToolbar "addSeparator" returning lsTemp
*----Add button to toolbar
     map button 8 at osToolbar to menuId ID-HELP-HELP
                                                at osResource
Add the following declaration to the Local-Storage Section at the top
of this method:
01 lsTemp object reference.
Each statement is in the form:
map button n at osToolbar to menuId symbol
MAP BUTTON is another vocabulary defined verb phrase. It adds the
nth sub-bitmap on the bitmap as the next button on
the toolbar, and maps it to the menu item represented by
symbol.
The order of the MAP BUTTON statements determines the order the buttons
appear on the toolbar; the index n determines which
sub-bitmap is used for the image on the toolbar button.
You can see the effect of adding the toolbars and bitmaps by rebuilding
the application and running it. Don't click any of the new menu items or
toolbar buttons. Most of them are mapped to methods that you haven't yet added
to MainWindow, and clicking them will cause a "doesNotUnderstand" exception.
However, if you move the mouse cursor slowly over the toolbar buttons, you will
see the tool tips and menu hints. Click Exit on the
Phonebook File menu to close it when you have finished
looking at it.
In this section you are going to add the dialog boxes to the
application. The phonebook application uses three dialog boxes:
The About dialog box.
This is supplied as part of the GUI application template. You only
need to edit the appearance of this dialog box as all the code to control it is
built into the template.
The Record Details dialog box.
A dialog box for displaying a phone record, or for allowing you to
add one.
The Phonebook Search dialog box.
A dialog box for searching the phonebook.
You need to do the following for each dialog box:
Paint the dialog box.
Create a class for the dialog box, from the template dialog box class
provided.
Add code to the MainWindow to control the dialog box.
We will only look at the PhoneBook Search dialog box in detail, as the
tasks for adding any dialog box are similar.
First, paint the dialog box using the Dialog Editor, which you start
through the Resource Manager:
Double-click on tpltres.rc in the Project window
to start the Resource Manager.
Double-click on Dialogs in the Resource window.
Double-click on Dialog Group to start the Dialog Editor.
The Dialog Editor starts, and you are presented with a list of dialog
boxes to choose from.
These are the dialog boxes currently defined in the resource;
DLG_ABOUT is the About dialog box, and IDD_RECORD_DETAILS is the Record Details
dialog box.
Select IDD_RECORD_DETAILS.
You can see from the Symbol field at the top of the Dialog Editor
window that this dialog box has the symbol IDD_RECORD_DETAILS. You can see the
symbols assigned to the other controls by clicking on them with the mouse. Each
entry field and push button has a symbol assigned to it so that the code for
this dialog box can access them from the Windows resource.
Click New Dialog on the
Edit menu.
The dialog editor creates a new dialog box.
Type "Search" into the Caption field, and "IDD_SEARCH" into the
Dialog Symbol field, and push the Enter key.
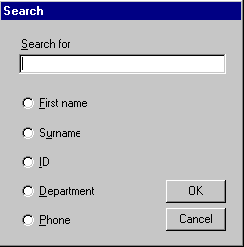
The finished dialog box should look like this:
To create it, drag the controls off the Dialog Editor's floating
toolbar onto your dialog box. If you aren't sure what a button on the floating
toolbar does, hold the mouse cursor over it to see a tool tip.
You can resize a control by clicking it with the mouse, then
dragging one of the small boxes on the selection rectangle that appears.
For each control, give it the symbol and caption indicated in the
table below. Alternatively, you can click on the picture of the dialog box
above to see what each control is, and what its symbol is.
Control
Caption
Symbol
Entry field
none
IDC_SEARCH_ENTRY
Radio button 1
&First name
IDC_RAD1_FORENAME
Radio button 2
S&urname
IDC_RAD1_SURNAME
Radio button 3
&ID
IDC_RAD1_ID
Radio button 4
&Department
IDC_RAD1_DEPT
Radio button 5
&Phone
IDC_RAD1_PHONE
Pushbutton 1
&OK
IDOK
Pushbutton 2
&Cancel
IDCANCEL
Text label
&Search for
none
When you add the text label for the Search field, go to the
Options menu and switch off Prefix
Controls. You don't need to give the text label a symbol, since you
won't be accessing it from the application.
When you have finished, click Exit from the File
menu, and OK any dialog boxes that ask you about saving
changes. Then close the Resource Window.
Having defined the appearance of the dialog box by painting a Windows
resource, you can now define its behavior by creating a COBOL class. This has
already been created for you, and named PBSearchDlg (filename
pbsrch.cbl). To see it, double-click on
pbsrch.cbl in the Project window. When you use the GUI
application template, you don't need to create these classes from scratch; you
copy the file tpltdbox.cbl to a new name and use that as a
starting point for writing your own dialog box.
Page down to the "create" method of PBSearchDlg. Code like this is
used to get object handles to each
of the controls on the dialog box:
move IDOK to lsResourceId
invoke self "getObjectFromId" using lsResourceId
                          returning lsPushbutton
The first part of the code in the "create" method fetches the object
handle for the OK button, then maps the clicked event to a
logical event, dialog-ok, on the dialog box. When the end user clicks the
OK button, the dialog box raises a dialog-OK event. When you
look at the MainWindow code that creates and displays the dialog box later in
this tutorial, you will see that the MainWindow maps the dialog-ok event to a
method.
This may seem a roundabout way of handling the clicked event. However,
it simplifies life for the programmer writing the dialog box code, and the
programmer writing the MainWindow code, even if they are the same person. When
you are writing the dialog box code, you don't need to think ahead to what
methods on another object should be invoked when a particular event occurs.
When you are writing the code in MainWindow, you don't need to know any
specifics about the controls of the dialog box; only that when the end user
clicks OK, the dialog box will raise the dialog-OK event.
For example, you might have a listbox inside your dialog box, and also map a
double-click on an entry in the list to dialog-ok; you can do this without
needing to change code anywhere else.
Similarly, Cancel is mapped to the dialog-cancel
event. You can extend this principle to other dialog box events, by defining
new logical events (for example, dialog-apply). By convention, dialog events
are assigned to level-78 datanames in tpltdial.cpy. Each
level-78 dataname is given a unique numeric ID.
Next you are going to add the code that displays the search dialog box
when the end user clicks Search on the
File menu. This menu item has been mapped to a method called
"onEventSearch". You can confirm this by looking at the code in MainWindow
method "defineMenuyMap", and checking that it contains the statement:
map menuId ID-FILE-SORT at osResource to z"onEventSort"
ID-FILE-SORT is the symbol that identifies Search
on the File menu in the menu resource file
tpltmenu.mnu.
To add the code for method "onEventSearch":
Copy the code below and paste it into Phone application MainWindow
class (tpltwin.cbl), immediately before the END-OBJECT
code (near the end of the program).
*>------------------------------------------------------
*> Window event method.
*> Invoked by selecting File, search.
*>------------------------------------------------------
 method-id. "onEventSearch".
 local-storage section.
 01 lsId                 pic x(4) comp-5.
 01 lsDialog             object reference.
 procedure division.
*----Instantiate the dialog box object from Windows resource
     move IDD-SEARCH to lsId
     invoke PBSearchDlg "fromResource" using self osResource lsId
                                     returning lsDialog
*----Map the dialog OK and cancel events to methods
     map event dialog-ok upon lsDialog
                    to method z"onDialogSearchOk" upon self
     map event dialog-cancel upon lsDialog
                    to method z"onDialogCancel" upon self
*----Display the dialog
     invoke lsDialog "create"
     invoke lsDialog "show"
     exit method.
 end method "onEventSearch".
The PBSearchDlg class used in this method hasn't yet been declared
in the Class-Control paragraph.
Go to the top of the MainWindow class, and find the Class-Control
paragraph. Between the USER-CODE and END-USER comments at the bottom of this
paragraph, add the following declaration:
PBSearchDlg is class "pbsrch"
You must enter the filename (the part of the declaration in
quotes) in lower case.
The comments in the "onEventSearch" method code show the three tasks
it performs:
Instantiating the dialog box.
The "fromResource" message creates a new
instance of the PBSearchDlg class;
this will be the new dialog box.
Mapping the dialog box logical events to methods, using the
vocabulary defined MAP EVENT verb phrase.
The dialog-ok event is mapped to "onDialogSearchOk" and the
dialog-cancel event is mapped to "onDialogCancel".
Displaying the dialog box.
The "onDialogCancel" method is already included in the MainWindow
class, and destroys the dialog box for you. For most dialog boxes, this is
sufficient. But in some applications the MainWindow needs to record some state
information when it displays particular dialog boxes. In this case, you need
either to write a special cancel method for these dialog boxes, which resets
the state information if the dialog box is canceled, or to extend the
"onDialogCancel" method.
You need to add the "onDialogSearchOK" method to MainWindow, so it can
handle the event when the end user pushes the OK button on the dialog box.
To add the "onDialogSearchOk" method, copy the code below and paste it
into Phone application MainWindow class (tpltwin.cbl),
immediately before the END-OBJECT code (near the end of the program).
*>------------------------------------------------------
*> Window event method.
*> Invoked by selecting OK on the Search dialog box.
*>------------------------------------------------------
 method-id. "onDialogSearchOk".
 local-storage section.
 01 lsDialog                 object reference.
 01 lsDataBlock              object reference.
 01 lsSearchText             object reference.
 01 lsSearchType             object reference.
 01 lsType                   pic x.
 01 i                        pic x(4) comp-x.
 linkage section.
 01 lnkEvent                 object reference.
 procedure division using lnkEvent.
*----Get the handle for the dialog box that raised the event
     invoke lnkEvent "getObject" returning lsDialog
*----Get the data input into the dialog box
     invoke lsDialog "getSearchText" returning lsSearchText
     invoke lsDialog "getSearchType" returning lsSearchType
*----Put the data into a symbol table
     invoke SymbolTable "new" returning lsDataBlock
     put value lsSearchType into table lsDataBlock
                              at symbol searchtype-key
     put value lsSearchText into table lsDataBlock
                              at symbol searchstring-key
     invoke wsEventManager "setSystemBusy"
*----Send a search signal
     signal search-signal lsDataBlock
*----Finalize the symbol table and its contents.
     invoke lsDataBlock "deepFinalize" returning lsDataBlock
     exit method.
 end method "onDialogSearchOk".
The "onDialogSearchOK" method does the following:
Retrieves the object handle for the dialog box that started the
search. Whenever a method is invoked by an event, an event object is passed
through as a parameter. You can interrogate the event object to get more
information about the event, including the object that raised the event.
Retrieves the data input into the dialog box. All the selections
that the end user made are held inside the dialog box controls. The PBSearchDlg
class includes methods that enable the MainWindow to access this data.
Puts the data into a SymbolTable. The SymbolTable enables you to
pass any number of parameters with a signal. The receiver of the signal fetches
each parameter it needs by giving the symbol the parameter is stored against.
Neither the sender or receiver of the signal needs to consider the number or
order of the parameters sent.
Sends the signal.
Finalizes the SymbolTable and its contents. Objects should always
be destroyed when they are no longer needed, to prevent
memory leaks.
Because the Search dialog box is modeless, it is left open at the end of the
method. If it was modal, you
would send it the messages "hide" and "finalize" at the end of the method, to
remove it from the desktop and destroy it.
You can see these methods working if you now rebuild and run the
application. Click on Search on the Phonebook
File menu to display the new dialog box. Enter some
information, and click the OK button. Nothing happens
because we haven't yet put in code to handle the result of the search. Click
the Cancel button to dismiss the dialog box. Click
Exit on the Phonebook File menu to close
the application.
The client area of a window
is the main information area of most applications. There are several ways of
putting information into the client area:
A list box or multiple line entry (MLE) field
A tree view
A subpane
A subpane offers the greatest flexibility; you write your own subclass
of subpane, and override the "paint" method. You can then display text and/or
graphics in the client area, with complete control over positioning, size,
color and font. However, for a simple data processing application like the
Phonebook, the effort involved in coding a subpane is not justified.
The Phonebook client area displays a list of records, each of which fits
onto a single line. For an application like this, a list box provides all the
functionality needed, at much lower cost.
The client area for your application is set up in the "defineClientArea"
method of MainWindow. Locate the "defineClientArea" method in MainWindow.
Currently it contains a single statement:
invoke Subpane "new" using lnkParent returning lnkSpace
You are going to replace this with the code that defines the client area
as a list box. To add the "defineClientArea" method.
Copy the code below and paste it into the "defineClientPane" method
of the Phone application MainWindow class (tpltwin.cbl),
between the METHOD-ID header, and the Linkage Section.
working-storage section.
* This data declared in working-storage because it is static
* declarations. Normally data for methods is declared in
* local storage.
copy "listflag.cpy".
01 tabs.
  03 filler                 pic x(4) comp-5 value 160.
  03 filler                 pic x(4) comp-5 value 260.
  03 filler                 pic x(4) comp-5 value 360.
  03 filler                 pic x(4) comp-5 value 420.
  03 filler                 pic x(4) comp-5 value 600.
01 filler               redefines tabs.
  03 tab-stop               pic x(4) comp-5 occurs 5.
local-storage section.
01 tab-stops                object reference.
01 i                        pic x(4) comp-5.
Delete the statement "invoke Subpane new...", then copy the code
below and paste it into the Procedure Division of the "defineClientPane" method
of the Phone application MainWindow class (tpltwin.cbl).
     invoke SingleSelectionListbox "new" using lnkParent
                                         returning lnkSpace
     set osList to lnkSpace
*----Set appearance. By default, listboxes adjust their height to
*----to be an integral number of text lines. This would prevent
*----the listbox from fitting the window client area exactly -
*----the noAdjust message switches this behavior off.
     invoke osList "noAdjust"
     invoke osList "yellow"
*----Set tab stops
     invoke osList "addFlags" using by value lbf-use-tabstops
     move 5 to i
     invoke Array "ofValues" using cobolcomp5 i
         returning tab-stops
     perform varying i from 1 by 1 until i > 5
         invoke tab-stops "atPut" using i tab-stop(i)
     end-perform
     invoke osList "setTabStops" using tab-stops
     invoke tab-stops "finalize" returning tab-stops
*----Set listbox events
     map event p2ce-accept upon osList
         to method z"onEventEdit" upon self
     map event p2ce-select upon osList
         to method z"onEventRecordSelect" upon self
Go to the Class-Control paragraph, and add these declarations:
Array is class "array"
SingleSelectionListBox is class "slistbox"
This method also stores the object handle for the client area object
in object storage. The Object-Storage Section is used to declare data available
to all the methods in this object. Locate the Object-Storage Section (it's a
little way down from the Class-Control paragraph), and add the following
declaration:
01 osList object reference.
This code does the following:
Creates a single selection list box.
There are two types of list box, single selection and multiple
selection. A single selection list box enables the end user to select a single
list box entry at a time, and is represented by the class
SingleSelectionListBox.
Sets the appearance of the list box, giving it a yellow background,
and ensuring that it always fits exactly into the client area of the window.
Sets up tab stops on the list box .
To set five tab stops, the code creates an Array with five elements,
and sets the values into the Array, then uses the array as the parameter in a
"setTabStops" method. The tab-stop settings are given in pixels. If you want to
learn more about using collection objects, like Array, see the chapter
Collections, Intrinsics and
Dictionaries Tutorial.
Maps list box events to methods.
If the end user selects a record in the list box,
"onEventRecordSelect" method is invoked. This enables the Phonebook application
edit and delete functions, which are normally disabled, as you can't delete or
edit a record without selecting one first. If the end user double-clicks on a
record in the list box, the "onEventEdit" method is invoked, which displays the
Edit record dialog box. You need to declare another two classes for this
method, Array and SingleSelectionListBox.
If you rebuild and run the application now, the client area of the
MainWindow is filled by a list box with a yellow background. When you resize
the window (by dragging the window borders), the list box resizes automatically
to fit. The resizing of the client area is handled for you by code in SDIFrame,
which is the superclass of
MainWindow.
In this section, you are going to add the code that enables the end user
to open and save phonebook files. The table below shows the items provided on
the File menu, and the methods they are mapped to.
Item
Method
Description
Open master
"onEventOpenMaster"
Send the openmaster-signal
Open user
"onEventOpen"
Display the Windows File Open dialog, extract the
filename and path, and sends a fileopen-signal. The MainWindow class includes a
default "onEventOpen" method.
Import
"onEventImport"
Display the Windows File Open dialog, extract the
filename and path, and sends a fileimport-signal.
Save
"onEventSave"
Send the filesave-signal. The MainWindow class includes
a default "onEventSave" method.
Save as
"onEventSaveAs"
Display the Windows File Open dialog, extract the
filename and path, and sends a filesaveas-signal.
We don't need to make any changes to the "onEventSave" method supplied,
even though we won't allow the end user to save when no phonebook is open, or
when the master phonebook is open. Instead of adding code to "onEventSave" to
check whether or not a save is allowed, we can add code elsewhere that disables
the Save menu item, and only enables it when a file other than the master
phonebook is successfully opened.
The "onEventOpen" method supplied already does most of what we want;
however, we want to restrict the files displayed in the File Open dialog boxes
to those with extension *.lst. We want the File Save
dialog boxes to do the same, so we will put all the code to set the file
filters on a file dialog box into a method called "setFileFilter", and invoke
this every time we want to set the file filter.
Copy the code below and paste it into Phone application MainWindow
class (tpltwin.cbl), immediately before the END-OBJECT
code (near the end of the program).
*>----------------------------------------------------------------
*> Set the file filter on an FileSave or FileOpen dialog box to
*> display Phonebook files (extension .lst).
*>----------------------------------------------------------------
 method-id. "setFileFilter".
 local-storage section.
 01 lsString                 object reference.
 01 lsString2                object reference.
 linkage section.
 01 lnkFileDialog            object reference.
 procedure division using lnkFileDialog.
     invoke CharacterArray "withValue"
                          using z"Phonebooks (*.lst)"
                          returning lsString
     invoke CharacterArray "withValue" using z"*.lst"
                          returning lsString2
     invoke lnkFileDialog "addFilter" using lsString lsString2
     invoke lsString "finalize" returning lsSTring
     invoke lsString2 "finalize" returning lsSTring2
     exit method.
 end method "setFileFilter".
Find the "onEventOpen" method in the MainWindow class, and enter
the statement below, immediately before the statement that displays the File
Open dialog (invoke lsOpenDialog "show"):
invoke self "setFileFilter" using lsOpenDialog
This method takes a File Open or File Save dialog box as a parameter,
and sends it the "addFilter" message. The first parameter provides a
description for the Files of type field in the dialog box; the second parameter
is a filter that restricts the dialog box to displaying files of type
.lst.
Both parameters are CharacterArrays, which are finalized at
the end of the method. The FileDialog class takes its own copies of the data
you passed it, so you have to destroy these objects to avoid a memory leak. All
Base Class Library objects take copies of the objects you pass in as
parameters, with the exception of the Collection classes.
Copy the code below and paste it into Phone application MainWindow
class (tpltwin.cbl), immediately before the END-OBJECT
code (near the end of the program).
 method-id. "onEventImport".
 local-storage section.
 01 lsDataBlock              object reference.
 01 lsOpenDialog             object reference.
 01 lsString                 object reference.
 01 lsMessage                object reference.
 procedure division.
*----Display File Open dialog.
     invoke OpenDialog "new" using self
                         returning lsOpenDialog
     invoke self "setFileFilter" using lsOpenDialog
     invoke lsOpenDialog "setTitleZ" using z"Import phonebook"
     invoke lsOpenDialog "show"
*----Retrieve information from dialog
     invoke lsOpenDialog "getFile" returning lsString
     if lsString <> null
         invoke SymbolTable "new" returning lsDataBlock
         put value lsString into table lsDataBlock
                             at symbol filepath-key
         invoke lsOpenDialog "getFileTitle" returning lsString
         put value lsString table lsDataBlock symbol filename-key
*--------Finalize the File Open dialog.
         invoke lsOpenDialog "finalize" returning lsOpenDialog
         invoke self "update"
*--------Send open signal.
         invoke wsEventManager "setSystemBusy"
         signal import-signal lsDataBlock
*--------Clean up.
         invoke lsDataBlock "deepFinalize" returning lsDataBlock
     end-if
     exit method.
 end method "onEventImport".
This method is similar to "onEventOpen", but it sends a different
signal, and sets a different title on the File Open dialog box.
To get the code for "onEventOpenMaster" copy the code below and paste
it into Phone application MainWindow class (tpltwin.cbl),
immediately before the END-OBJECT code (near the end of the program).
*>------------------------------------------------------
*> Window event method.
*> Invoked by selecting File, Open master.
*>------------------------------------------------------
 method-id. "onEventOpenMaster".
 local-storage section.
 01 lsDataBlock              object reference.
 procedure division.
     invoke SymbolTable "new" returning lsDataBlock
     invoke wsEventManager "setSystemBusy"
     signal openmaster-signal lsDataBlock
     invoke lsDataBlock "deepFinalize" returning lsDataBlock
     exit method.
 end method "onEventOpenMaster".
This method is much simpler than the methods for opening and importing
files. It is the responsibility of the receiver of this signal to determine the
filename of the master file, so this method just sends an openmaster-signal.
None of the methods we've added so far handle any of the incoming
data. They just send signals. The component that receives these signals sends
the result back via other signals that indicate success or failure, or send a
set of records to display.
Copy the code below and paste it into Phone application MainWindow
class (tpltwin.cbl), immediately before the END-OBJECT
code (near the end of the program).
*>------------------------------------------------------
*> Window event method.
*> Invoked by selecting File, save as. Raises
*> signal saveas-signal.
*>------------------------------------------------------
 method-id. "onEventSaveAs".
 local-storage section.
 01 lsDataBlock              object reference.
 01 lsSaveDialog             object reference.
 01 lsString                 object reference.
 01 lsMessage                object reference.
 procedure division.
*----Display File Save As dialog.
     invoke SaveDialog "new" using self
                         returning lsSaveDialog
     invoke self "setFileFilter" using lsSaveDialog
     invoke lsSaveDialog "show"
*----Retrieve information from dialog
     invoke lsSaveDialog "getFile" returning lsString
     if lsString <> null
         invoke SymbolTable "new" returning lsDataBlock
         put value lsString into table lsDataBlock
                             at symbol filepath-key
         invoke lsSaveDialog "getFileTitle" returning lsString
         put value lsString table lsDataBlock symbol filename-key
*--------Finalize the File Save As dialog.
         invoke lsSaveDialog "finalize" returning lsSaveDialog
         invoke self "update"
         invoke wsEventManager "setSystemBusy"
         if lsDataBlock <> null
*--------Send save as signal.
         signal saveas-signal lsDataBlock
---------Clean up.
         invoke lsDataBlock "deepFinalize" returning lsDataBlock
     else
         invoke lsSaveDialog "finalize" returning lsSaveDialog
     end-if
     exit method.
 end method "onEventSaveAs".
This method uses a new class, SaveDialog. Add the following
declaration to the MainWindow Class-Control paragraph:
SaveDialog is class "savedlg"
This method:
Displays a native File Save dialog box
Puts the file and path information into a symbol table
Sends a save-as signal.
You've now added all the interface code for opening and saving files.
In this section you are going to add the code that enables the end user
to add, edit and delete records. The table below shows the items provided on
the Record menu, and the methods they are mapped to.
Item
Method
Description
Add
"onEventAdd"
Display the RecordDetails dialog box. Map the dialog-OK
event to "onDialogAddOk", and the dialog-cancel method to "onDialogCancel".
Edit
"onEventEdit"
Display the RecordDetails dialog, and set it to the
contents of the currently selected record. Map the dialog-OK event to
"onDialogEditOk", and the dialog-cancel method to "onDialogCancel".
Delete
"onEventDelete"
Display a confirmation message box. If the end user
clicks OK, delete the currently selected record.
Copy the code below and paste it into Phone application MainWindow
class (tpltwin.cbl), immediately before the END-OBJECT
code (near the end of the program).
*>----------------------------------------------------------------
*> Window Event method, invoked by selecting Record, add.
*> Displays dialog to add a new record.
*>----------------------------------------------------------------
 method-id. "onEventAdd".
 working-storage section.
 01 wsBlanks.
   03 filler                  pic x(79) value spaces.
   03 filler                  pic x(1) value x"00".
 local-storage section.
 01 lsString                 object reference.
 01 lsRecord                 object reference.
 01 lsDataBlock              object reference.
 01 lsDialog                 object reference.
 01 lsId                     pic x(4) comp-5.
 procedure division.
*----Get the value of the record selected in the list box
     invoke osList "selectedString" returning lsString
     if lsString = null
*--------No record selected, so create a string with all spaces
         invoke CharacterArray "withValue" using wsBlanks
                                       returning lsString
     end-if
*----Create a TelRecord from the value in the selected string
     invoke TelRecord "withAll" using lsString
                        returning lsRecord
*----Record the value of the selected record in instance data.
*----The selected record is used by the application component
*----to position the new record.
     set osCurrentRecord to lsRecord
     invoke lsString "finalize" returning lsString
*----Create a Record Details dialog box.
     move IDD-RECORD-DETAILS to lsId
     invoke RecordDetailsDialog "fromResource"
                          using self osResource lsId
                          returning lsDialog
*----Map the OK and Cancel events.
     map event dialog-ok upon lsDialog
                 to method z"onDialogAddOk" upon self
     map event dialog-cancel upon lsDialog
                 to method z"onDialogCancel" upon self
*----display
     invoke lsDialog "show"
     exit method.
 end method "onEventAdd".
Go to the Class-Control paragraph, and add these declarations:
TelRecord is class "telrec"
RecordDetailsDialog is class "recrdbox"
You also need to declare a new item of instance data, to hold the
value of the currently selected record. Locate the MainWindow Object-Storage
Section, and add the following declaration:
01 osCurrentRecord object reference.
The "onEventAdd" method:
Fetches the record currently selected in the client area list box,
and stores this as the currently selected record (in osCurrentRecord).
Displays a Record Details dialog box with the fields left blank.
Maps the dialog-ok event to method "onEventAddOk" and the
dialog-cancel event to method "onDialogCancel". The "onEventAddOk" method is
invoked when the end user clicks OK on the dialog box, and sends the signal to
add a new record
To get the code for the "onDialogAddOK" method, the code below and it
into Phone application MainWindow class (tpltwin.cbl),
immediately before the END-OBJECT code (near the end of the program).
*>----------------------------------------------------------------
*> Window Event method, invoked by when the OK button is pushed
*> on the Add record dialog. Adds a new record.
*>----------------------------------------------------------------
 method-id. "onDialogAddOK".
 local-storage section.
 01 lsDialog                 object reference.
 01 lsString                 object reference.
 01 lsDataBlock              object reference.
 linkage section.
 01 lnkEvent                 object reference.
 procedure division using lnkEvent.
     invoke lnkEvent "getObject" returning lsDialog
     invoke lsDialog "hide"
     invoke SymbolTable "new" returning lsDataBlock
     invoke lsDialog "getFields" returning lsString
     put value lsString into table lsDataBlock
                     at symbol record-key
     put value osCurrentRecord into table lsDataBlock
                     at symbol position-key
     invoke lsDialog "finalize" returning lsDialog
     signal add-signal lsDataBlock
     invoke lsDataBlock "deepFinalize" returning lsDataBlock
     set osCurrentRecord to null
     exit method.
 end method "onDialogAddOK".
The "onDialogAddOK" method:
Gets an object handle for the dialog box from the event object
passed to the method.
Gets the contents of the dialog box.
Puts the contents of the dialog box and osCurrentRecord into a
SymbolTable, and sends an add signal.
Deep finalizes the SymbolTable to prevent a memory leak. This also
has the effect of finalizing the object stored in osCurrentRecord. Otherwise,
the next time "onEventAdd" or "onEventEdit" are invoked, a new object handle is
stored in osCurrentRecord, and the object handle already in there is lost.
Although the application no longer has any access to this object through its
object handle, the object itself still exists.
Sets the value of osCurrentRecord to null. The "deepFinalize" has
destroyed the object referred to by osCurrentRecord, but the object handle is
still in osCurrentRecord. Setting the value to null enables other code to test
whether or not osCurrentRecord is pointing to an object or not, by comparing
its contents to null.
The MainWindow must also finalize osCurrentRecord whenever the Add or
Edit dialog box is canceled. Both these dialogs are destroyed by
"onDialogCancel", so you need to add some extra code. To do this:
Locate the "onDialogCancel" method in the MainWindow class.
Add the following code immediately before the EXIT METHOD
statement:
if osCurrentRecord <> null
        invoke osCurrentRecord "finalize"
                                returning osCurrentRecord
    end-if
The new section of code you have just added tests to see whether
osCurrentRecord contains null; if it doesn't, then there is an object that
should be finalized. The "finalize" method returns null as a parameter, which
is put into osCurrentRecord.
To get the code for the "onEventEdit" method copy the code below and
paste it into Phone application MainWindow class
(tpltwin.cbl), immediately before the END-OBJECT code
(near the end of the program).
*>----------------------------------------------------------------
*> Window Event method, invoked by selecting Record, edit.
*> Displays dialog to edit a new record.
*>----------------------------------------------------------------
 method-id. "onEventEdit".
 local-storage section.
 01 lsString                 object reference.
 01 lsMessageBox             object reference.
 01 lsRecord                 object reference.
 01 lsDialog                 object reference.
 01 lsId                     pic x(4) comp-5.
 procedure division.
*----Fetch the currently selected record, and create a telephone
*----record
     invoke osList "selectedString" returning lsString
     invoke TelRecord "withAll" using lsString
                                returning lsRecord
*----Store the currently selected record in instance data
     set osCurrentRecord to lsRecord
     invoke lsString "finalize" returning lsString
*----Create a record details dialog box
     move IDD-RECORD-DETAILS to lsId
     invoke RecordDetailsDialog "fromResource"
                                using self osResource lsId
                                returning lsDialog
*----Map the dialog boxes to methods
     map event dialog-ok upon lsDialog
                 to method z"onDialogEditOk" upon self
     map event dialog-cancel upon lsDialog
                 to method z"onDialogCancel" upon self
*----Send the dialog box the "create" method - this sets up the
*----object handles for the entry fields on the dialog box.
     invoke lsDialog "create"
*----Set the data on the dialog box, and display it.
     invoke lsDialog "setFields" using lsRecord
     invoke lsDialog "show"
     exit method.
 end method "onEventEdit".
This code displays a Record Details dialog box, and sets its fields to
the contents of the currently selected record. It also maps the dialog-ok event
to method "onEventEditOk" and the dialog-cancel event to method
"onDialogCancel".
To get the code for the "onDialogEditOk" method, copy the code below
and paste it into Phone application MainWindow class
(tpltwin.cbl), immediately before the END-OBJECT code
(near the end of the program).
*>----------------------------------------------------------------
*> Window Event method, invoked by when the OK button is pushed
*> on the Edit record dialog. Amends the record.
*>----------------------------------------------------------------
 method-id. "onDialogEditOK".
 local-storage section.
 01 lsDialog                 object reference.
 01 lsString                 object reference.
 01 lsDataBlock              object reference.
 linkage section.
 01 lnkEvent                 object reference.
 procedure division using lnkEvent.
     invoke lnkEvent "getObject" returning lsDialog
     invoke lsDialog "hide"
     invoke SymbolTable "new" returning lsDataBlock
     invoke lsDialog "getFields" returning lsString
     put value lsString into table lsDataBlock
                         at symbol record-key
     put value osCurrentRecord into table lsDataBlock
                         at symbol position-key
     invoke lsDialog "finalize" returning lsDialog
     signal edit-signal lsDataBlock
     invoke lsDataBlock "deepFinalize" returning lsDataBlock
     set osCurrentRecord to null
     exit method.
 end method "onDialogEditOK".
This method retrieves the contents of the dialog box, and puts it into
a SymbolTable, and sends it with a recordEdit-signal. Like "onDialogAddOk", it
finalizes the SymbolTable, and sets osCurrentRecord to null when the object is
finished with.
To get the code for the "onEventDelete" method, and paste it into the
MainWindow class:
Copy the code below and paste it into Phone application MainWindow
class (tpltwin.cbl), immediately before the END-OBJECT
code (near the end of the program).
*>----------------------------------------------------------------
*> Window event method. Invoked by selecting Record, delete.
*> Deletes a record.
*>----------------------------------------------------------------
 method-id. "onEventDelete".
 local-storage section.
 01 lsString                 object reference.
 01 lsMessageBox             object reference.
 01 lsRecord                 object reference.
 01 lsDialog                 object reference.
 01 lsDataBlock              object reference.
 01 lsId                     pic x(4) comp-5.
 procedure division.
     invoke osList "selectedString" returning lsString
     invoke MessageBox "new" using self returning lsMessageBox
     invoke lsMessageBox "setTitleZ" using wsWindowTitle
*----Display confirmation message box.
     invoke lsMessageBox "okcancel"
     invoke lsMessageBox "setMessageZ"
                                 using wsMsgDeleteRecord
     invoke lsMessageBox "show" returning lsId
     invoke lsMessageBox "finalize" returning lsMessageBox
     if lsId = mb-return-ok
         invoke SymbolTable "new" returning lsDataBlock
*--------Create a telephone record from the value of the currently
*--------selected record.
         invoke TelRecord "withAll" using lsString
                                returning lsRecord
         invoke lsString "finalize" returning lsString
*--------Store it in a symbol table
         put value lsRecord into table lsDataBlock
                             at symbol record-key
         invoke wsEventManager "setSystemBusy"
*--------Send the delete signal.
         signal delete-signal lsDataBlock
         invoke lsDataBlock "deepFinalize"
                         returning lsDataBlock
     end-if
     exit method.
 end method "onEventDelete".
This method prompts the user to confirm deletion with a message
box. You need to add the message text to the MainWindow Working-Storage
Section. Locate the MainWindow Working-Storage Section (near the top of the
program, beneath the Class-Control paragraph.
Add the following 03-level declaration to wsMessages:
03 wsMsgDeleteRecord     pic x(27)
              value z"OK to delete this record?".
The "onEventDelete" method:
Displays a message box, and sends it the "okCancel" method. This
creates it with OK and Cancel buttons
(the default for message boxes is to have an OK button only.
Tests the return value from the message box to see if the OK button
was clicked.
Message boxes are simpler to handle than dialog boxes. They return
a parameter on the "show" message that tells you which button the end user
clicked. This is easier than mapping events to methods, and coding different
methods to handle different events. Message boxes have this simple interface
because they are restricted, allowing you to set a message, and choose one of a
small number of predetermined button styles (for example "ok" and "okcancel").
Puts the currently selected record into a SymbolTable and sends a
delete-signal.
The currently selected record is the one highlighted in the list box
in the client area. If no record is currently selected, we want to disable the
edit and delete functions. We do this by writing a method
"disableEditFunctions", and invoking it from the "initialize" method. We will
also invoke it whenever a new set of records are displayed in the list box, as
this removes the selection highlight.
To get the code for the "disableEditFunctions" method, and paste it
into the MainWindow class, copy the code below and paste it into Phone
application MainWindow class (tpltwin.cbl), immediately
before the END-OBJECT code (near the end of the program).
*>----------------------------------------------------------------
*> Disable the Edit and Delete record functions. Invoked whenever
*> no record is selected in the list box.
*>----------------------------------------------------------------
 method-id. "disableEditFunctions".
 local-storage section.
 01 lsItem               object reference.
 01 lsId                 pic x(4) comp-5.
 procedure division.
     move ID-RECORD-EDIT to lsId
     invoke self "getObjectFromId" using lsId returning lsItem
     invoke lsItem "disable"
     move ID-RECORD-DELETE to lsId
     invoke self "getObjectFromId" using lsId returning lsItem
     invoke lsItem "disable"
     exit method.
 end method "disableEditFunctions".
This method uses the "getObjectFromId" method to fetch the
Edit and Delete menu items (represented
by symbols ID-RECORD-EDIT and ID-RECORD-DELETE), and sends them the "disable"
message. Sending a menu item "disable" grays it out, so that the end user can't
select it. If there is an associated toolbar button, this is disabled as well.
Back when we added the code to define the list box, we mapped the
event raised whenever a user selects a record to the method
"onEventRecordSelect". This method enables these functions.
To get the code for the "onEventRecordSelect" method and paste it into
the MainWindow class, copy the code below and paste it into Phone application
MainWindow class (tpltwin.cbl), immediately before the
END-OBJECT code (near the end of the program).
*>------------------------------------------------------
*> Window event method.
*> Invoked by selecting a record in the list box.
*> Enables the Edit and Delete functions.
*>------------------------------------------------------
 method-id. "onEventRecordSelect".
 01 lsId                     pic x(4) comp-5.
 01 lsItem                   object reference.
 procedure division.
     move ID-RECORD-EDIT to lsId
     invoke self "getObjectFromId" using lsId returning lsItem
     invoke lsItem "enable"
     move ID-RECORD-DELETE to lsId
     invoke self "getObjectFromId" using lsId returning lsItem
     invoke lsItem "enable"
     exit method.
 end method "onEventRecordSelect".
This method enables the Edit and
Delete menu items, and works in a similar way to
"disableEditFunctions".
Finally, the Add function is disabled until a phonebook has been
opened. We will add this code to to the "initialize" method, together with a
statement to invoke "disableEditFunctions".
To get the additional code for the "initialize" method, and paste it
in to the MainWindow "initialize" method, immediately before the EXIT METHOD
statement:
Copy the code below and paste it into Phone application MainWindow
class (tpltwin.cbl), between the USER and END-USER
comments in the "Initialize" method.
*----Disable menu functions that are not initially available
     invoke self "disableEditFunctions"
     move ID-FILE-SAVE to lsId
     invoke self "getObjectFromId" using lsId
                                   returning lsItem
     invoke lsItem "disable"
     move ID-RECORD-ADD to lsId
     invoke self "getObjectFromId" using lsId
                                   returning lsItem
     invoke lsItem "disable"
This new code uses two data items that are not yet declared, lsId
and lsItem. You need to add a Local-Storage Section to the "initialize" method.
Enter the following code to the "initialize" method, immediately above the
Linkage-Section at the top of the method:
The only user interface function we haven't added yet is the Sort
function. Sort on the File menu is mapped
to the "onEventSort" method.
To get the code for the "onEventSort" method, and paste it into the
MainWindow class, copy the code below and paste it into Phone application
MainWindow class (tpltwin.cbl), immediately before the
END-OBJECT code (near the end of the program).
*>------------------------------------------------------
*> Window event method.
*> Invoked by selecting File, sort.
*>------------------------------------------------------
 method-id. "onEventSort".
 procedure division.
     invoke wsEventManager "setSystemBusy"
     signal sort-signal
     exit method.
 end method "onEventSort".
This method sends the sort signal. The receiver of the signal is
responsible for carrying out the sort and signalling back the sorted data.
We are now going to map the input signals for this component to code
that will handle those signals. This is done by the "defineInputSockets" method
of MainWindow. Locate this using the Browse window, then copy the code below
and paste it into the "defineInputSockets" method of the Phone application
MainWindow class (tpltwin.cbl), between the USER-CODE and
END-USER comments.
    map signal searchfailed-signal from mainApplicationSocket
                            to method z"onSignalSearchFailed"
    map signal displaydata-signal from mainApplicationSocket
                            to method z"onSignalDisplayData"
    map signal saved-signal from mainApplicationSocket
                            to method z"onSignalFileOpen"
    map signal savefailed-signal from mainApplicationSocket
                            to method z"onSignalSaveFailed"
This is another piece of code that uses a vocabulary defined verb
phrase, MAP SIGNAL. The statement:
map signal displaydata-signal from mainApplicationSocket
                        to method z"onSignalDisplayData"
is equivalent to:
invoke self "defineInSignal" using mainApplicationSocket
                             displaydata-signal z"onSignalDisplayData"
Each MAP SIGNAL statement says which method should be invoked when a
particular signal is received. The mainApplicationSocket parameter indicates
the socket on which the signal appears; a component can define more than one
socket to receive input signals. The MainWindow class in this application only
uses the mainApplicationSocket. You can see this declared at the top of this
method by the statement:
declare socket mainApplicationSocket
This is another vocabulary defined verb.
The table below lists the input signals and the methods they are
mapped to.
Signal
Method
Description
fileOpen-signal
"onSignalFileOpen"
Changes the Window titlebar to include the name of the file, and
enables or disables the Save menu item according to whether
a user phonebook or the master phonebook was opened. Default method is included
in template, but does not contain any functionality.
fileOpenFailed-signal
"onSignalOpenFailed"
Display a message box saying the open was unsuccessful. Default
method included in template.
searchFailed-signal
"onSignalSearchFailed"
Display message box saying no matches were found.
displayData-signal
"onSignalDisplayData"
Display all the records sent with the signal in the client area
list box.
saved-signal
"onSignalFileOpen"
Changes the Window titlebar to include the name of the file (if
this signal has been sent because of a Save As, the filename
will have changed)..
savefailed-signal
"onSignalSaveFailed
Display a message box saying the save was unsuccessful.
We now need to add code for all the above methods, except
"onSignalOpenFailed", since the default method included in the template has all
the functionality needed.
This is a good moment to change the title for the window from "Window"
to "Phonebook". Go to the Working-Storage Section of the MainWindow class, and
locate the declaration for wsTitle. Change it to:
To get the code for the "onSignalFileOpen" method:
Locate the "onSignalFileOpen" method in the MainWindow class, and
delete it.
Copy the code below and paste it into Phone application MainWindow
class (tpltwin.cbl), immediately before the END-OBJECT
code (near the end of the program).
*>----------------------------------------------------------------
*> Window signal method, invoked whenever the application
*> successfully opens a file.
*>----------------------------------------------------------------
 method-id. "onSignalFileOpen".
 local-storage section.
 01 lsFilename               object reference.
 01 lsStatus                 object reference.
 01 lsWindowTitle            pic x(100).
 01 lsString                 pic x(100).
 01 lsId                     pic x(4) comp-5.
 01 lsLength                 pic x(4) comp-5.
 01 lsMenuItem               object reference.
 linkage section.
 01 lnkDataBlock             object reference.
 procedure division using lnkDataBlock.
*----USER-CODE. Add code to handle a successful file open.
*----Update the window title
     fetch value lsFilename from table lnkDataBlock
                           at symbol filepath-key
     move length of lsString to lsLength
     invoke lsFilename "getValueWithSize" using lsLength
                                          returning lsString
     move wsWindowTitle to lsWindowTitle
     move " - " to lsWindowTitle(10:)
     move lsString to lsWindowTitle(13:)
     perform varying lsLength from length of lsWindowTitle
             by -1 until lsWindowTitle(lsLength:1) not = space
             or lsLength = 1
     end-perform
     add 1 to lsLength
     move x"00" to lsWindowTitle(lsLength:1)
     invoke self "setTitleZ" using lsWindowTitle
*----Find out whether to gray the Save menu item.
     fetch value lsStatus from table lnkDataBlock
                           at symbol status-key
     move spaces to lsString
     invoke lsStatus "getValueZ" returning lsString
     move ID-FILE-SAVE to lsId
     invoke self "GetObjectFromId" using lsId
                                   returning lsMenuItem
     if lsString <> StatusUpdate
         invoke lsMenuItem "disable"
     else
         invoke lsMenuItem "enable"
     end-if
     move ID-RECORD-ADD to lsId
     invoke self "GetObjectFromId" using lsId
                                   returning lsMenuItem
     invoke lsMenuItem "enable"
*----END-USER.
     exit method.
 end method "onSignalFileOpen".
This method does two things:
It updates the window title with the name of the file opened.
It disables the Save menu item if this file
cannot be updated, and enables it if the file can be updated.
The data sent with the signal, lnkDataBlock, is a SymbolTable.
If you look at the method more closely, you can see that it
interrogates object lnkDataBlock for the data sent with the signal, using the
vocabulary defined verb phrase FETCH VALUE.
The statement:
fetch value lsFilename from table lnkDataBlock
                      at symbol filepath-key
returns the object stored against filepath-key into lsFilename. By
convention, the objects stored in SymbolTables are either
CharacterArrays, or
OrderedCollections. In this
case, it is a CharacterArray. Having retrieved the CharacterArray containing
the filename, its value is read into a buffer, and used to create a new title
for the window. The new title is set by the MainWindow sending itself the
message "setTitleZ".
invoke self "setTitleZ" using lsWindowTitle
The next section of code fetches the CharacterArray stored at symbol
status-key, and compares its value to StatusUpdate (a 78-level dataname).
According to the result, it either enables or disables the
Save menu item.
Method "onSignalFileOpen" doesn't actually display any data though;
that is the responsibility of the method invoked by the displayData-signal,
"onSignalDisplayData".
To get the code for the "onSignalDisplayData" method:
Copy the code below and Paste it into Phone application MainWindow
class (tpltwin.cbl), immediately before the END-OBJECT
code (near the end of the program).
*>------------------------------------------------------
*> Window signal method.
*> This method is invoked whenever the application has an
*> updated list of records for display.
*>------------------------------------------------------
 method-id. "onSignalDisplayData".
 local-storage section.
 01 lsCollection             object reference.
 01 lsStatus                 pic x(9).
 01 lsId                     pic x(4) comp-5.
 01 lsItem                   object reference.
 linkage section.
 01 lnkDataBlock             object reference.
 procedure division using lnkDataBlock.
*----Populate listbox with collection data
     fetch value lsCollection from table lnkDataBlock
                           at symbol collectionref-key
     invoke osList "setContents" using lsCollection
*----Following a "setContents", no record is selected, so the
*----Edit and Delete record functions must be disabled.
     invoke self "disableEditFunctions"
*----END-USER.
     exit method.
 end method "onSignalDisplayData".
This method is very simple, with only three statements. The first
statement retrieves the data to display from the SymbolTable sent with the
signal:
fetch value lsCollection from table lnkDataBlock
                           at symbol collectionref-key
This time, the data sent over is an OrderedCollection, containing
CharacterArrays. Each CharacterArray is the data for a single phonebook record.
The next statement displays this data in the client area of the
Phonebook window:
invoke osList "setContents" using lsCollection
The client area is a list box, which you can set to display the
contents of a collection with the message "setContents".
The last statement in the method invokes the method
"disableEditFunctions", which we added to the MainWindow class earlier in this
tutorial. This disables the Edit and
Delete functions on the Record menu -
when you send "setContents" to the list box, any previously highlit selection
is deselected.
At this point, you can rebuild and run the Phonebook application, and
it has most of its functions. You can open a phonebook, and add, delete and
edit records. You can also search, but you won't get notified if there are no
matches. You also won't get notified if the application is unable to save a
file. Click Exit on the Phonebook File
menu before completing this tutorial
The notification for a search failed is the responsibility of the
"onSignalSearchFailed" method. To get the code for the "onSignalSearchFailed"
methods:
Copy the code below and paste it into Phone application MainWindow
class (tpltwin.cbl), immediately before the END-OBJECT
code (near the end of the program).
*>------------------------------------------------------
*> Window signal method.
*> This method is invoked whenever the window gets sent
*> the Searchfailed signal, indicating that a component has
*> attempted to find a search string and failed.
*>------------------------------------------------------
 method-id. "onSignalSearchFailed".
 local-storage section.
 01 lsMsgBox                 object reference.
 linkage section.
 01 lnkDataBlock             object reference.
 procedure division using lnkDataBlock.
     invoke MessageBox "new" using self returning lsMsgBox
     invoke lsMsgBox "setTitleZ" using wsWindowtitle
     invoke lsMsgBox "setMessageZ" using wsMsgSearchFailed
     invoke lsMsgBox "show"
     invoke lsMsgBox "finalize" returning lsMsgBox
     exit method.
 end method "onSignalSearchFailed".
Locate the MainWindow Working-Storage section and add the following
declaration for the text displayed inside the message box:
03 wsMsgSearchFailed     pic x(17)
                                   value z"No matches found".
This method doesn't make any use of data passed back with the signal.
It simply creates a MessageBox and displays it to the end user.
To get the code for the "onSignalSaveFailed" method:
Copy the code below and paste it into Phone application MainWindow
class (tpltwin.cbl), immediately before the END-OBJECT
code (near the end of the program).
*>------------------------------------------------------
*> Window signal method.
*> This method is invoked whenever the window gets sent
*> the savefailed signal, indicating that a component has
*> attempted to save a file, and failed.
*>------------------------------------------------------
 method-id. "onSignalSaveFailed".
 local-storage section.
 01 lsString                 object reference.
 01 lsMsgBox                 object reference.
 01 lsLength                 pic x(4) comp-5.
 01 lsSize                   pic x(4) comp-5.
 01 lsBuffer                 pic x(300).
 linkage section.
 01 lnkDataBlock             object reference.
 procedure division using lnkDataBlock.
*----USER-CODE. Add code to handle an unsuccessful file save.
*----The default code displays a message box.
     move spaces to lsBuffer
     move wsMsgSaveFailed to lsBuffer
     move length of wsMsgSaveFailed to lsLength
     add 2 to lsLength
     fetch value lsString from table lnkDataBlock
                           at symbol filename-key
     if lsString <> null
         compute lsSize = length of lsBuffer - lsLength
         invoke lsString "getValueWithSize"
                 using lsSize
                 returning lsBuffer(lsLength:)
         invoke lsString "size" returning lsSize
         add lsSize to lsLength
         if lsLength > length of lsBuffer
            move length of lsBuffer to lslength
         end-if
         move low-value to lsBuffer(lsLength:1)
         add 1 to lsLength
         move x"00" to lsBuffer(lsLength:1)
     end-if
     invoke MessageBox "new" using self returning lsMsgBox
     invoke lsMsgBox "setMessageZ" using lsBuffer
     invoke lsMsgBox "show"
     invoke lsMsgBox "finalize" returning lsMsgBox
*----END-USER.
     exit method.
 end method "onSignalSaveFailed".
Locate the MainWindow Working-Storage section and add the following
declaration for the text displayed inside the message box:
03 wsMsgSaveFailed       pic x(20)
                         value z"Could not save file".
This method is similar to the "onSignalSearchFailed" method, but it
does get the name of the file from a SymbolTable, and uses it as part of the
text displayed in the MessageBox.
Rebuild the phonebook project and rerun it. You have now completed the
phonebook tutorial. If you want to explore it in more detail, try setting
breakpoints on the "onSignal..." methods in the MainApplication class
(tpltapp.cbl). Then you can see at what points in
execution the MainWindow sends signals, and step through the code to see how
the requests represented by each signal are handled, and how the results are
signalled back.