

| Data File Editor | Directory Facility | |
The Data File Editor is a tool for editing all the Micro Focus supported file types, in either ASCII or EBCDIC character sets, and either unformatted or formatted against the file structure as contained in a COBOL copyfile.
This tutorial demonstrates some of the main features of this editor. At the end of this tutorial you should be able to:
The tutorial uses the following files, provided in the directory $COBDIR/demo/dfed:
You should copy these files to a working directory, and set execute permissions on them. Set your default directory to the one containing these files before beginning the tutorial.
Note: The Tutorials use sample programs and files that are copied to your system during installation.
Start the Server Express Integrated Development Environment, select the Alternate menu, and select F4=data-file-editor to start the Data File Editor.
This tutorial is based around the creation of records for an indexed personnel file for a small business. The types of record in the file are executive records, manager records, and employee records.
To start, load a file containing four records.
Select the Data File Editor's Alternate menu, and press F3=load-file to load the data file. The Load menu appears, as shown in Figure 5-1.
![]()
Figure 5-1: The Data File Editor Load Menu
Type in the filename of the tutorial file:
dfeddemo.dat
Press Enter. The file is now loaded.
The records cannot be viewed formatted against a structure until you define a structure. To do so, you must load the structures as defined in dfeddemo.cbl.
Select the Alternate menu, and press F8=structure-selector to enter
the Structure Selector to define the records. The Structure Selector first
screen appears, as shown in
Figure 5-2.

Figure 5-2: The Load IDY File Menu
This screen prompts you for the name of an .idy file, which must have been created using the Compiler from Micro Focus COBOL Version 3 or later. Type:
dfeddemo
You do not need to type in the .idy extension. It is added automatically.
Press Enter. The .idy file is loaded, and the Loaded Structure screen containing the declarations in the program dfeddemo.cbl appears, as shown in Figure 5-3.
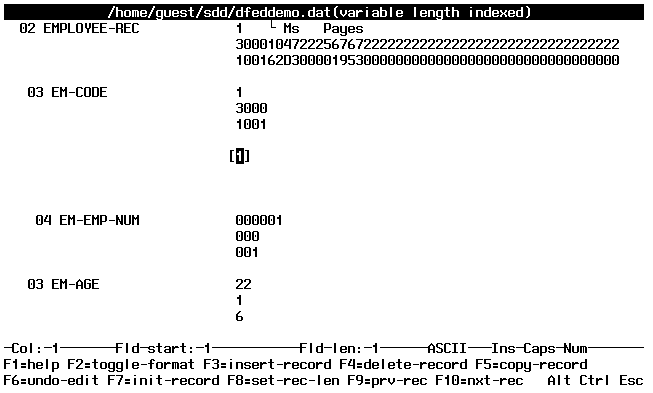
Figure 5-3: The Loaded Structure Screen
The dfeddemo.cbl program contains the record structures you wish to use.
Move the highlight to the executive-rec field. We define this
as a conditional record.
Press F7=accept-conditional-structure to do this.
The executive-rec structure has now been cut from the main
body of definition and is displayed alone. A condition must now be defined to
state when this record structure should be used.
In this file all employees have a employee code consisting of an employee position and an employee number. The format for position is:
| E | = | executive personnel | |
| M | = | manager personnel | |
| 1 | = | grade 1 employee | |
| 2 | = | grade 2 employee | |
| 3 | = | grade 3 employee |
As the record currently displayed is the executive-rec, all
records in the file that this relates to have "E" in the ex-position
field.
Move your cursor to the ex-position field and press Enter.
A box appears to prompt you to enter the value to be used in this field for the
condition. In this case, you use the value "E" as the condition for
executive record.
Type in:
E
Press Enter. The box is now hidden so that you can make further field selections. It is possible to define other conditions, but you have defined all those required at this point, and you commit this structure.
Press F7=accept-structure to do so. The original program definitions are redisplayed, and EXECUTIVE-REC appears in the structure list.
You now need to repeat this process for the manager record, which is manager-rec,
found further down the data structure.
Move your cursor to manager-rec. Press F7=accept-conditional-structure.
Move your cursor to mn-position.
Press Enter and type in:
M
Press Enter, then press F7=accept-structure to commit the structure.
You have now defined the two conditional structures. All other records we expect to find in the personnel file should be employee records.
Three grades of employee records are in the file. You can define employee-rec
three times by placing a different value in emp-position each
time.
A way to define the record more quickly is to define it as a default structure, which is the structure used when all other structure conditions do not match.
To define emplyee-rec as a default structure, move your cursor
to employee-rec.
Press F6=accept-default-structure. EMPLOYEE-REC appears in the structure list with an asterisk preceding it and the word "Default" after it. This structure is now defined as default.
Press F5=structure-box to make a hard copy of the details of these structures applicable to the personnel file available. The structure List menu appears.
Press F2=list-structures-to-file and type in:
dfeddemo
Press Enter. The file dfeddemo.lst, which holds details of the structures you have just defined, is created.
Press F5=exit-structure-box to leave the structure functions menu.
You want, of course, to save the structure file so that you do not need to define it each time you load the file.
Select the Alternate menu, then press F4=save-str-file to save the structure file and type in:
dfeddemo
Press Enter to create the file dfeddemo.str. The structure file has the same name as the data file whenever the data file dfeddemo is loaded.
The structures have now been defined. Press Escape to leave Structure Selector.
Press F2=toggle-format. The first record is displayed as formatted against its record structure, as shown in Figure 5-4.

Figure 5-4: Formatted Display of a Record
Use the F9=prv-rec and F10=next-rec keys to scroll backward and forward in the file. Each record is automatically formatted.
Press F3=insert-record to insert a record in your .str file. The word "Spaces" and a list of possible record structures to insert appear. In this case, another executive has been appointed, and we add a record for that individual.
Move the selection bar to EXECUTIVE-REC and press Space.
A new executive-rec is now shown with an "E" in the
ex-position field to define this record as an executive-rec.
To make this record the prime key, type:
000003
in the ex-emp-num field.
Press F10=file-info in the Alternate menu to display the file information so that you can check which areas of the record map to the key. Press Escape to remove the file information from the display.
Now try to enter some details for the new executive.
Press F2=toggle=hex in the Alternate menu to enter details in hexadecimal; press F2 in the Alternate menu to return to normal editing.
Press F10=next-rec to write the record and to move to the next record.
The personnel file needs to be updated, because Darren A. Hayes has been dismissed and replaced with Derek G. Jameson.
To update the file, find the record for Darren A. Hayes, which is to be deleted.
Move your cursor to the ex-surname field and select F2=search
from the Ctrl menu to bring up the Search menu. Because the ex-surname
field is not a key field for this file, you need to search for the record on a
string search.
Press F4=search to select search. The window shown in Figure 5-5 is displayed.

Figure 5-5: The Search Window
Type in the employee's surname to identify the key you want:
Hayes
Press F2=toggle-search-direction until "Backward Search" is displayed on the information line, then press Enter. The search is case sensitive, so you must enter the surname exactly as shown above. You want to search backward, because Hayes is an employee, and employee records occur before executive records, where we are now.
The record for Darren A. Hayes is highlighted.
Press F4=delete-record to delete the record.
Insert an employee-rec record for Derek G. Jameson and fill in
the details.
To alter a record key, press F10=file-info in the Alternate menu to display the file information. The file information window is shown in Figure 5-6.

Figure 5-6: The Configuration Screen
The arrow points to the key currently being used. Use your cursor to highlight the key that you wish to use.
Press F2=change-read-key to alter the read order on the file.
You are returned from the File Information window. If you are displaying the file in unformatted mode, you can see the highlighted part of the file change when you change the key.
You can create the dfeddemo file from within the Data File Editor.
Press F5=new-file in the Alternate menu. Type in the filename
yourdemo and press Enter. This displays the File Creation
screen, shown in Figure 5-7, and places your cursor on the file organization
field.
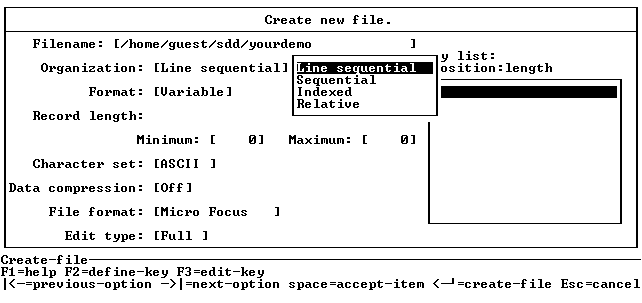
Figure 5-7: File Creation Screen
Move the selection bar to Indexed, and press Space. Press Tab until the cursor is in the Minimum field.
Type in 348 in the Minimum field, and press Tab.
Type in 628 in the Maximum field, and press Tab.
This information defines the file as an indexed file.
Once an indexed file is created, you must define its keys.
Press F2=define-key. The Key Definition screen, shown in Figure 5-8, appears. This enables you to type in a key definition string that conforms to the record type.
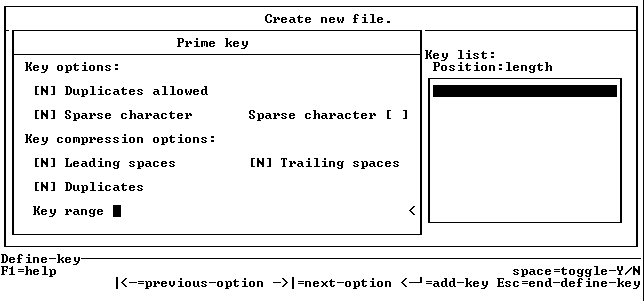
Figure 5-8: The Key Definition Screen
The format of the key definition is:
key-component-start-position:key-component-length
For a key starting at byte 1 and 2 bytes long, this would be 1:2.
For split keys you can repeat the parameters, using a comma to separate them. For example, in a split key with two components, when the first starts at byte 1 and is 2 bytes long and the second starts at byte 4 and is 3 bytes long, this would be 1:2,4:3.
Press Tab to move between the options, and press Space to toggle between Y and N to set the various settings available on the key.
The dfeddemo file consists of three keys, and one of them is split. These keys are:
Prime key 1:1, 2:3
First alternate key 5:1
Second alternate key    6:1
Type in:
1:1,2:3
in the Key Range field, and press Enter.
For the second and third keys, change the Duplicates Allowed option to Y. Use Tab to move your cursor and press Space when the arrow points to the Duplicated Allowed field.
Once you define a key, press Enter to add the key. The name of the current key is displayed at the top of the window.
Press Escape to return to the File Creation screen when you enter the final key.
Press Enter to create the file. An empty file of the same type just edited is displayed.
Copyright © 2000 MERANT International Limited. All rights reserved.
This document and the proprietary marks and names
used herein are protected by international law.
| Data File Editor | Directory Facility | |