

 | Using Dialog System | Panels |  |
The first step when you develop your Dialog System application is to define the Data Block for your screenset. The Data Block contains all the fields to be displayed in an application or to be entered on the various panels that make up a screenset, and is passed as a parameter from your application program. So, to place a field on a panel in the screenset, you must first define that field in the Data Block.
This chapter describes:
To access the data definition function, press F2=data-definition from the Main menu. When you select the data definition function, a further menu providing options for data field definition or error message definition is displayed (see Figure 4-1).

Figure 4-1: Data Definition Menu
You can designate one data field as the error message field ; this is the field in which error messages appear if validation errors are found at run time. You can specify this field at any stage when you are developing your dialog; you do not have to specify it at the same time as you define your Data Block.
Press F2=data-fields from the Data Definition menu to select this option, and the menu shown in Figure 4-2 is displayed with a popup list of fields above it. When you access this function for the first time for a new screenset, the list of fields is empty. When you access this function and there are some fields already defined, you can scroll up and down the list, and insert, change, or delete fields in this list, using the appropriate function keys shown in the Data Field Definition menu. The maximum number of data fields in a screenset is 512.
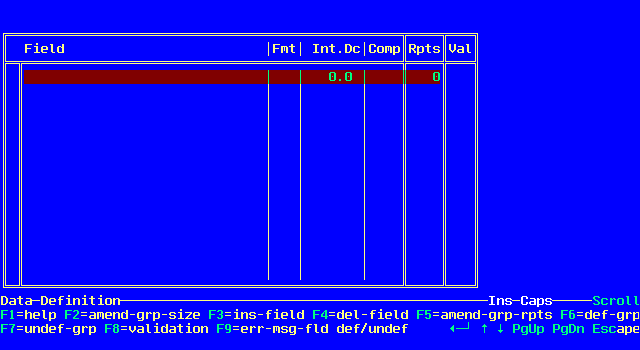
Figure 4-2: Data Field Definition Menu
You use the data field list to define the fields that are used for data entry in your application. Also, you can arrange selected fields that repeat, for example an address field, into groups.
The following data details can be entered on this list:
When you access the Data Field Definition function, the cursor appears on the first line of the list of data fields. For a new screenset, you can simply type in the appropriate data, using Tab to move from the Field column to the Fmt column. The cursor automatically skips from the Fmt column to the Comp column. The Rpts column is displayed, but you cannot access it. To access this column, you use the Define Group function described later in this chapter. When you have finished entering the details for a data field, press Enter to move down to the next line and repeat the process to specify the details for another data field. There is a maximum of 512 data fields per screenset.
To change an existing data field, overtype the entries for that field. You cannot change certain field attributes if that data field is already being used on a panel, or if validation rules have been assigned to it. If you try to change an attribute and cannot, check that the data field is deleted from all panels and that the validation rules have been deleted.
Once you have defined fields for a screenset, you can scroll to the desired field and use the facilities on the Data Fields Definition menu described in the following section. When you have finished defining your data fields and any validations desired, press the Escape key to return to the Data Definition menu.
Pressing F2=amend-group-size from the Data Fields Definition menu displays a submenu (see Figure 4-3) where you can alter the number of data fields that are contained in a previously defined group (details on defining data groups are provided later in this chapter). The submenu also offers the standard help facility.

Figure 4-3: Amend Group Size Menu
You can expand or contract the group. First select the appropriate mode by pressing F2=expand/contract group to toggle between expand and contract. To expand the group, press <down-arrow> for the required number of lines; to contract the group, press <up-arrow> to move the cursor to the desired entry. The "[" expands and contracts to encompass those fields contained in the group. Press Enter to complete the process. To abandon any changes made so far, press the Escape key.
Pressing F3=ins-field from the Data Fields Definition menu enables you to insert a new field at the current selection bar position. If the selection bar is currently in a group, the new field is also included in that group.
To insert a new field at the end of a group, insert a normal non-group item outside the group and then extend the group using the Amend Group Size function.
Pressing F4=del-field from the Data Fields Definition menu deletes the field at the selection bar's current position. You cannot delete a field if the field is in use in any of the panels or in the dialog (unless you have turned on the auto-comment feature; see the chapter Panel Painting for details).
Pressing F5=amend-grp-rpts from the Data Fields Definition menu displays the menu shown in Figure 4-4, which enables you to change the number of repeats of a previously defined group.

Figure 4-4: Amend Group Repeats Menu
You can always increase the number of repeats in a group, up to a maximum of 999. However, if a group is being used in a panel, you can only decrease the number of repeats to the number defined when the group was added to the panel. If the group is not in use in any of the panels, you can decrease the number of repeats to any number.
To change the number of repeats in a group, from the Data Field Definition menu, position the cursor on any field in that group and press F5. At the prompt, enter the number of repeats you want.
Pressing F6=def-grp from the Data Fields Definition menu displays the same menu as shown in Figure 4-4, which enables you to define selected fields as repeating groups once a number of fields have been entered. You are prompted to enter the number of repetitions, up to a maximum of 999, for the items in the highlighted group.
Once you have specified the number of repetitions, you can include extra fields in the group by pressing <up-arrow> or <down-arrow> to highlight the desired fields. When you have finished defining your group, press Enter to execute the changes. To abandon any changes made so far, press the Escape key.
Pressing F7=undef-grp from the Data Fields Definition menu enables you to delete a group definition, making any fields in this group non-group items again. However, you cannot undefine a group if the selected group has been used in any panels.
Pressing F8=validation from the Data Fields Definition menu displays the Validation menu , an example of which is shown in Figure 4-5. This menu enables you to enter validation details against the current field.
To define data validation, there are four stages:
The functions displayed on this menu vary depending on the current field type; the menu enables you to define only details appropriate to validate that field type. For example, if the current field is a single-digit field, the menu does not show the date validation key, because a date cannot be defined in a single-digit field.
The validations that are currently active for the chosen field are displayed on the status line. When you have defined validation against a particular field, the letter "V" appears in the Val column.
The validations you specify are applied at run time whenever that field is used for input. That means that the validation is performed when the cursor enters a field and a subsequent attempt is made to move the cursor out of the field. To validate all input fields on a panel at run time, whether or not the cursor has entered a field, there are two methods:
At run time, certain validation checks are activated automatically upon data entry because of either the data definition format or the screen format. For example:
These automatic validations do not result in any error messages. If you require error message handling, you must specifically define validation using the facilities provided in this menu.
Pressing F2=delete-all-validations from the Validation menu enables you to delete all validations associated with the current field.
This function is useful when you want to change the format of a field, because you cannot change the format of fields that are validated. This feature of the data definition facility ensures that the validations specified remain appropriate to the field. For example, if you assign validations to an alphanumeric field, then later want to change that field to a numeric field, the defined validations would not make sense. Therefore, you must delete all of the validation details before the format of a field can be changed.
Pressing F3=range/table from the Validation menu enables you to enter the upper and lower values for multiple ranges for numeric, alphabetic, and alphanumeric fields, and a table of entries for all field types. You can enter these values and entries in any order.
You can specify range validation for date fields of all formats except DDMMMYY. When you enter a date value in the range table, you must enter it in the order year, month, day regardless of the actual date format of the field. For example, to define range validation for a date field defined as DDMMYY and verify that the user enters a date between 10 01 91 (10 Jan 1991) and 06 04 93 (6 Apr 1993), you need the following values in the range table:
910110
930406
When you choose the F3=range/table option, the screen shown in Figure 4-6 is displayed. You set any validation ranges for a field and add any table entries for a field using the appropriate functions from the menu, as described in the following section. By default, you enter validation values in the left-hand column of the table and they are treated as table values, unless you enter a value in the right-hand column, when the pair of values are treated as upper and lower values of a range. You can list a maximum of 30 range/table validations for each field.
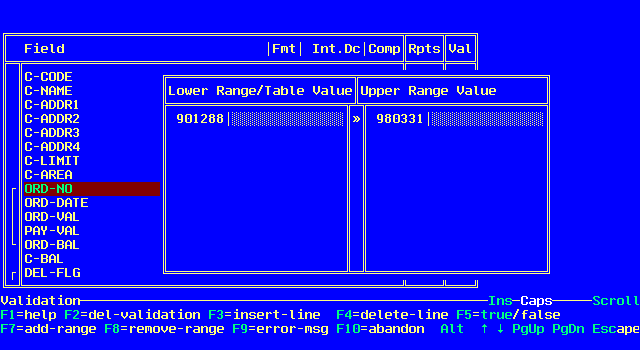
Figure 4-6: Range/Table Validation Menu
Pressing F2=del-validation from the Range/Table Validation menu deletes all the range/table validations for the current field.
Pressing F3=insert-line from the Range/Table Validation menu inserts a blank line at the selection bar's current position.
Pressing F4=delete-line from the Range/Table Validation menu deletes the line at the selection bar's current position.
Pressing F5=true/false from the Range/Table Validation menu enables you to choose whether the entry in a field is validated for being within the defined ranges, including the upper and lower values, or being one of the table entries (true), or for not being within the ranges or not being one of the table entries (false).
True
Pressing F6=hexadecimal-input from the Range/Table Validation menu enables you to enter the range and table values in hexadecimal form. This option applies only to alphanumeric fields.
Pressing F7=add-range from the Range/Table Validation menu moves the cursor into the right-hand column to enter an upper range value.
Pressing F8=remove-range from the Range/Table Validation menu deletes the right-hand upper range value and returns the cursor to the left-hand column of the table.
Pressing F9=error-msg from the Range/Table Validation menu enables you to assign an error message number to the range/table validation. If the error message file has been defined for this screenset and is present in the current disk directory, you can select from the list of currently defined error messages. You can also use a number that is not in the list and define the error message later if required. To do this, enter the error message number you want at the following prompt:
Enter error number [000] then Enter
If you specify error number 000 for a validation, no error message is displayed, but the system beeps.
At run time, if any range or table validation error occurs on a field where you have assigned an error message, the appropriate error message is placed into the field defined as the error field, and the error message number is placed in the control block. If the error field is present on the current panel, the error message is displayed. When the error is corrected, the message field is automatically cleared and the error number in the control block is changed to zero.
There is a further facility, the ERR key code, to specify in your dialog that an error procedure is performed, for example a procedure to display an error panel. If you use this ERR key code, the functions defined with the ERR are performed whenever a validation error occurs (see the chapter Dialog for further details of this facility).
Pressing F10=abandon from the Range/Table Validation menu cancels the definition or range/table validations and returns to the Validation menu.
Pressing Alt from the Range/Table Validation menu invokes the Range/Table Validation Alternate menu, shown in Figure 4-7.
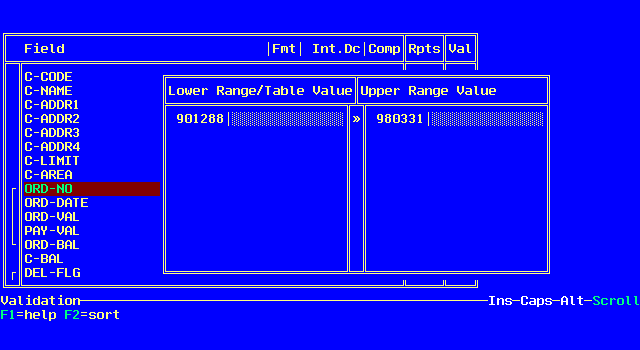
Figure 4-7: Range/Table Validation Alt Menu
This menu provides the standard Help facility and a Sort facility. The list is sorted automatically when you exit from range/table validation, but this option enables you to sort the range/table validations into ascending sequence before you exit. It also tidies up and merges any overlapping validations. Press F2=sort from this menu to use this facility.
Pressing F4=check-digit from the Validation menu displays the Check Digit Validation panel and menu as shown in Figure 4-8. You can specify check digit validation only for numeric fields that have no decimal places.
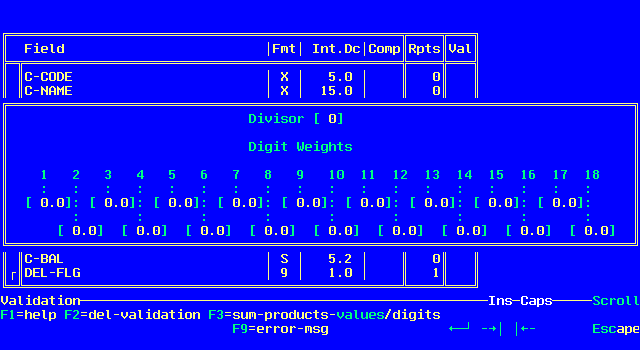
Figure 4-8: Check Digit Validation Menu
The panel contains the following fields:
| Divisor | This is the divisor to be used by the check digit system. It can be any non-zero, two-digit number. |
| Digit Weights | These are the weights to be used, starting with the most significant digit as digit one. |
From this menu you can enter the divisor and the weights associated with
the check digit routine. Enter the required divisor and press <right-arrow>|
to
move the cursor to the Digit Weights fields for entry. Press |<left-arrow>
to move back to the Divisor field if required. Press Enter to
complete your selection. Remember that the divisor must not be zero.
The functions available from the Check Digit Validation menu are described in the sections following this section.
The method of calculating whether a check digit is valid or not is illustrated by the following example.
There is a 4-digit number 6843. The defined weights are 2, 3, 4, and 5. The divisor is 11.
The following calculation is performed:
The default method is to add the results of the calculation to give:
An alternative method is to add the individual digits in the results of the calculation to give:
The result of the addition is divided by 11. If the remainder is zero, the number is considered valid.
Therefore, in this example, the first method gives an invalid check digit, the second method gives a valid check digit.
This is a more detailed example of a check digit validation, taken from a real check digit system used by one of the major credit card companies.
The rules of this system are as follows:
None of these rules presents any problem to our system with the exception of Rule 4. However, this is easily handled by allowing non-integer weights with rounding on the product calculation.
Take the example of the number 5929734106706:
5 9 2 9 7 3 4 1 0 6 7 0 6
with weights
1 2 1 2 1 2 1 2 1 2 1 2 1
The values resulting from the products of the weights are:
5 18 2 18 7 6 4 2 0 12 7 0 6
Following Rule 4, these values then should be:
5 19 2 19 7 6 4 2 0 13 7 0 6
The sum is 90. This is divisible by 10 and, therefore, is a valid number.
The same result is very easily achieved with our definition system by using weights:
1 2.1 1 2.1 1 2.1 1 2.1 and so on.
When the values of the products are calculated, the run-time validation routine rounds any value up to the nearest integer. The following result, therefore, is given in our example:
5 19 2 19 7 6 4 2 0 13 7 0 6
with a sum of 90 as required.
Pressing F2=del-validation from the Check Digit Validation menu deletes the check digit validation for the current field.
Pressing F3=sum-products-values/digits from the Check Digit Validation menu enables you to toggle between having the values or the digits of each product summed.
Sum products values.
Pressing F9=error-msg from the Check Digit Validation menu has the same effect as error message definition for range/table validation. You can assign an error message to the check digit validation so that if any check digit validation error occurs at run time, the error text is placed into the error field and the error message number is placed into the control block. You can, of course, use the same or different error messages to those used for range/table validation.
Pressing F5=date from the Validation menu displays the panel and menu shown in Figure 4-9.
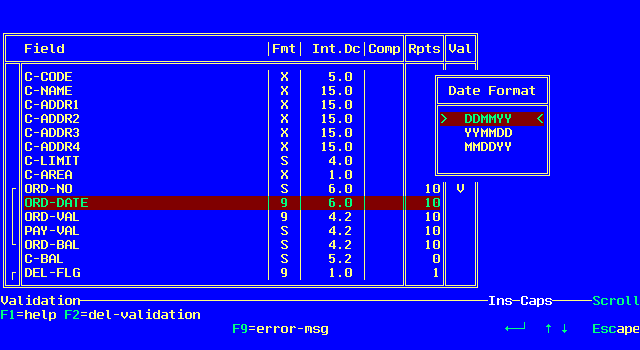
Figure 4-9: Date Validation Menu
The Date Validation facility enables you to define date validation for a field if the field defined is appropriate for dates. If you have not defined a field appropriate for dates, this option is not displayed, because only functions available for the current field type appear on the Validation menu. Date validation is independent of whether you display the field on the panel in date edited form, for example 99/99/99. Full leap year checking is available.
Date validation checks that the components of a single date field are in the correct range, and therefore are not impossible dates. Do not confuse this with range validation for date fields, which checks that the value of a date field lies within a range that you specify (see the section Range/Table Validation (F3) earlier in this chapter).
You can define date validation for the following types of field:
Depending upon the size and type of the field, you can select any one of the following date types from the Date Format panel:
| 4-character dates | DDMM MMDD MMYY YYMM |
| 5-character dates | YYDDD |
| 6-character dates | DDMMYY YYMMDD MMDDYY |
| 7-character dates | DDMMMYY where MMM is one of JAN, FEB, MAR, APR, MAY, JUN, JUL, AUG, SEP, OCT, NOV or DEC. |
| 8-character dates | DDMMYYYY |
Use the <up-arrow> or <down-arrow> keys to highlight the desired date type and press Enter to select it.
Pressing F2=del-validation from the Date Validation menu deletes the date validation for the current field.
Pressing F9=error-msg from the Date Validation menu has the same effect as error message definition for range/table validation. You can assign an error message to the date validation so that if any date validation error occurs at run time, the error text is placed into the error field and the error message number is placed into the control block. You can, of course, use the same or different error messages to those used for range/table validation.
Pressing F6=null-validation from the Validation menu enables you to determine whether a null entry in the field is valid or invalid. Null means zero in numeric fields or spaces in alphabetic or alphanumeric fields. The menu shown in Figure 4-10 is displayed.

Figure 4-10: Null Validation Menu
Pressing F2=allow/disallow-null from the Null Validation menu enables you to toggle between the allow and disallow null options. If you choose the "disallow null" option, you can assign an error message number to this validation.
Allow null values.
Pressing F9=error-msg from the Null Validation menu enables you to assign an error message if the disallow null option has been selected. As with error message definition for range/table validation, you can assign an error message, the text of which will be placed into the error field and the number of which will be placed into the control block if any null validation error occurs at run time. You can, of course, use the same or different error messages.
Pressing F7=user-validation from the Validation menu enables you to apply your own validation type to any field, cross-validate with other fields, set flags or change data in the data block, and dynamically change the error message for display.
The user validation menu is displayed.
Pressing F2=allow/disallow-user-validation from the User-validation menu enables you to toggle between the allow and disallow user validation options. If you choose the "allow user-validation" option, you can assign an error message number to this validation.
Disallow user-validation.
At run time, when you are about to exit a field which has user validation enabled, the module DSUSRVAL is called. This module is passed the Control Block and full Data Block, as well as a small Status Block. DSUSRVAL contains validation code written by you. Micro Focus ships a skeleton source of this module, containing comments to help you add your own code.
You use the Control Block to establish the screenset, panel, field-number and occurrence of the current field. Because of this level of control, the single module DSUSRVAL can be used by many different screensets, panels and fields.
To simplify the setting up of the current field in the user code, Dialog System can generate a copybook for each screenset you need to include in the source of dsusrval.cbl. These copybooks are similar to the standard screenset copybooks (.cpb), but are tailored for use specifically for inclusion in the user validation source file. You generate these copybooks using F5=Generate from the main menu.
Note: The copybook generated for screenset use is not interchangeable with the copybook generated for user validation. Therefore, ensure you use two different extensions for them. For example, .cpb and .cpu.
You use the copybook code to reference fields in the Data Block by name, and to identify the current field from the Control Block field number by using the associated constant (level-78) names in the copybook.
After validating the field, you can flag it as valid or invalid. If invalid, any error message you associated with this validation is, by default, displayed in your message data item. You can override this by specifying an error message number which will cause the corresponding message to be displayed.
See the chapter Programming for more details of the DSUSRVAL module.
Pressing F9=err-msg-fld def/undef from the Data Fields Definition menu enables you to designate a single alphanumeric field on the Data Definition List to be the "error message field". This is the field in which error messages are placed if validation errors are found at run time. This field is automatically cleared if no errors are found, or when those found are corrected.
Press F9 to designate a field as the error message field, and an "E" is displayed in the Val column of the Data Definition List. You are prevented from validating this field itself.
Pressing F3=error-messages from the Data Definition menu enables you to build up a file of error messages to use when validating the various data fields at run time. These error messages are stored in a relative file and are automatically accessed by their relative key.
You can assign these messages to any of the field validations in the validation definition function (described earlier in this chapter). This file can be common to many applications and does not need to relate to just one screenset, so as noted previously, you can use the same error message file in any number of screensets. Error messages will appear in the designated error message field.
When you select this facility, the Error Messages menu is displayed. If there is no error message file selected for the current screenset, the menu shown in Figure 4-11 is displayed. If there is already an error message file selected for the current screenset, the menu shown in Figure 4-12 is displayed.

Figure 4-11: Error Message Menu
Pressing the F2=select-error-message-filename option from the Error Messages menu displays the following prompt:
Enter error message file name [ ] then Enter
The error message filename must not exceed eight characters, plus a three-character extension. If no extension is supplied, .err is the default.
After you name an error message file, the option F3=define-error-messages appears on the Error Messages menu. You can use this option to enter or modify the error message as shown in Figure 4-12.

Figure 4-12: Error Message Menu
To define your error message, press F3=define-error-messages from the Error Messages menu and the screen shown in Figure 4-13 is displayed.
In the No. field, type the error code. This is a number in the range 001 to 998. The cursor automatically skips to the next field where you can type the error message text, which can be up to 76 characters long. To enter this text and move to the next line ready to enter another error message, press Enter. When your error message file is complete, press the Escape key twice to return to the Data Definition menu.
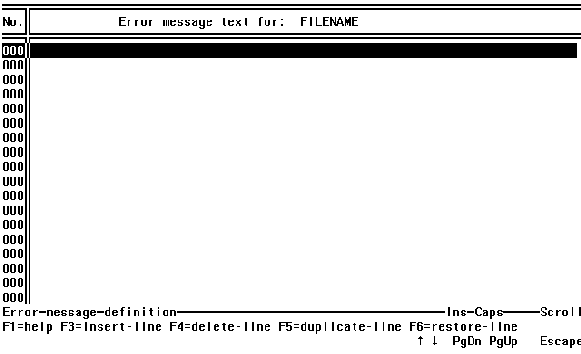
Figure 4-13: Error Message Definition Menu
When you are defining your error message file, you can use the following facilities available on the Error Message Definition menu.
Pressing F3=insert-line from the Error Message Definition menu enables you to insert a line before the current error line. Because error numbers are in ascending sequence, you can only insert a line if there is a vacant error number before the current one. For example, if you have defined error message numbers 005 and 007, position the cursor on error 007 and press F3 to insert error message number 006. You can, of course, insert new error numbers at the end of the list.
Pressing F4=delete-line from the Error Message Definition menu deletes the current error message. Up to 16 deleted lines are stored so that you can restore them later if required.
Pressing F5=duplicate-line from the Error Message Definition menu duplicates the current error message text on the next line, if that line is empty. If the next line is not free, the following prompt appears:
No place to duplicate
and the operation is canceled.
When you duplicate error message text, you must assign a new number to the text before you can move off the line.
Pressing F6=restore-line from the Error Message Definition menu enables you to undelete up to 16 deleted entries, starting with the most recently deleted one. The cursor must be on or directly beneath an empty line when you use this function. If the deleted entry has been restored out of sequence, you must alter the error number to put it in sequence.
Copyright © 1999 MERANT International Limited. All rights reserved.
This document and the proprietary marks and names
used herein are protected by international law.
 | Using Dialog System | Panels |  |