Security Guide : Authentication

Authentication
The first layer of security protection for any system is authentication (as well as identity representation). This layer defines the process of verifying the entities are who they claim to be. Most of the time, credentials are required to verify the identity of an entity.
VisiSecure employs the Java Authentication and Authorization Service (JAAS) framework to facilitate the interaction between the entities and the system. At the same time, the authentication mechanism concept is employed to represent the format (encoding and decoding process) for communicating or transporting authentication information between various components of the security subsystem.
Managing authentication with JAAS
The Java Authentication and Authorization Service (JAAS) defines extensions that allow pluggable authorization and user-based authentication. This framework effectively separates the implementation of authentication from authorization, allowing greater flexibility and broader vendor support. The fine-grained access control capabilities allow application developers to control access to critical resources at the granularity level that makes the most sense.
Basics of JAAS concepts
VisiSecure employs the Java Authentication and Authorization Service (JAAS) framework to facilitate the interaction between the entities and the system. The three essential concepts of the framework are subject, principal, and credential.
Subjects
JAAS uses the term subject to refer to any user of a computing service or resource. Another computing service or resource, therefore, is also considered a subject when it requests another service or resource. The requested service or resource relies on names in order to authenticate a subject. However, different services may require different names in order to use them.
For example, your email account may use one username/password combination, but your ISP requires a different combination. However, each service is authenticating the same subject—namely yourself. In other words, a single subject may have multiple names associated with it. Unlike the example situation, in which the subject himself must know a set of usernames, passwords, or other authentication mechanisms at a specific time, JAAS is able to associate different names with a single subject and retain that information. Each of these names is known as a principal.
Principals
A principal represents any name associated with a subject. A subject could have multiple names, potentially one for each different service it needs to access. A subject, therefore, comprises a set of principals, such as in the code sample below:
Java
public interface Principal {
public String getName();
}
public final class Subject {
public Set getPrincipals()
}
C++
class Principal {
public:
std::string getName() const=0;}
class Subject {
public:
Principal::set& getPrincipals();
}
Principals populate the subject when the subject successfully authenticates to a service. You do not have to rely on public keys and/or certificates if your operational environment has no need for such robust technologies.
To return the principal name(s) for a subject from the application context, use getCallerPrincipal.
Note
Principals participating in transactions may not change their principal association within those transactions.
Credentials
In the event that you want to associate other security-related attributes with a subject, you may use what JAAS calls credentials. Credentials are generic security-related attributes like passwords and public-key certificates. Credentials can be any type of object, allowing you to migrate any existing credential information or implementation into JAAS. Or, if you want to keep some authentication data on a separate server or other piece of hardware, you can simply store a reference to the data as a credential. For example, you can use JAAS to support a security-card reader.
Public and private credentials
Credentials in JAAS come in two types, public and private. Public credentials do not require permissions to access them. Private credentials require security checks. Public credentials could contain public keys and so on, while private credentials are private keys, encryption keys, sensitive passwords, and so on. Consider the following subject:
Java
public final class Subject {
...
public Set getPublicCredentials()
}
C++
class Subject {
public:
Credential::set& getPrivateCredentials();
}
No additional permissions would be necessary to retrieve the public credentials from the subject, but the situation changes when trying to retrieve private credentials with following APIs:
Java
public final class Subject {
...
public Set getPrivateCredentials()
}
C++
class Subject {
public:
Credential::set& getPrivateCredentials();
}
For Java, permissions are required for code to access private credentials in a Subject. For C++, all codes are local and therefore trusted.
Public credentials are used for authorization only. Private credentials are used for caching purposes. These credentials are populated by login modules.
For more information on permissions in Java, consult the JAAS Specification from Oracle.
Authentication and pluggability
Within the JAAS framework, the logon service separates the configuration from implementation. A low-level system programming interface called the LoginModule provides an anchor point for pluggable security modules.
The authentication mechanism concept is employed to represent the “format” for communicating (or transporting) authentication information between various components of the security subsystem. The security service provider for the authentication/identification process implements the specific format (encoding and decoding process) that is to be used by the underlying core system.
In a distributed environment, the authentication process is further complicated by the fact that the representation of the entity and the corresponding credential must be transported among peers in a generic fashion. Therefore, the VisiSecure Java SPI employs the concept of the AuthenticationMechanism and defines a set of classes for doing authentication/identification in a distributed environment.
Authentication mechanisms and LoginModules
An authentication mechanism represents the encoding/decoding for communicating authentication information between various components of the security subsystem. For example, it represents how LoginModules communicate with the mechanism and how the mechanism on one process communicates with an equivalent mechanism on another process.
VisiSecure includes several common LoginModules for server and client authentication as well as the Service Provider Interface classes for Java and C++ that enable you to “plug-in” security service provider implementations of authentication and identification.
Identity, trust and authentication
Relationship between trust and authentication
Authentication is a process of verifying an identity. When the verification is successful, the identity becomes a trusted identity. In other words: a successful authentication of an identity puts trust on the identity. Trust is a result of a successful authentication. It is also the result of the identity assertion.
Assertion works as follows:
1
2
3
Trust can be applied at the transport level if a certificate identity is presented, or at even higher levels (at the CSIv2 layer) where the identity takes the form of a username/password.
Java
For trusting certificates with Java code, VisiSecure provides mechanisms to support user-provided JSSE X509TrustManager that indicates whether a given certificate chain is trusted. You can also specify a Java keystore where certificate entries are trusted using standard Java properties.
C++
For VisiBroker for C++ users, a set of APIs that allow trustpoints (trusted certificates) to be configured is provided as well. For more information, see “VisiSecure for C++ APIs”.
Note: For certificate authentication, login modules cannot be used.
Identities
Any system that needs to engage in secure communication as a client must be configured to have an identity that represents the user/client on whose behalf it is acting. When using SSL with mutual authentication, a server also needs a certificate to identify itself to the client.
In addition to many clients and users that need to be authenticated to the various VisiBroker services, VisiSecure itself needs to be provided with its own identity. This allows the server to identify itself when it communicates with other secure servers or services. It also allows end-tier servers to trust assertions made by this server in the case where this server acts on behalf of other clients.
System identity
Any system first needs to identify itself before being allowed access to resources. Client identification is always required for resource access. In a CORBA/J2EE environment, the need for identification also exists for servers as well. Servers need identification in two cases:
Client identity
There are situations, however, where the client process does not have any information on the realm that it needs to authenticate against. In this case, by default the client consults the server's IOR for a list of available realms, and the user is given the option to choose one to which to supply username and password. This username/password will be used by the server, which will consult its configuration file for the specified realm, and use the information collected from the client as data for its specified LoginModule.
For example, if the following is the server side configuration file, then the information collected or entered by a user will be used for its JDBCLoginModule.
SecureRealm{
com.borland.security.provider.authn.JDBCLoginModule required
DRIVER=F"com.borland.datastore.jdbc.DataStoreDriver"
URL="jdbc:borland:dslocal:../userdb.jds"
USERNAMEFIELD="USERNAME"
GROUPNAMEFIELD="GROUPNAME"
GROUPTABLE="UserGroupTable"
};
The default behavior of the process can be changed through properties. You can set the retry count by setting vbroker.security.authentication.retryCount. The default is 3. The security properties including those for authentication are listed and described in “Security Properties for Java” and “Security Properties for C++”.
Configuring authentication
The authentication config file contains the data necessary to authenticate a user to one or more realms and defines an authentication mechanism and provides the code to interact with a specific type of authentication mechanism (for example, LoginModules).
The configuration must specify which LoginModules should be used for a particular application, and in what order the LoginModules should be invoked. For more information, see “Associating a LoginModule with a realm”.
An example of the config.jaas file looks like this:
customrealm {
 
CustomLoginModule required;
 
};
This defines a realm called customrealm, which requires the use of the CustomLoginModule. Each realm entry has a particular syntax that must be followed. For more information on realm syntax, see “Syntax of a realm entry”.
A login configuration contains the following information. Each entry in the configuration is indexed via realm name and contains a list of LoginModules configured for that application.
Each LoginModule is specified via its fully qualified class name. Authentication proceeds down the module list in the exact order specified. If an application does not have specific entry, it defaults to the specific entry.
The Flag value controls the overall behavior as authentication proceeds down the stack. For a description of the valid values for Flag and their respective semantics, see “Syntax of a realm entry”.
For information on LoginModules, see “LoginModules”.
Authentication property settings
The authentication policy—whether it is server or client authentication and whether it is done using public-key certificates or passwords—is determined by property settings. For more information, see “Security Properties for C++” and “Security Properties for Java”.
The security configuration uses properties and a configuration file to define the identities that represent the system. This configuration file is populated with all the LoginModules necessary for authentication to the various realms to which this process needs to authenticate.
For example:
Set the property vbroker.security.login=true
Set the property vbroker.security.login.realms=payroll,hr
Set the following realm information in a file reference by vbroker.security.authentication.config=<config-file>
Set the property vbroker.security.callbackhandler=<callback-handler>
In the <config-file> setup the following:
payroll {
com.borland.security.provider.authn.HostLoginModule required;
};

hr {
com.borland.security.provider.authn.BasicLoginModule required
DRIVER=com.borland.datastore.jdbc.DataStoreDriver
URL="jdbc:borland:dslocal:../userdb.jds"
TYPE=BASIC
LOGINUSERID=admin
LOGINPASSWORD=admin;
};
In this code sample:
The format of the realm information passed into vbroker.security.login.realms is as follows:
<authentication Mechanism>#<Authentication Target>
This format is called Formatted target.
Formatted target
Formatted target is the canonical representation of an authentication mechanism.
A formatted target is of the form:
<authentication mechanism>#<mechanism specific target name>
For example:
Realm1, Realm3, GSSUP#Realm4,
In the above example, realm1, realm3 and realm4 are specific instances of GSSUP authentication mechanism. GSSUP is assumed by default if no other authentication mechanism is specified.
This can be used to represent how LoginModules communicate with the authentication mechanism and how the mechanism on one process communicates with an equivalent mechanism on another process. The mechanism specific target name represents how the mechanism represents this target.
For more information on authentication mechanisms, see “Authentication mechanisms”.
Setting the config file for client authentication
Each process uses its own configuration file containing the configuration for the set of authentication realms that the system supports for client authentication.
To set the location of the configuration file:
1
Set the vbroker.security.authentication.config property to the path of the configuration file.
2
vbroker.security.authentication.configs=myconfig, yourconfig, hisconfig, herconfig
vbroker.security.authConfig.myconfig=<the physical file name for myconfig>
vbroker.security.authConfig.yourconfig=<the physical file name for yourconfig>
vbroker.security.authConfig.hisconfig=<the physical file name for hisconfig>
vbroker.security.authConfig.herconfig=<the physical file name for herconfig>
If more than one login configuration file is specified then the files are read and concatenated into a single configuration.
Note: the use of forward or backward slashes is based on the underlying file system. The URLs always use forward slashes, regardless of what operating system the user is running.
Setting up authentication realms
A system administrator determines the authentication technologies, or Login Modules, to be used for each application and configures them in the configuration file.
Follow these steps to setup the authentication realm:
1
2
Use the property vbroker.security.authentication.config to involve the configuration file into the runtime.
vbroker.security.authentication.config=<the filename of the config file>
An example:
customrealm {
CustomLoginModule required;
};
In the above example, the realm entry is named "customrealm". This name must be unique as it will be used by the VisiSecure to refer to this entry. The entry specifies the LoginModule to be used for the user authentication.
This LoginModule is “required” for the authentication to be considered successful. The LoginModule will succeed only if the name and password supplied by the user are successfully used to log the user into the system.
For setting up the configuration file for client and server, refer to the basic authentication example in the <install_dir>\examples\vbroker\security\basic folder. The example given here has all the basic setting needed to secure the application.
For more information on the authentication realm (user domain), see “Authentication realm (user domain)”.
Different types of Authentication
With the VisiBroker implementation of JAAS, you can set up different mechanisms of authentication. You can have server authentication, where servers are authenticated by clients using public-key certificates. You can also have client authentication. Clients can be authenticated using passwords or public-key certificates. That is, the server can be configured to authenticate clients with a password or clients with public-key certificates. Whether it is server or client authentication and whether it is done using public-key certificates or passwords, it is determined by property settings. For more information see “Authentication property settings”.
Servers
Authentication can be accomplished using a standard username/password combination. For servers using username and password, authentication is performed locally since the realms are always known.
There can be constraints on certificate identities, depending on whether they are stored in a KeyStore or whether they are specified through APIs.
Clients
To authenticate clients using usernames and passwords, several things need to happen. The server should expose a set of realms to which it can authenticate a client. Each realm should correspond to a JAAS LoginModule that actually does the authentication. Finally, the client should provide a username and password, and a realm under which it wishes to authenticate itself.
For clients using usernames and passwords, there can be constraints about what the client knows about the server's realms. Clients may have prior knowledge of the server's supported realms or none at all at the time of identity inquiry.
The client always authenticates at the server end for which the client has to do the identity enquiry.
If the client does not know about the server’s realm upfront, then it has to read the server IOR and reactively do an identity enquiry to make the server authenticate.
The client can authenticate itself if the server’s realm is known upfront. Even in such cases the server will authenticate again.
Keeping these constraints in mind, VisiSecure supports the following usage of authentication models: GSSUP mechanism and Certificate mechanism. You can use any of these to provide an identity to the server or client.
Authentication mechanisms
An authentication mechanism represents the encoding/decoding for communicating authentication information between various components of the security subsystem.
For example, it represents how LoginModules communicate with the mechanism and how the mechanism on one process communicates with an equivalent mechanism on another process. The mechanism specific target name represents how the mechanism represents this target.
There are two types of authentication mechanisms supported by VisiSecure:
GSSUP mechanism
VisiSecure provides a mechanism for a simple username/password authentication scheme. This mechanism is called GSSUP. The OMG CSIv2 standard defines the interoperable format for this mechanism. The LoginModule to mechanism interaction model is defined by Micro Focus. This is because the mechanism implementation needs to translate the information provided by a LoginModule to information (to a specific format) it can transmit over the wire using CSIv2.
As mentioned above, the target name for a mechanism is specific to that mechanism. For the GSSUP mechanism, the target name is a simple string representing a target realm (for example, in the JAAS configuration file, on the receiving tier). So, if a server has a configuration file with one realm defined, for example “ServerRealm”, a client side representation of this realm would be:
GSSUP#ServerRealm
Note
For convenience, since the GSSUP mechanism is always available in VisiBroker, you can omit the “GSSUP#” from the target name. However, this is only for the GSSUP mechanism. When the security service interprets a “realm” name, it first attempts to resolve the realm name with a local JAAS configuration entry. If that fails, it treats that realm name as representing “GSSUP#”.
GSSUP based authentication methods are:
Authenticating clients with usernames and passwords
For authentication, you need username/password or certificates. Username/password and certificates can be collected from user through JAAS callback handlers. These can also be collected through APIs.
Username/password authentication using LoginModules for known realms
If the realm to which the client or server wishes to authenticate is known, the client-side can be configured by setting properties as below:
vbroker.security.login=true
vbroker.security.login.realms=<known-realm>
Username/password authentication using APIs
For C++:
The following code sample demonstrates the use of the login APIs. This case uses a wallet. For a full description of the four login modes supported, see “VisiSecure for C++ APIs” and “Security SPI for C++”.
int main(int argc, char* const* argv) {
// initialize the ORB
CORBA::ORB_var orb = CORBA::ORB_init(argc, argv);
CORBA::Object_var obj = orb->resolve_initial_references("VBSecurityContext");
Context* c = dynamic_cast<Context*> (obj.in());
// Obtain a walletFactory
CORBA::Object_var o = orb->resolve_initial_references("VBWalletFactory");
vbsec::WalletFactory* wf = dynamic_cast<vbsec::WalletFactory*>(o.in());
vbsec::Wallet* wallet = wf->createIdentityWallet( <username>, <password>, <realm>);
c->login(*wallet);
}
For Java:
The following code sample demonstrates the use of the login APIs. This case uses a wallet. For a full description of the four login modes supported, see “LoginModules”.
public static void main(String[] args) {
//initialize the ORB
org.omg.CORBA.ORB orb = org.omg.CORBA.ORB.init(args, null);
com.borland.security.Context ctx = (com.borland.security.Context)
orb.resolve_initial_references("VBSecurityContext");
if(ctx != null) {
com.borland.securty.IdentityWallet wallet =
new com.borland.security.IdentityWallet(<username>,
<password>.toCharArray(), <realm>);
ctx.login(wallet);
}
}
Certificate mechanism
The Certificate mechanism is a mechanism that uses certificates for authentication. This mechanism is different from GSSUP; certificates are used instead of username/password, and these identities are used at the SSL layer and not at the higher CSIv2 over IIOP layer.
You can put certificates into VisiSecure using certificate login or wallet APIs. When using wallet APIs, you need to specify the usage through the constant definitions in the vbsec.h file, class vbsec::WalletFactory. For more information, see “class vbsec::WalletFactory”.
Using certificate login, you need to specify the target realm using the following format:
Certificate#<target>
Note
If you do not specify the usage, the default is ALL.
The following describes the available targets defined for the certificate login mechanism.
A process can have either a client and server identity that are different or an identity that is used in all roles, but not both. In other words, you cannot establish an identity in the Certificate#CLIENT and the Certificate#ALL targets simultaneously.
Note
For backward compatibility, wallet properties and SSL APIs are supported; certificate identities established this way are only treated as Certificate#ALL.
Typical uses of certificate-based authentication methods are:
Certificate-based authentication using KeyStores and property settings
This section demonstrates how to make a minimal SSL configuration on the simplest, security-unaware VisiBroker example such that client and server communicate using SSL to perform mutual PKI authentication. Executables from basic/bank_agent are re-used to emphasize the fact that in order to secure non-security aware application no source code changes are required.
1
2
3
4
prompt> Server -DORBpropStorage=cpp_server.properties -Dvbroker.orb.dynamicLibs=<VisiSecure shared library name>
5
prompt> Client -DORBpropStorage=cpp_client.properties -Dvbroker.orb.dynamicLibs=<VisiSecure shared library name>
6
Open the property files cpp_server.properties and cpp_client.properties and notice how the certificates and private keys are installed using the wallet property set in the files.
C++ Server properties
vbroker.security.peerAuthenticationMode=require_and_trust
vbroker.security.requireauthentication=false
vbroker.security.trustpointsRepository=Directory:./trustpoints
vbroker.security.server.transport=SECURE_ONLY
vbroker.security.wallet.type=Directory:./identities
vbroker.security.wallet.identity=frans
vbroker.security.wallet.password=frans
C++ client properties
vbroker.security.trustpointsRepository=Directory:./trustpoints
vbroker.security.peerAuthenticationMode=require_and_trust
vbroker.security.wallet.type=Directory:./identities
vbroker.security.wallet.identity=charles
vbroker.security.wallet.password=charles
For descriptions of these properties, see “Security Properties for C++”.
7
Browse through the content of subdirectory identities and trustpoints and understand how the directory wallet and trustpoints are structured.
Note:
The VisiSecure shared library name depends on the platforms. For example:
We recommend that you check your ${VBROKER_DIR}/lib (on UNIX) or <install_dir>\bin (on Windows) directory.
Certificate-based authentication using APIs
1
Build the example as mentioned in the security/bank_SSL example in the example folder by executing the command:
nmake cpp (for Windows) or
make cpp (for UNIX).
A successful build creates the executables SecureServer.exe and SecureClient.exe on Windows, or SecureServer and SecureClient on UNIX.
2
Make sure osagent is up and running.
3
prompt> SecureServer
4
prompt> SecureClient
5
Launch either server or client or both using -Dvbroker.app.useCRL=true, and notice how the mutual SSL authentication fails and client gets NO_PERMISSION exception.
For example:
prompt> SecureClient -Dvbroker.app.useCRL=true
6
Read and learn from SecureServer.C, SecureClient.C:
how they impose peerAuthenticationMode=require_and_trust and alwaysSecure=true through QoP
SecureServer.C
...
if (ssp) {
CORBAsec::ASN1ObjectList chain;
chain.length( bank::numberOfCertificates);
CORBA::ULong L;
for (CORBA::ULong i = (CORBA::ULong)0; i < bank::numberOfCertificates; i++) {
L = (CORBA::ULong) strlen( bank::certificate[i]);
chain[i].replace ( L, L, (CORBA::Octet*)bank::certificate[i],
(CORBA::Boolean)false );
} // Wrap the b64 certificate chain in an ASN1ObjectList as
// required by the certificate factory
 
CORBAsec::X509CertList_var certchain =
ssp->getCertificateFactory().importCertificateChain( chain);
// Consult the certificate factory to convert the chain
// into an X509CertList as required to create an SSLContext
Note:
In the resulting list, the order is reversed: The root cert is list[0]
L = (CORBA::ULong) strlen( bank::privateKey);
CORBAsec::ASN1Object key ( L, L, (CORBA::Octet*)bank::privateKey,
(CORBA::Boolean)false );
// Wrap the b64 private key in an ASN1Object
 
CORBAsec::ASN1Object_var privatekey =
ssp->getCertificateFactory().importPrivateKey( key);
// Consult the certificate factory to convert the private key
// into a DER wrapped inside an ASN1Object
 
const char* const sword = "frans";
L = (CORBA::ULong) strlen( sword);
vbsec::VBSSLContext* sslctx = ssp->createSSLContext (
*certchain,
*privatekey,
CSI::UTF8String( L, L, (CORBA::Octet*)sword,
(CORBA::Boolean)false )
); // Consult the SecureSocketProvider to create an SSLContext
// from the chain and the private key.
 
CORBAsec::X509Cert* cacert = (*certchain)
[(CORBA::ULong)0];
sslctx->addTrustedCertificate( *cacert);
 
The root of this chain is an implicit part of trustpoint. But it does not happen automatically.
For Java:
If you do not want to use KeyStores directly, you can specify certificates and private keys using the CertificateWalletAPI. This class also supports the pkcs12 file format.
X509Certificate[] certChain = ...list-of-X509-certificates...
PrivateKey privKey = private-key
com.borland.security.CertificateWallet wallet =
new com.borland.security.CertificateWallet(alias,
certChain, privKey, "password".toCharArray());
The first argument in the new Certificate wallet is an alias to the entry in the KeyStore, if any. If you are not using keystores, set this argument to null.
Certificate based authentication using APIs with pkcs12Server
This section demonstrates how to use VisiSecure API for handling a PKCS12 storage, a very widely acceptable storage format for certificates and private keys.
1
Build the example as mentioned in the bank_SSL example in the security folder by executing the command:
nmake cpp (for Windows) or
make cpp (for UNIX).
When the build completes, the executable pkcs12Server.exe is created on Windows, or pkcs12Server on UNIX platforms.
2
3
prompt> pkcs12Server frans.pfx frans
4
prompt> SecureClient
5
Launch the client using -Dvbroker.app.useCRL=true, and notice how the mutual SSL authentication fails and the client gets a NO_PERMISSION exception.
prompt> SecureClient -Dvbroker.app.useCRL=true
6
Notice how it installs certificates and a private key from a PKCS12 file.
PKCS12Server.C
...
if (ssp) {
CORBA::ULong L = (CORBA::ULong) bank::BUF_SIZE;
CORBAsec::ASN1Object pkcs12bytes( L, L, bank::gBuffer, (CORBA::Boolean)0 );
L = (CORBA::ULong) strlen( argv[2]);
CSI::UTF8String sword( L, L, (CORBA::Octet*)argv[2], (CORBA::Boolean)0 );
CORBAsec::X509CertList_var certchain =
ssp->getCertificateFactory().importCertificateChain ( pkcs12bytes,
sword );
// Consult the certificate factory to convert the chain
// into an X509CertList as required to create an SSLContext
It is IMPORTANT to note that in the resulting list, the order is reversed. The root cert is list[0].
CORBAsec::ASN1Object_var privatekey =
ssp->getCertificateFactory().importPrivateKey( pkcs12bytes,sword );
// Consult the certificate factory to convert the
// private key into a DER wrapped inside an ASN1Object
 
if ( !certchain || !privatekey ) {
cerr << "Fail to import certificates and private key from pkcs12 "
<< "file named: " << argv[1] << endl;
exit( 1);
}
vbsec::VBSSLContext* sslctx = ssp->createSSLContext (
*certchain,
*privatekey,
sword
); // Consult the SecureSocketProvider to create an
// SSLContext from the chain and the private key.
Certificate based authentication using Certificate wallet
Use a certificate wallet as follows:
1
com.borland.security.provider.CertificateWallet wallet =
new com.borland.security.provider.CertificateWallet (null, certChain,
encryptedPrivateKey.getBytes (), "Delt@$$$".toCharArray());
2
// Login
com.borland.security.Context ctx = (com.borland.security.Context)
orb.resolve_initial_references ("VBSecurityContext");
3
ctx.login (wallet)
Setting wallet properties
You can set the transport identity for SSL using the properties below:
vbroker.security.wallet.type=Directory:./identities
vbroker.security.wallet.identity=frans
vbroker.security.wallet.password=frans
PKCS#12-based authentication using KeyStores
You can use the same APIs discussed in “Username/password authentication using APIs” to login using PKCS#12 KeyStores. The realm name in the IdentityWallet should be CERTIFICATE#ALL, the username corresponds to an alias name in the default KeyStore that refers to a Key entry, and the password refers to the password needed to unlock the PKCS#12 file. The property javax.net.ssl.KeyStore specifies the location of the PKCS#12 file.
Specify the details of the PKCS#12 KeyStore file as follows:
For C++:
vbroker.security.wallet.type=PKCS12:./identities/
client.p12
vbroker.security.wallet.identity=client
vbroker.security.wallet.password=password
Note:
The vbroker.security.wallet.identity property is ignored for a PKCS12 keystore, but the property must be set.
For Java:
vbroker.security.wallet.type=PKCS12:./identities
vbroker.security.wallet.identity=client
vbroker.security.wallet.password=password
The VisiBroker for Java secure client then looks for a client.p12 file in the ./identities folder.
PKCS#12-based authentication using APIs
If you do not want to use KeyStores directly, you can import certificates and private keys using the CertificateFactoryAPI. This class also supports the PKCS#12 file format.
CORBA::Object_var o = orb-resolve_initial_references("VBSecureSocketProvider"); vbsec::SecureSocketProvider* ssp = dynamic_cast<vbsec::SecureSocketProvider*>(o.in());
const vbsec::CertificateFactory& cf = ssp-getCertificateFactory ();
The first argument in the new Certificate wallet is an alias to the entry in the KeyStore, if any. If you are not using keystores, set this argument to null.
Creating LoginModules
A LoginModule defines an authentication mechanism and provides the code to interact with a specific type of authentication mechanism. Each LoginModule is customized using authentication options that point it to a specific data source and provide other customizable behavior as defined by the author of the LoginModule.
Each LoginModule authenticates to a particular authentication realm (any authenticating body or authentication provider—for example, an NT domain). An authentication realm is represented by a configuration entry in a JAAS configuration file. A JAAS configuration entry contains one or more LoginModule entries with associated options to configure the realm. For more information, see “Associating a LoginModule with a realm” on page 32.
LoginContext class and LoginModule interface
VisiSecure uses the class LoginContext as the user API for the authentication framework. The LoginContext class uses the JAAS configuration file to determine which authentication service to plug-in under the current application.
Java
public final class LoginContext {
public LoginContext(String name)
public void login()
public void logout()
public Subject getSubject()
}
C++
class LoginContext{
public:
LoginContext(const std::string& name, Subject *subject=0, CallbackHandler *handler=0);
void login();
void logout();
Subject &getSubject() const;
}
The authentication service itself uses the LoginModule interface to perform the relevant authentication.
Java
public interface LoginModule {
boolean login();
boolean commit();
boolean abort();
boolean logout();
}
C++
class LoginModule {
public:
virtual bool login()=0;
virtual bool logout()=0;
virtual bool commit()=0;
virtual bool abort()=0;
}
It is possible to stack LoginModules and authenticate a subject to several services at one time.
Authentication and stacked LoginModules
Authentication proceeds in two phases in order to assure that all stacked LoginModules succeed (or fail, otherwise).
1
The first phase is the “login phase,” during which the LoginContext invokes login() on all configured LoginModules and instructs each to attempt authentication.
2
If all necessary LoginModules successfully pass, the second, “commit phase” begins, and LoginContext calls commit() on each LoginModule to formally end the authentication process. During this phase the LoginModules also populate the subject with whatever credentials and/or authenticated principals are necessary for continued work.
Note
If either phase fails, the LoginContext calls abort() on each LoginModule and ends all authentication attempts.
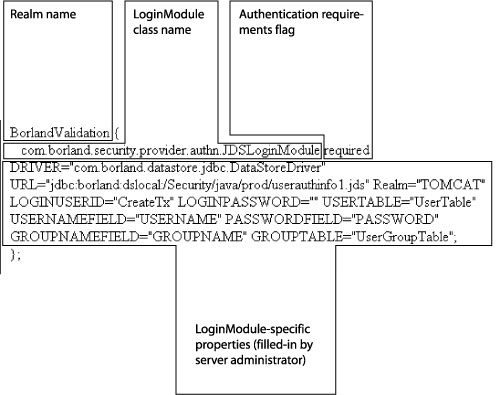
Associating a LoginModule with a realm
VisiSecure uses the JAAS configuration file to associate a LoginModule with a realm and store that information. The JAAS configuration file contains an entry for each authentication realm. The following is an example of a JAAS configuration entry:
MyLDAPRealm {
com.borland.security.provider.authn.LDAPModule required URL=ldap://directory.borland.com:389
}
The following figure shows the elements of a realm entry in the JAAS configuration file.
Figure 2
A server can support multiple realms. This allows clients to authenticate to any one of those realms. In order for a server to support multiple realms, all you need to do is configure the server with that many configuration entries. The name of the configuration entries is not predefined and can be user defined, for example PayrollDatabase.
Note
There must be at least one LoginModule with the authentication requirements flag=required.
Syntax of a realm entry
The following code sample shows the generic syntax for a realm entry:
//server-side realms for clients to authenticate against
realm-name {
loginModule-class-name required|sufficient|requisite|optional
[loginModule-properties];
...
};
Note
The semicolon (“;”) character serves as the end-of-line for each LoginModule entry.
The following four elements are found in the realm entry:
Realm Name—the logical name of the authentication realm represented by the corresponding LoginModule configuration
LoginModule Name—the fully-qualified class name of the LoginModule to be used
Authentication Requirements Flag—there are four values for this flag—required, requisite, sufficient, and optional. You must provide a flag value for each LoginModule in the realm entry. Overall authentication succeeds only if all required and requisite LoginModules succeed. If a sufficient LoginModule is configured and succeeds, then only the required and requisite LoginModules listed prior to that sufficient LoginModule need to have succeeded for the overall authentication to succeed. If no required or requisite LoginModules are configured for an application, then at least one sufficient or optional LoginModule must succeed. The four flag values are defined as follows:
required—the LoginModule is required to succeed. If it succeeds or fails, authentication still continues to proceed down the LoginModule list for each realm.
requisite—the LoginModule is required to succeed. If it succeeds, authentication continues down the LoginModule list in the realm entry. If it fails, control immediately returns to the application—that is, authentication does not proceed down the LoginModule list.
sufficient—the LoginModule is not required to succeed. If it does succeed, control immediately returns to the application—again, authentication does not proceed down the LoginModule list. If it fails, authentication continues down the list.
optional—the LoginModule is not required to succeed. If it succeeds or fails, authentication still continues to proceed down the LoginModule list.
LoginModule-specific properties—each LoginModule may have properties that need to be provided by the server administrator. The necessary properties for each LoginModule provided by Micro Focus are described below.
LoginModules
Micro Focus provides the following common LoginModules for server and client authentication. These LoginModules are used for both client authentication and authentication of the VisiSecure server itself to its operating environment.
Not all LoginModules have the same properties, and your own LoginModules may have different properties as well. Each LoginModule included with VisiBroker is described below, its syntax and properties explained, and a realm entry code sample is provided.
Basic LoginModule—this LoginModule uses a proprietary schema to store and retrieve user information. It uses standard JDBC to store its data in any relational database. This module also supports the proprietary schema used by the Tomcat JDBC realm.
JDBC LoginModule—this LoginModule uses a standard JDBC database interface to authenticate the user against native database user tables.
LDAP LoginModule—similar to the JDBC LoginModule, but uses LDAP as its authentication back-end.
Host LoginModule—for authentication to the operating system hosting the server. This is the only LoginModule supported for C++.
Using the callback handler to communicate with users
Sometimes the LoginModule needs to communicate with the user to obtain authentication information, for example asking the user to provide username and password. The LoginModule uses the callback handler for this purpose. Out of the box, VisiSecure provides command-line based callback handlers.
GUI-based callback handler
A GUI-based callback handler is provided in VisiSecure Java Edition for all login modules. To use the GUI login you must specify the correct callback handler, by setting the following property:
vbroker.security.authentication.callbackHandler=com.borland.security.provider.authn.DialogCallbackHandler
Using a Vault
When running clients, the security subsystem has the opportunity to interact with users to acquire credentials for authentication. This is done using a callback handler, as mentioned in “Using the callback handler to communicate with users”. However, when running servers (your VisiBroker server or a Partition), it is not desirable or even possible to have user interaction at start up time. A typical example of this if the server is started as a service at the startup time of a host or from a automated script of some sort.
The vault was designed to provide the identity information to the security subsystem in such environments. Note that the vault itself is not directly tied to the security subsystem. It is merely a tool to replace the user interaction.
In other words, a vault does not contain authenticated credentials. The security service will perform all appropriate authentication, but will receive information from the vault rather than by interacting with a callback handler. Due to the fact that no user interaction is required, the data in the vault, while sufficiently secure, does contain sensitive information (the usernames and passwords). Hence the vault file that is used for authentication of such servers must be protected using host security mechanisms (file permissions for example) or other equivalent approaches.
Creating a Vault
To create a vault, you can use the vaultgen command-line tool from your installation's bin directory. Its usage is as follows:
vaultgen [<driver-options>] -config <config.jaas-file> -vault <vault-name> [<options>] <command>
<driver-options> are optional, and can be any of the following:
-J<option>: passes a -J Java option directly to the JVM
-VBJVersion: prints VBJ version information
-VBJDebug: prints VBJ debugging information
-VBJClasspath: specify a classpath that will precede the CLASSPATH environment variable
-VBJProp <name=value>: passes the name/value pair to the VM
-VBJjavavm: specify the path to the Java VM
-VBJaddJar <jar-file>: appends the JAR file to the CLASSPATH before executing the VM
-config <config.jaas-file> points to the location of the config.jaas file containing the realms the identities in the vault will authenticate to. -vault <vault-name> is the path to the vault to be generated. You can also specify an existing vault in order to add additional identities to it.
<options> are other optional arguments, and can be any of the following:
-?, -h, -help, -usage: prints usage information
-driverusage: prints usage information, including driver options
-interactive: enables an interactive shell
<command> is the command you want vaultgen to execute. You can select any one of the following:
login <realm|formatted-target>: establishes an identity in the vault for a given realm or formatted target. The identity is first established when the vault is used for login during system startup.
logout <realm|formatted-target>: removes an identity from the vault for a given realm or formatted target.
runas <alias> <realm>: configures a run-as alias with the identity provided for a given realm.
removealias <alias>: removes a configured run-as alias from the vault.
realms: lists the available realms for this configuration.
mechanisms: lists the available mechanisms (for formatted targets) for this configuration.
aliases: lists configured aliases in the vault.
identities: lists configured identities in the vault.
Example—using VaultGen
This example uses VaultGen. Assume we want to create a vault called MyVault for use with a domain called base. First, we need to know which security profile the domain is using so that we can reference its config.jaas file. We check the value of the domain's vbroker.security.profile property in the domain's orb.properties file:
#
# Security for the user domain
#
# Disable user domain security by default
vbroker.security.profile=
default
vbroker.security.vault=${properties.file.path}/../security/scu_vault
The name of the security profile is default. This tells us that the path to the profile's config.jaas file is:
c:/BDP/var/security/profiles/default/config.jaas
Now we can check which realms are contained in the profile for which we want to create identities. We navigate to the installation's bin directory, and use the realms command:
c:\BDP\bin> vaultgen -config ../var/security/profiles/default/config.jaas -vault myVault realms
vaultgen tells us the following realms are available:
The following realms are available:
- UserRealm
- MikeRealm
- BenRealm
Next we execute vaultgen using the login command:
c:\BDP\bin> vaultgen -config ../var/security/profiles/default/config.jaas -vault myVault login UserRealm
vaultgen prompts us for the username and password for the UserRealm, which we enter. We then repeat the process for each additional realm. At the end of each command, vaultgen informs us that it has logged-in the new identity and saved changes to MyRealm.
Logged into realm BenRealm
Generating Vault to MyVault
The vault is created in the directory you specify in the command, in this case the bin directory. A good place to put the actual vault files are in the domain's security directory, located in:
<install-dir>/var/domains/<domain-name>/adm/security/
Example—Using API
This example illustrates the use of the Security Context Interface's APIs generateVault(std::osstream& os, CSI::UTF8String& pass), login(std::istream& is) which can be used to explicitly login to the server. The example given here has all the basic setting needed to secure an application.
The API generateVault will take a file output stream and store the userid/password and realm in a file. It generates a byte stream from the login information by encrypting the login (Userid/password/realm) information. After encrypting, it closes the files and logs out.
During authorization, the system uses the file created above to login rather than asking the user to provide the information using FileInputStream API and gets the security Context from the ORB and logs in using the file.
The example also illustrates the use of VisiBroker properties and JAAS configuration file to secure your application. The example client and server use username/password authentication of the client on the server and also for the server's self-authentication.
The different properties files (server.properties, client.properties) and the server.config files for the basic vault example are in the <install_dir>\examples\vbroker\security\basic folder. The Bank Agent example has a simple AccountManager interface to open an Account and to query the balance in that account.
To run the example, first generate the vault file as given below.
Generate the vault file
1
prompt% Server -DORBpropStorage=cpp_server.properties -genVault <vaultfileName>
It will ask for the userid/password. Enter the Host Login Name and password for the current system. This information gets stored in the vaultfile.
To run the server without providing authentication information:
prompt% Server -DORBpropStorage=cpp_server.properties -useVault <vaultfileName>
(start Server -DORBpropStorage=cpp_server.properties -useVault <vaultfileName> on Windows)
2
prompt% Client -DORBpropStorage=cpp_client.properties
-Dvbroker.orb.dynamicLibs=<vbsec library>
where <vbsec library> is:
(on Windows): vbsec.dll located in %VBROKERDIR%/bin directory
(on UNIX): libvbsec shared library located in $VBROKERDIR/lib
3
Certificate Revocation List (CRL) and revoked certificate serial numbers
C++ Only
When signed public key certificates are created by a Certificate Authority (CA), each certificate has an expiration date that indicates when it is no longer valid. However, in order to address the case where a certificate becomes invalid for some reason before the date of expiration, the Certificate Revocation List (CRL) feature is provided for VisiSecure for C++. For more information about Certificate Authorities (CA)s, see “Certificates and Certificate Authority”.
Using the VisiSecure for C++ Certificate Revocation List (CRL) feature, you can set up CRLs and check peer certificates against this list during SSL handshake communication.
The CRL files can be in either DER binary format or base 64 text format (PEM format). When an application adds a trusted certificate into a VBSSLContext instance, the corresponding CRL of that trusted certificate can be passed as second parameter of the call to the addTrustedCertificate() method. For this, the physical CRL bytes (if in DER) or string characters (if in B64) need to be wrapped in an instance of CORBAsec::ASN1Object, which is actually a CORBA octet sequence. See the VBSSLContext API in header file vbssp.h.
class _VBSECEXPORT VBSSLContext
{
...
virtual void
addTrustedCertificate( const CORBAsec::X509Cert& trusted,
const CORBAsec::ASN1Object* crl = NULL ) = 0;
...
};
Multiple trusted certificates can be installed along with their respective CRLs by means of multiple calls on a VBSSLContext instance. Concrete examples of CRL installation is in the bank_ssl example.
The method addTrustedCertificate() involves cryptographic verification to make sure that the CRL is signed using the private key of the public key in the certificate.
Applications can call addTrustedCertificate() with only the first parameter, in which case it is assumed that the trusted certificate has no corresponding CRL.
Notes
Support for MS-CAPI
Windows
On Windows systems, VisiBroker supports the Microsoft Cryptography API (CAPI).
Both VisiBroker C++ and VisiBroker Java
When CAPI is fully enabled, it takes over the mechanism for some cryptographic operations, most notably generating RSA, DSA and ECDSA signatures. That means that private keys must be stored in Windows stores if CAPI is being used this way by a VisiBroker process. This is currently only supported on the client side.
VisiBroker C++ Only
You can enable CAPI support in VisiBroker C++ by setting the vbroker.security.useCAPI property to true.
A limitation when using CAPI is that the OpenSSL CAPI engine (and therefore the VisiBroker C++ CAPI engine) does not support generating a client certificate chain. The client certificate must have been signed by a CA root or intermediary known to the server. Normally the client could send a chain with its own certificate and any intermediaries needed to establish a path back to a CA trusted by the server. VisiBroker does not support that with CAPI.
A new property has been introduced to assist in selecting the right client certificate if the user has multiple identity certificates that are eligible. See vbroker.security. identityCertificates. nameMustContain for details.
By setting the vbroker.security.client. socket.allowedDigests parameter to short you can prevent the use of the SHA-2 family of digests (SHA-256, etc). You may need to set this on the client side when the client is using a DSS certificate, unless you are using .1 or earlier, or you are using an add-on Credential Service Provider (CSP) that supports both DSA and SHA-512.
This option was introduced:
1
2
VisiBroker Java Only
CAPI support is automatically enabled in VisiBroker for Java.
The property vbroker.security.mscapiAliasFix was introduced to deal with a Java bug that has now been fixed in later Java version updates.