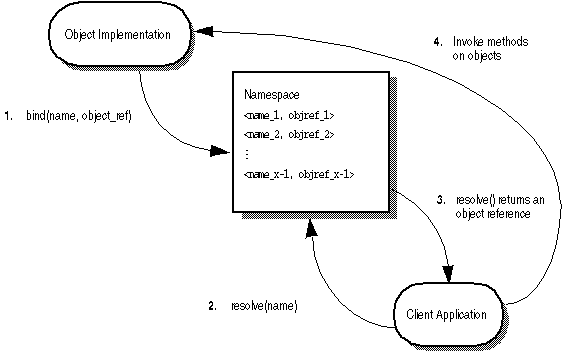
The VisiNaming Service allows you to associate one or more logical names with an object reference and store those names in a namespace. With the VisiNaming Service, your client applications can obtain an object reference by using the logical name assigned to that object.
|
1
|
an object implementation can bind a name to one of its objects within a namespace.
|
|
2
|
client applications can then use the same namespace to resolve a name which returns an object reference to a naming context or an object.
|
The figure below shows how the VisiNaming Service might be used to name objects that make up an order entry system. This hypothetical order entry system organizes its namespace by geographic region, then by department, and so on. The VisiNaming Service allows you to organize the namespace in a hierarchical structure of NamingContext objects that can be traversed to locate a particular name. For example, the logical name NorthAmerica/ShippingDepartment/Orders could be used to locate an Order object.
|
Figure 26
|
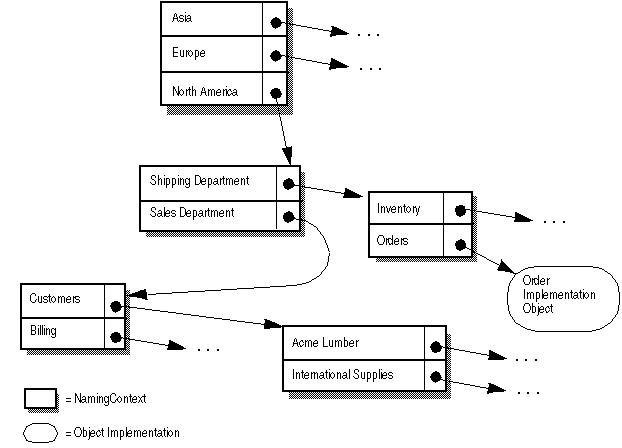
To implement the namespace shown above with the VisiNaming Service, each of the shadowed boxes in the diagram above, would be implemented by a NamingContext object. A NamingContext object contains a list of Name structures that have been bound to object implementations or to other NamingContext objects. Though a logical name may be bound to a NamingContext, it is important to realize that a NamingContext does not, by default, have a logical name associated with it nor is such a name required.
Object implementations use a NamingContext object to bind a name to an object that they offer. Client applications use a NamingContext to resolve a bound name to an object reference.
A NamingContextExt interface is also available which provides methods necessary for using stringified names.
A naming context factory provides the interface for bootstrapping the VisiNaming Service. It has operations for shutting down the VisiNaming Service and creating new contexts when there are none. Factories also have an additional API that returns the root context. The root context provides a very critical role as a reference point. This is the common starting point to store all data that are supposed to be publicly available.
Two classes are provided with the VisiNaming Service that allow you to create a namespace; the default naming context factory and the extended naming context factory. The default naming context factory creates an empty namespace that has no root NamingContext. You may find it more convenient to use the extended naming context factory because it creates a namespace with a root NamingContext.
You must obtain at least one of these NamingContext objects before your object implementations can bind names to their objects and before client applications can resolve a name to an object reference.
Each of the NamingContext objects shown in the figure above could be implemented within a single name service process, or they could be implemented within as many as five distinct name server processes.
A CosNaming::Name represents an identifier that can be bound to an object implementation or a CosNaming::NamingContext. A Name is not simply a string of alphanumeric characters; it is a sequence of one or more NameComponent structures.
Each NameComponent contains two attribute strings, id and kind. The Naming service does not interpret or manage these strings, except to ensure that each id and kind is unique within a given NamingContext.
The id and kind attributes are strings which uniquely identify the object to which the name is bound. The kind member adds a descriptive quality to the name. For example, the name "Inventory.RDBMS" has an id member of "Inventory" and a kind member of "RDBMS."
module CosNaming
typedef string Istring;
struct NameComponent {
Istring id;
Istring kind;
};
typedef sequence<NameComponent> Name;
};
typedef string Istring;
struct NameComponent {
Istring id;
Istring kind;
};
typedef sequence<NameComponent> Name;
};
The id and kind attributes of NameComponent in the code example above, must be a character from the ISO 8859-1 (Latin-1) character set, excluding the null character (0x00) and other non-printable characters. Neither of the strings in NameComponent can exceed 255 characters. Furthermore, the VisiNaming Service does not support NameComponent which uses wide strings.
The id attribute of a Name cannot be an empty string, but the kind attribute can be an empty string.
Your client applications use the NamingContext method resolve to obtain an object reference, given a logical Name. Because a Name consists of one or more NameComponent objects, the resolution process requires that all of the NameComponent structures that make up the Name be traversed.
Because the representation of CosNaming::Name is not in a form that is readable or convenient for exchange, a stringified name has been defined to resolve this problem. A stringified name is a one-to-one mapping between a string and a CosNaming::Name. If two CosNaming::Name objects are equal, then their stringified representations are equal and vice versa. In a stringified name, a forward slash (/) serves as a name component separator; a period (.) serves as the id and kind attributes separator; and a backslash (\) serves as an escape character. By convention a NameComponent with an empty kind attribute does not use a period (for example, Order).
In the following examples, NameComponent structures are given in their stringified representations.
A simple name, such as Billing, has only a single NameComponent and is always resolved relative to the target naming context. A simple name may be bound to an object implementation or to a NamingContext.
A complex name, such as NorthAmerica/ShippingDepartment/Inventory, consists of a sequence of three NameComponent structures. If a complex name consisting of n NameComponent objects has been bound to an object implementation, then the first (n-1) NameComponent objects in the sequence must each resolve to a NamingContext, and the last NameComponent object must resolve to an object implementation.
If a Name is bound to a NamingContext, each NameComponent structure in the sequence must refer to a NamingContext.
The code sample below shows a complex name, consisting of three components and bound to a CORBA object. This name corresponds to the stringified name, NorthAmerica/SalesDepartment/Order. When resolved within the topmost naming context, the first two components of this complex name resolve to NamingContext objects, while the last component resolves to an object implementation with the logical name "Order."
The VisiNaming Service is installed automatically when you install VisiBroker. It consists of a file nameserv, which for Windows is a binary executable and for UNIX is a script, and Java class files which are stored in the vbjorb.jar file.
In previous versions of VisiBroker, the VisiNaming Service maintained persistence by logging any modifying operations to a flat-file. From version 4.0 onward, the VisiNaming Service works in conjunction with backing store adapters. It is important to note that not all backing store adapters support persistence. The default InMemory adapter is non-persistent while all the other adapters are. For more details about adapters, see “Pluggable backing store”.
A Naming Server is designed to register itself with the Smart Agent. In most cases you should to run the Smart Agent to bootstrap the VisiNaming Service. This allows clients to retrieve the initial root context by calling the resolve_initial_references method. The resolving function works through the Smart Agent for the retrieval of the required references. Similarly, Naming Servers that participate in a federation also uses the same mechanism for setting up a federation.
You can start the VisiNaming Service by using the nameserv launcher program in the /bin directory. The nameserv launcher uses the com.inprise.vbroker.naming.ExtFactory factory class by default.
See “Programmer tools for C++” for descriptions of the driver options available to all of the VisiBroker programmer tools.
The VisiNaming Service Utility (nsutil) provides the ability to store and retrieve bindings from the command line.
To use nsutil, first configure the Naming service instance using the following commands:
|
Note: Before using SVCnameroot, you must first run OSAgent.
|
|
|
File name or URL, prefixed by its type, which may be (corbaloc:, corbaname:, file:, ftp:, http:, or ior:). For example, to assign a file in a local directory, the ns_config string would be:-VBJprop ORBInitRef=NameService=<file:ns.ior>
|
|
The additional nsutil commands are:
|
Resolves the stringified name and contacts the object to see if it is still alive.
|
||
|
Shuts the VisiNaming Service down gracefully from the command line. The ns_name is the name specified when the VisiNaming Service was started.
Note: The initial context need not have been set for this command to be invoked.
|
To run an operation from the nsutil command, place the operation name and its parameters as the <cmd> parameter. For example:
on the host TestHost.
The VisiNaming Service provides a simple mechanism by which the resolve_initial_references method can be configured to return a common naming context. You use the resolve_initial_references method which returns the root context of the Naming Server to which the client program connects.
You use the -DSVCnameroot option to specify into which VisiNaming Service instance (especially important if several unrelated Naming service instances are running) you want to bootstrap.
For instance, if you want to bootstrap into ns1, you would start your client program as:
You can then obtain the root context of ns1 by calling the resolve_initial_references method on an ORB reference inside your client application as illustrated below. The Smart Agent must be running in order to use this option.
Keep in mind that the -DSVCnameroot bootstrapping mechanism is based on the proprietary functionality that VisiBroker Smart Agent provides and it is not interoperable with other CORBA implementations.
You can use either the corbaloc or corbaname URL naming schemes to specify which VisiNaming Service you want to bootstrap. This method does not rely on the Smart Agent.
If you want to bootstrap using VisiNaming Service ns2, then start your client application as follows:
You can then obtain the root context of ns2 by calling the resolve_initial_references method on the VisiBroker ORB reference inside your client application as illustrated in the example above.
The deprecated iioploc and iiopname URL schemes are implemented by corbaloc and corbaname, respectively. For backwards compatibility, the old schemes are still supported.
You can then obtain the root context of ns3 by calling the resolve_initial_references method on the VisiBroker ORB reference inside your client application as illustrated above.
You can use either a corbaloc or corbaname URL to specify which VisiNaming Service you want to bootstrap. This method does not rely on the Smart Agent.
If you want to bootstrap into ns2, then you should start your client program as:
You can then obtain the root context of ns2 by calling the resolve_initial_references method on the VisiBroker ORB reference inside your client application as illustrated in the sample above.
The combination of -ORBDefaultInitRef or -DORBDefaultInitRef and corbaname works differently from what is expected. If -ORBDefaultInitRef or -DORBDefaultInitRef is specified, a slash and the stringified object key is always appended to the corbaname.
For example, if the URL is corbaname::TestHost:20002, then by specifying -ORBDefaultInitRef, resolve_initial_references in C++ will result in a new URL: corbaname::TestHost:20003/NameService.
This object is used to contain and manipulate a list of names that are bound to VisiBroker ORB objects or to other NamingContext objects. Client applications use this interface to resolve or list all of the names within that context. Object implementations use this object to bind names to object implementations or to bind a name to a NamingContext object. The sample below shows the IDL specification for the NamingContext.
The NamingContextExt interface, which extends NamingContext, provides the operations required to use stringified names and URLs.
A client application can specify a default naming context, which is the naming context that the application will consider to be its root context. Note that the default naming context is the root only in relation to this client application and, in fact, it can be contained by another context.
The VisiBroker ORB method resolve_initial_references can be used by a client application to obtain the default naming context. The default naming context must have been specified by passing the SVCnameroot or ORBInitRef command-line argument when the client application was started. The sample below shows how a C++ client application could invoke this method.
#include "CosNaming_c.hh"
. . .
int main(int argc, char* const* argv) {
try {
CORBA::ORB_var orb = CORBA::ORB_init(argc, argv);
. . .
CORBA::Object_var ref = orb->resolve_initial_references("NameService");
CosNaming::NamingContext_var rootContext =
CosNaming::NamingContext::_narrow(ref);
. . .
} catch(const CORBA::Exception& e) {
cout << "Failure: " << e << endl;
exit(1);
}
exit(0);
}
. . .
int main(int argc, char* const* argv) {
try {
CORBA::ORB_var orb = CORBA::ORB_init(argc, argv);
. . .
CORBA::Object_var ref = orb->resolve_initial_references("NameService");
CosNaming::NamingContext_var rootContext =
CosNaming::NamingContext::_narrow(ref);
. . .
} catch(const CORBA::Exception& e) {
cout << "Failure: " << e << endl;
exit(1);
}
exit(0);
}
|
If 1, enables master/slave naming services configuration. See “VisiNaming Service Clusters for Failover and Load Balancing” for information about configuring master/slave naming services.
|
||
|
This property specifies the full path name for storing the Naming Service IOR. If you do not set this property, the Naming Service will try to output its IOR into a file named ns.ior in the current directory. The Naming Service silently ignores file access permission exceptions when it tries to output its IOR.
|
||
|
This property allows special logging for all of the update operations on the CosNaming::NamingContext, CosNamingExt::Cluster, and CosNamingExt::ClusterManager interfaces.
The CosNaming::NamingContext interface operations for which this property is effective are:
bind, bind_context, bind_new_context, destroy, rebind, rebind_context, unbind. The CosNamingExt::Cluster interface operations for which this property is effective are:
bind, rebind, unbind, destroy. The CosNamingExt::ClusterManager interface operation for which this property is effective is:
create_cluster When this property value is set to true and any of the above methods is invoked, the following log message is printed (the output shows a bind operation being executed):
|
|
When set to true, it specifies that an interceptor be installed to handle fail-over for objects that were retrieved from the VisiNaming Service. In case of an object failure, an attempt is made to transparently reconnect to another object from the same cluster as the original.
|
||
|
If 1, the implicit clustering feature is turned on.
|
||
|
This property is relevant when the name service cluster uses the Smart Round Robin criterion. When this property is set to 1, a stale object reference that was previously bound to a cluster with the Smart Round Robin criterion will be removed from the bindings when the name service discovers it. If this property is set to 0, stale object reference bindings under the cluster are not eliminated. However, a cluster with Smart Round Robin criterion will always return an active object reference upon a resolve() or select() call if such an object binding exists, regardless of the value of the vbroker.naming.smrr.pruneStaleRef property. By default, the implicit clustering in the name service uses the Smart Round Robin criterion with the property set to 1.
|
|
This property is used to configure VisiNaming Service instances in the cluster mode or in the master/slave mode. The vbroker.naming.enableSlave property must be set to 1 for this property to take effect.
Set this property to cluster to configure VisiNaming Service instances in the cluster mode. VisiNaming Service clients will then be load balanced among the VisiNaming Service instances that comprise the cluster. Client failover across these instances are enabled.
Set this property to slave to configure VisiNaming Service instances in the master/slave mode. VisiNaming Service clients will always be bound to the master server if the master is running but failover to the slave server when the master server is down.
|
||
|
This property specifies the name of a VisiNaming Service cluster. Multiple VisiNaming Service instances belong to a particular cluster (for example, clusterXYZ) when they are configured with the cluster name using this property.
|
||
|
See the related property vbroker.naming.serverAddresses.
|
||
|
This property specifies the host and listening port for the VisiNaming Service instances that comprise a VisiNaming Service cluster. The order of VisiNaming Service instances in this list must be identical to that of the related property vbroker.naming.serverNames, which specifies the names of the VisiNaming Service instances that comprise a VisiNaming Service Cluster. This property supports the format:
|
||
|
This property must be set to true on the VisiNaming Service client to utilize the load balancing and failover features available when VisiNaming Service instances are configured in the VisiNaming Service cluster mode. The following is an example of how to use this property:
|
|
•
|
|
•
|
|
Specifies the Naming service adapter type to use. This property specifies which type of backing store you want the VisiNaming Service to use. The valid options are: InMemory, JDBC, Dx, JNDI. The default is InMemory.
|
||
|
Specifies whether to use the Naming Service cache. A value of 1 (one) enables caching.
|
||
|
This property is required when the Naming Service cache is enabled (vbroker.naming.cacheOn=1) and the Naming Service instances are configured in Cluster or Master/Slave mode. It helps locate an Event Service/VisiNotify instance in the format <hostname>:<port>. For example:
See “Caching facility” for details about enabling the caching facility and setting the appropriate properties.
|
||
|
0 (no limit)
|
This property should be set to JDBC. The poolSize , jdbcDriver, url, loginName, and loginPwd properties must also be set for the JDBC adapter.
This property sets the database reconnection retry time by the Naming Service in seconds. The default value is 30. The Naming Service will ignore the request and throw a CannotProceed exception if the time interval between this request and the last reconnection time is less than the value set by this property. The valid value for this property is 0 (zero) or a greater integer. If the property value is 0 (zero), the VisiNaming Service will try to reconnect to the database for every request, once disconnected.
This property specifies the number of database connections in your connection pool when using the JDBC Adapter as our backing store. The default value is 5, but it can be increased to whatever value the database can handle. If you expect many requests will be made to the VisiNaming Service, you should make this value larger.
This property specifies the location of the database which you want to access. The setting is dependent on the database in use. The default is JDataStore and the database location is the current directory and is called rootDB.jds. You can use any name you like not necessarily rootDB.jds. The configuration file needs to be updated accordingly.
1You should start InterServer before accessing InterBase via JDBC. If the InterBase server resides on the local host, specify <server> as localhost; otherwise specify it as the host name. If the InterBase database resides on Windows, specify the <full_db_path> as driver:\\dir1\dir2\\db.gdb (the first backslash [\] is to escape the second backslash [\]). If the InterBase database resides on UNIX, specify the <full_db_path> as \dir1\dir2\db.gdb.
2Before you access DB2 via JDBC, you must register the database by its alias <db_name> using the Client Configuration Assistant. After the database has been registered, you do not have to specify <host> and <port> for the vbroker.naming.url property.
3 If the JDataStore database resides on Windows, the <full path of the JDataStore database> should be Driver:\\dir1\\dir2\\db.jds (the first backslash [\] is to escape the second backslash [\]). If the JDataStore database resides on UNIX, the <full path of the JDataStore database> should be /dir1/dir2/db.jds.
|
This setting specifies the backing store type which is JNDI for the JNDI adapter.
|
|
OpenLDAP is one of the supported VisiNaming back-end stores. When using OpenLDAP, additional configuration is required on the OpenLDAP server. You must perform the following actions:
|
1
|
Add corba.schema in the OpenLDAP server's config file (the default is slapd.conf). The corba.schema is included with your OpenLDAP server installation.
|
|
2
|
Add openldap_ns.schema in the OpenLDAP config file. openldap_ns.schema is provided with VisiBroker and is located in
|
Multiple Naming Service instances can access the same backing store if they are configured in the Naming Service Cluster mode or in the Master/Slave mode. In order to use the caching facility in these two modes, each Naming Service instance must be specially configured using the vbroker.naming.cache.connectString property. The VisiBroker Event Service or VisiNotify is used to coordinate the caching facility amongst the various Naming Service instances.
If multiple Naming Service instances in Cluster or Master/Slave mode will access the cache, set the vbroker.naming.cache.connectString property so that the Naming Services can locate the Event Service (or VisiNotify).
The format for vbroker.naming.cache.connectString is:
Where <host> is the hostname or IP address of the machine where VisiBroker Event Service is running and <port> is the port used by VisiBroker Event Service/VisiNotify (default is 14500 for Event Service and 14100 for VisiNotify).
See “Properties file” for more information about the caching facility properties.
Consistent configuration is very important. It is extremely important to configure all Naming Service instances in a Cluster to use the Caching Facility in a consistent manner. Naming Service instances that constitute a Cluster must either all use the caching facility or none use it. If certain Naming Service instances use the caching facility while others do not, the behaviour of the Cluster will be inconsistent. This is also true for Naming Services configured in the Master-Slave mode. If the Master is configured to use the caching facility, it is required that the Slave also be configured to use it, and vice versa.
The distributed cache depends on the Event Service/VisiNotify. If the Caching Facility is used in Naming Service Cluster mode (or the Master-Slave mode), the distributed cache needs synchronization across the multiple Naming Services instances. This is achieved using the Event Service (or VisiNotify). Please note that in such a configuration, the cached data might be stale. The quality of data would depend on the health of the Event Service/VisiNotify. Applications that do not find this acceptable are advised to avoid using the Caching Facility. It is advisable to perform tests to gauge the suitability of the distributed Caching Facility for a particular application.
VisiBroker supports a clustering feature which allows a number of object bindings to be associated with a single name. The VisiNaming Service can then perform load balancing among the different bindings in a cluster. You can decide on a load balancing criterion at the time a cluster is created. Clients, which subsequently resolve name-object bindings against a cluster, are load balanced amongst different cluster server members. These clusters of object bindings should not be confused with “VisiNaming Service Clusters for Failover and Load Balancing”.
A cluster is a multi-bind mechanism that associates a Name with a group of object references. The creation of a cluster is done through a ClusterManager reference. At creation time, the create_cluster method for the ClusterManager takes in a string parameter which specifies the criterion to be used. This method returns a reference to a cluster, which you can add, remove, and iterate through its members. After deciding on the composition of a cluster, you can bind its reference with a particular name to any context in a VisiNaming Service. By doing so, subsequent resolve operations against the Name will return a particular object reference in this cluster.
The VisiNaming Service uses a SmartRoundRobin criterion with clusters by default. After a cluster has been created, its criterion cannot be changed. User-defined criteria are not supported, but the list of supported criteria will grow as time goes on. SmartRoundRobin performs some verifications to ensure that the CORBA object reference is an active one; that the object reference is referring to a CORBA server which is in a ready state.
Although a cluster is very similar to a naming context, there are certain methods found in a context that are not relevant to a cluster. For example, it would not make sense to bind a naming context to a cluster, because a cluster should contain a set of object references, not naming contexts. However, a cluster interface shares many of the same methods with the NamingContext interface, such as bind, rebind, resolve, unbind and list. This common set of operations mainly pertains to operations on a group. The only cluster-specific operation is pick. Another crucial difference between the two is that a cluster does not support compound names. It can only use a single component name, because clusters do not have a hierarchical directory structure, rather it stores its object references in a flat structure.
To create a cluster, use the Cluster Manager interface. A single ClusterManager object is automatically created when a Naming Server starts up. There is only one ClusterManager per Naming Server. The role of a ClusterManager is to create, retrieve, and keep track of the clusters that are in the Naming Server. Here are the general steps in creating an object cluster:
|
2
|
Get a reference to the Cluster Manager by calling get_cluster_manager method on the factory reference.
|
|
5
|
Bind the Cluster object itself to a Name.
|
The clustering feature can be turned on automatically for a VisiNaming Service. The caveat is that once this facility is on, a cluster is created transparently to bind the object. The round robin criterion is used. The implication is that it is possible to bind several objects to the same name in the Naming Server. Conversely, resolving that name will return one of those objects, and an unbind operation would destroy the cluster associated with that name. This means that the VisiNaming Service is no longer compliant to the CORBA specification. The Interoperable Naming Specification explicitly forbids the ability to bind several objects to the same name. For a compliant VisiNaming Service, an AlreadyBound exception is thrown if a client tries to use the same name to bind to a different object. You must decide whether to use this feature for a dedicated server only.
Multiple instances of the VisiNaming Service can be clustered to provide for load balancing and failover. These clusters of VisiNaming Service instances should not be confused with the clustering of object bindings described in “Object Clusters”. Clients can bind to any one of the VisiNaming Service instances that comprise the cluster, which allows for load sharing across multiple VisiNaming Service instances. If a particular VisiNaming Service instance becomes inactive or terminates, the client will automatically fail over to another VisiNaming Service instance within the same cluster.
All instances of the VisiNaming Service within a cluster must use the common underlying data in a persistent backing store. The caching facility is available to Naming Service instances provided that a VisiBroker Event Service (or VisiNotify) instance is made available to the Naming Service instances via the vbroker.naming.cache.connectString property. There are certain restrictions regarding the choice of backing store. See the following Note that discusses these restrictions.
VisiNaming Service Clusters configured in the Master/Slave mode may use either the JNDI adapter or the JDBC adapter. Clusters not configured in the Master/Slave mode must use the JDBC adapter for RDBMS. Each clustered service must obviously point to the same backing store. See “Pluggable backing store” for information on configuring the backing store for the cluster.
The VisiNaming Service instances that comprise the cluster must be started with the relevant properties set as illustrated in the code sample below. The configuration is set to cluster mode using the enableSlave and the slaveMode properties. The instances of the VisiNaming Service that comprise the cluster have to be started on the hosts and ports specified using the serverAddresses property. The snippet shows the host and port entries for the three VisiNaming Service instances in the sample cluster. The serverNames property lists the factory names of the VisiNaming Service instances. These names are unique and the ordering identical to the serverAddresses property. Finally, the serverClusterName property names the cluster.
|
•
|
vbroker.naming.proxyEnable allows the VisiNaming Service to use a proxy. Turn off this property (default is turned off), and the VisiNaming Service will ignore other Naming service properties for the proxy.
|
|
•
|
vbroker.naming.proxyAddresses gives each Naming service in the cluster a proxy host and a proxy port. The ordering of the proxyAddresses is identical to the serverAddresses.
|
C++ clients need to set the boolean property vbroker.naming.anyServiceOrder in order to benefit from the load-balancing and failover capabilities provided by VisiNaming Service clusters. Clients must use the corbaloc mechanism to resolve to a VisiNaming Service instance within the cluster, provided osagent is being used.
The Naming Service instances comprising a Cluster can benefit from the Naming Service Caching Facility. Use the vbroker.naming.cacheOn and vbroker.naming.cache.connectString properties to configure caching for a Naming Service cluster. See “Caching facility” for details.
When using the vbroker.naming.proxyAddresses property, place a semicolon (;) separator between each host and port pair.
|
1
|
For this to succeed, make sure that the <port_number> is available on the host on which the Naming Service is running. Make sure that the portRange property is set to 0 (zero). You can leave it at its default setting or explicitly set the property. Note that both the port and portRange settings described above should be applied.
The deferAccept property should only be used for Naming Services. Using for other services or user written servers can result in undefined behavior.
|
Indicates whether naming client authentication is required. When vbroker.naming.security.disable is true, no client authentication will be performed regardless what value this property takes.
|
|||
For detailed information on authentication and authorization, see “Using the VisiNaming Service” and “Using the VisiNaming Service”.
Depending on the security requirements, different properties can be set to configure the VisiNaming service. For the full list of security properties and their descriptions, go to the VisiBroker Security Guide, “Security Properties for Java” or “Security Properties for C++.”
For information about how to configure the client to use SSL, go to “Using the VisiNaming Service” or “Using the VisiNaming Service”.
|
•
|
|
•
|
When security is enabled for the Naming service and enableAuthorization is set to true, only authorized users of each method of these object types can invoke the corresponding method.
You need to specify the roles before invoking each method of the objects listed above. This is done using the required_roles property for each method. Below is the list of these properties and the corresponding default values. These default values are used only when you do not define any required_roles specified using the property vbroker.naming.security.requiredRolesFile. The values of these properties are space or comma separated:
The UNIX applications need to be linked with the cosnm_r.so (multi-threaded) library.
The Windows applications need to be linked with the cosnm_r.lib (cosnm_r_6.dll) (multi-threaded) library.
Several example programs that illustrate the use of the VisiNaming Service are provided with VisiBroker Edition. They show all of the new features available with the VisiNaming Service and are found in the <install_dir>/examples/vbe/ins directory. In addition, a Bank Naming example illustrates basic usage of the VisiNaming Service is found in the <install_dir>/examples/vbe/basic/bank_naming directory.
Before running the example programs, you must first start the VisiNaming Service, as described in Running the VisiNaming Service. Furthermore, you must ensure that at least one naming context has been created by doing one of the following:
|
•
|
Start the VisiNaming Service, as described in “Running the VisiNaming Service” which will automatically create an initial context.
|
|
•
|
|
•
|
Have your client use the ExtendedNamingContextFactory.
|
If no naming context has been created, a CORBA::NO_IMPLEMENT exception is raised when the client attempts to issue a CosNaming::NamingContext::bind.
Always start JdsServer from the location where the AutoFailover_* jds files are located. Never start JdsServer from <JdataStore Install Directory>/bin unless vbroker.naming.url is set accordingly. The required jar files are:
|
•
|
|
2
|
Create a new project named NS_AutoFailover in the JDataStore Server Console.
|
|
3
|
Click DataSource1 (in the Structure pane) to open it for editing.
|
|
4
|
|
5
|
|
9
|
|
12
|
|
13
|
Choose Save Project "NS_AutoFailover.datasources" from the File menu to save the project.
|
|
14
|
|
15
|
Click Mirror Status (in the Structure pane) and verify that Validate Primary is checked for Mirror1 only.
|