Creating an AWM Model
To create an AWM Model:
- Launch
Visual COBOL. Specify a path for the Eclipse workspace when prompted.
If this is the first time you start Eclipse, you now see the Eclipse Welcome page, click Open Team Developer Perspective.
- Click
.
This opens the New Project dialog box.
- Click , and then click Next.
- In the Project Name field, type Model Configuration.
- Click
Finish.
This creates an empty project.
- Right-click the project, and then click
.
This opens the New dialog box.
- Click , and then click Next.
- In the File name field, type CONFIG.model.
- Click
Finish.
The CONFIG.model is displayed in the AWM Model editor.
The AWM Model editor shows all modeled types and relationships in a tree structure. You can view and edit the attributes in the Properties view. If the Properties view is not visible, right-click in the AWM Model editor, and then click Show Properties View. When editing an AWM model the editor view and the properties are closely linked. New AWM components are defined in the editor view by right-clicking an AWM component, and then clicking New Child or New Sibling. The attributes of the new component are displayed in the Properties view.
The first line in the Model editor represents the resource that is currently being worked on. You can display the next level
of the hierarchy by clicking
 . This displays the
Document Root which is part of every AWM model. The
Document Root stores global, non-configurable attribute definitions. Expand the next level in the hierarchy to display the
AWM Model. The categories for all object types are defined here. When you are creating a model from scratch the model does not contain
any categories at first. You start by defining all categories which you require in your model.
. This displays the
Document Root which is part of every AWM model. The
Document Root stores global, non-configurable attribute definitions. Expand the next level in the hierarchy to display the
AWM Model. The categories for all object types are defined here. When you are creating a model from scratch the model does not contain
any categories at first. You start by defining all categories which you require in your model.
Categories are children of the AWM Model and are created using the context menu's New Child command. For example, to create the Properties category:
- Right-click AWM Model.
- Click
.
This adds the Properties category as a child to the AWM Model.
You can add a Property to the Properties category:
- Right-click Properties.
- Click
.
This opens the New Object dialog box.
- In the New ID field, type SAMPLE_PROP_NewProperty.
- Click OK.
The attributes of the property are displayed in the Properties view:
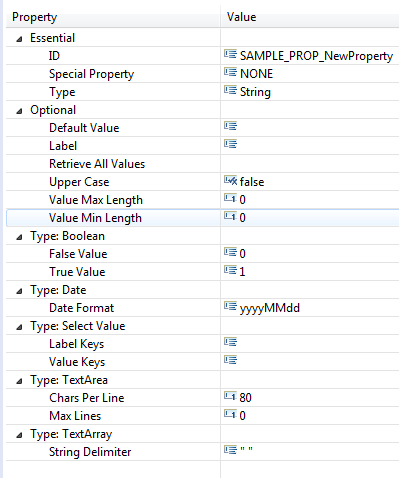
You can modify the values of the attributes in the Value column. You are constrained to type or select values appropriate to the attribute.
You must specify the Special Property attribute. The default value is NONE, see Special Properties for more information.
You must specify the Type attribute. The default value is String, see Property for more information.
The Retrieve All Values attribute requires a reference to an action descriptor. The property is intended to define an action which references a tool to retrieve all valid values for this property. At this point no action descriptor has been defined so the reference to the action descriptor cannot be specified.
The Value Keys attribute enables you to specify multiple values. To specify multiple values:
- Click in the
Value Keys Value column, and then click
 .
.
This opens the Value Keys dialog box.
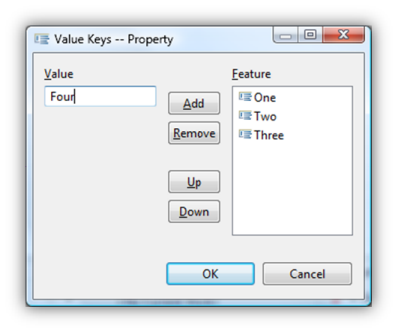
- In the Value field, type One.
- Click Add.
- Repeat steps 2 through 3 for the values Two, Three, and Four.
- Click OK.
You can remove values by clicking Remove or change the order of the values by clicking Up or Down.
Some attributes have string values with multiple lines; these are marked with "multi line" in the tables in Tool descriptor, Relationship: Tool Has Input Parameter. Double-click an input field in the Properties view to open an Input dialog with a text area. In this field you can enter or edit a string with several lines.
When typing a value into a field, help text is displayed at the lower left of the Eclipse window. This is either a short description of the attribute or in the case of an incorrect entry, an error message. The value typed into the attribute fields are validated against expected attribute values. For example, typing characters into the Value Min Length field generates a format exception message as the field expects a number.

Long help messages can be truncated. If this happens, move the pointer over the text to display the message in full.
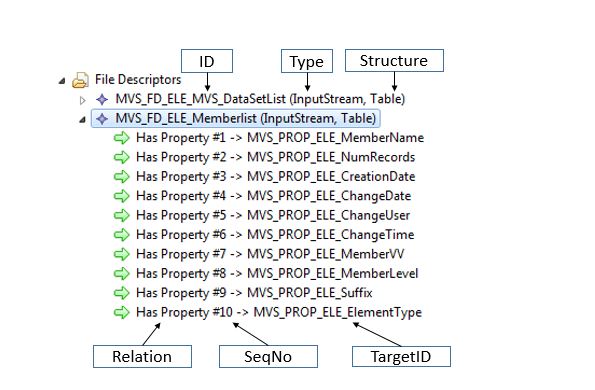
You can configure relationships and complex attributes. Both are children of the corresponding object types (for example, element type or tool descriptor) and are created by clicking New Child in the context menu. These are then modeled in the Properties view.
Relationships differ from other types in the editor through their presentation. Their Target ID is shown directly in the label. Any sequence numbers (Seq No) that occur are shown in their labels.
To delete an object type use the Delete command from its context menu. Deleting an object type removes all levels below it. If you delete something by mistake, it can be recovered using the undo command in the context menu of the Model editor.